
The dashboard is the first screen anyone sees after logging into WordPress, and out of the box it's mostly noise: Quick Draft, WordPress Events, Site Health, a welcome panel nobody reads. What's missing is the stuff your team actually wants on day one. A support link. The posting checklist. A short video for the client who'll forget how to add a page by next Tuesday.
A custom dashboard widget in WordPress is how you put that there. You can do it two ways. Developers reach for the wp_add_dashboard_widget() function; everyone else can build the same thing visually in WP Adminify and lock it to specific user roles without writing a line of PHP.
This guide covers both, so you can pick the one that fits how you work.
Summer Sale - Flat 50% Off WP Adminify (Bundle Included)
One license, every Pro feature plus the full bundle. Limited time. Make sure to use "SUMMERSALE" coupon to purchase Adminify Bundle. For Adminify the coupon is auto applied.
What is a custom dashboard widget in WordPress?
A custom dashboard widget is a box on the main WordPress admin dashboard (the index.php screen at wp-admin) that holds content you define: text, links, an RSS feed, a video, a shortcode, or your own HTML. WordPress ships a handful of core widgets and gives you an API to register your own through wp_add_dashboard_widget(), hooked to wp_dashboard_setup.
Each widget needs three things: a unique ID, a visible title, and a callback that prints the content. Once it's registered, it behaves like any native widget. Users can drag it, collapse it, or move it between the Normal and Side columns. The catch is the callback. It expects you to echo raw markup, so anything past a paragraph of text means writing and maintaining your own HTML by hand.
Why add a custom dashboard widget?
The dashboard is the cheapest internal real estate you own. Everyone who logs in sees it instantly, no clicks required. That makes it good for a few specific jobs:
- Client onboarding. Agencies drop a welcome note, a support email, and a 90-second "how to edit your site" video right where clients land. Cuts down the "how do I..." emails.
- Editorial standards. A widget that only Authors and Editors see can hold the style guide, image-size rules, or the publishing checklist nobody remembers.
- Live data. Embed an analytics snapshot or an RSS feed of company news so the team sees it without leaving WordPress.
- Branding. Swapping the default boxes for your own is one quiet step toward a customized WordPress dashboard that looks like your shop instead of a stock install.
Both methods below land in the same place. Pick based on whether you'd rather open functions.php or click through a settings panel.
Method 1: The code method (wp_add_dashboard_widget)
If you're fine editing PHP, the native API is direct and has no dependencies. Drop this in your theme's functions.php, or better, a small site-specific plugin so the widget doesn't vanish the next time you switch themes.
1
2<?php
3/**
4 * Register a custom dashboard widget.
5 */
6function adminify_register_dashboard_widget() {
7    wp_add_dashboard_widget(
8        'adminify_team_widget',              // Unique widget ID
9        'Team Announcements',                // Widget title
10        'adminify_team_widget_render'        // Display callback
11    );
12}
13add_action( 'wp_dashboard_setup', 'adminify_register_dashboard_widget' );
14
15/**
16 * Output the widget content.
17 */
18function adminify_team_widget_render() {
19    echo '<p>Welcome back. Submit a support request or read the latest posting guidelines below.</p>';
20    echo '<a href="https://example.com/support" class="button button-primary">Open Support</a>';
21}
22
The wp_dashboard_setup hook fires while the dashboard is being built, which is the only safe place to register widgets. That third argument is a callback that echoes markup. Return values get ignored, so always print directly. The official wp_add_dashboard_widget() documentation covers the optional arguments too, including a config callback if you want user-editable settings.
Restricting a dashboard widget by user role in code
By default the widget shows to anyone who can see the dashboard. To narrow it, wrap the registration in a capability check. Capabilities beat hard-coded role names because they keep working when someone renames or adds a role:
1
2<?php
3function adminify_editor_only_widget() {
4    // Only users who can edit other people's pages (Editors, Admins).
5    if ( current_user_can( 'edit_others_pages' ) ) {
6        wp_add_dashboard_widget(
7            'adminify_editorial_widget',
8            'Editorial Guidelines',
9            'adminify_editorial_widget_render'
10        );
11    }
12}
13add_action( 'wp_dashboard_setup', 'adminify_editor_only_widget' );
14
15function adminify_editorial_widget_render() {
16    echo '<p>House style: sentence-case headings, 1200px images, alt text required.</p>';
17}
18
If you genuinely need to target a named role instead of a capability, read the current user's roles directly:
1
2<?php
3$user = wp_get_current_user();
4if ( in_array( 'shop_manager', (array) $user->roles, true ) ) {
5    // Register a widget only WooCommerce Shop Managers should see.
6}
7
Reach for current_user_can() with a capability wherever you can. It reads cleaner and you're not betting on a role slug staying the same after a plugin update. The code route is precise, but every change is a deploy and there's no visual editing. That's the part the next method fixes.
Method 2: The no-code method with WP Adminify
WP Adminify has a Dashboard & Welcome Widget builder that registers the widget for you and adds a visual editor, six content types, and a role selector on top. No functions.php edits, no deploys. It's the same WordPress API underneath, just wrapped in something the whole team can use. The steps below match the plugin screen for screen.
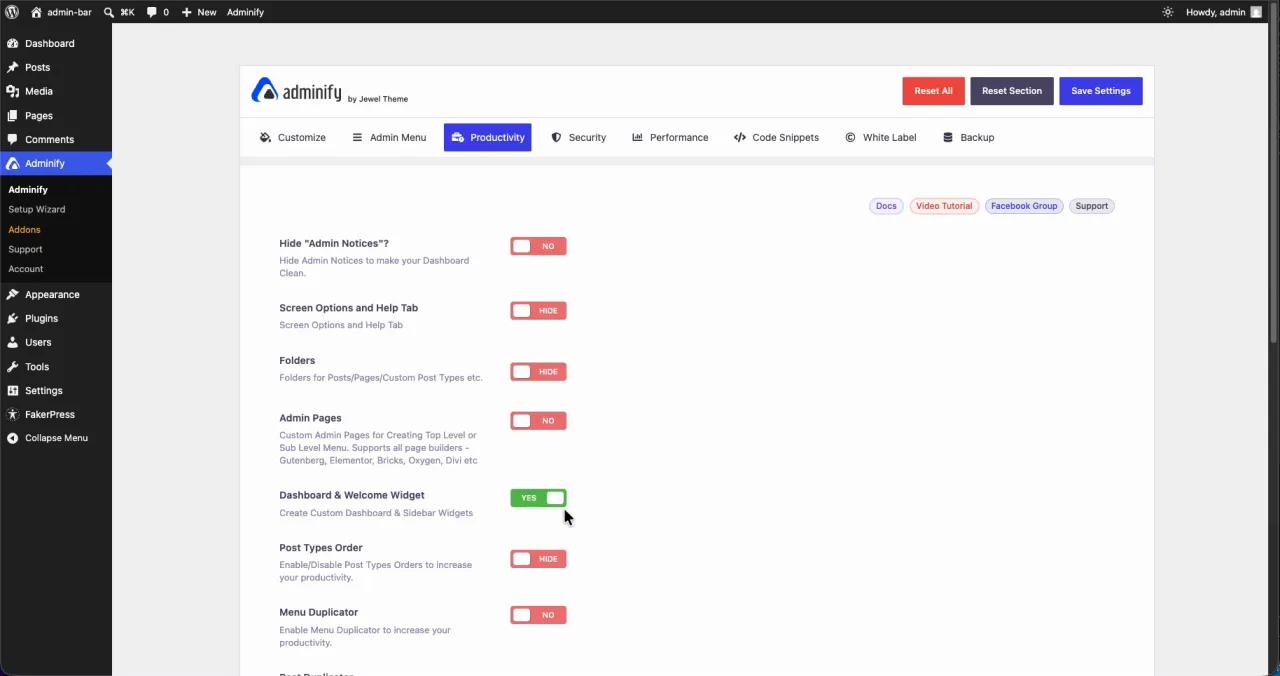
Step 1: Enable the Dashboard & Welcome Widget feature
From the admin sidebar, head to Adminify → Productivity. Find the Dashboard & Welcome Widget row, flip its toggle to YES, and click Save Settings. That unlocks the widget manager and adds a new Dashboard Widget item under the Adminify menu.
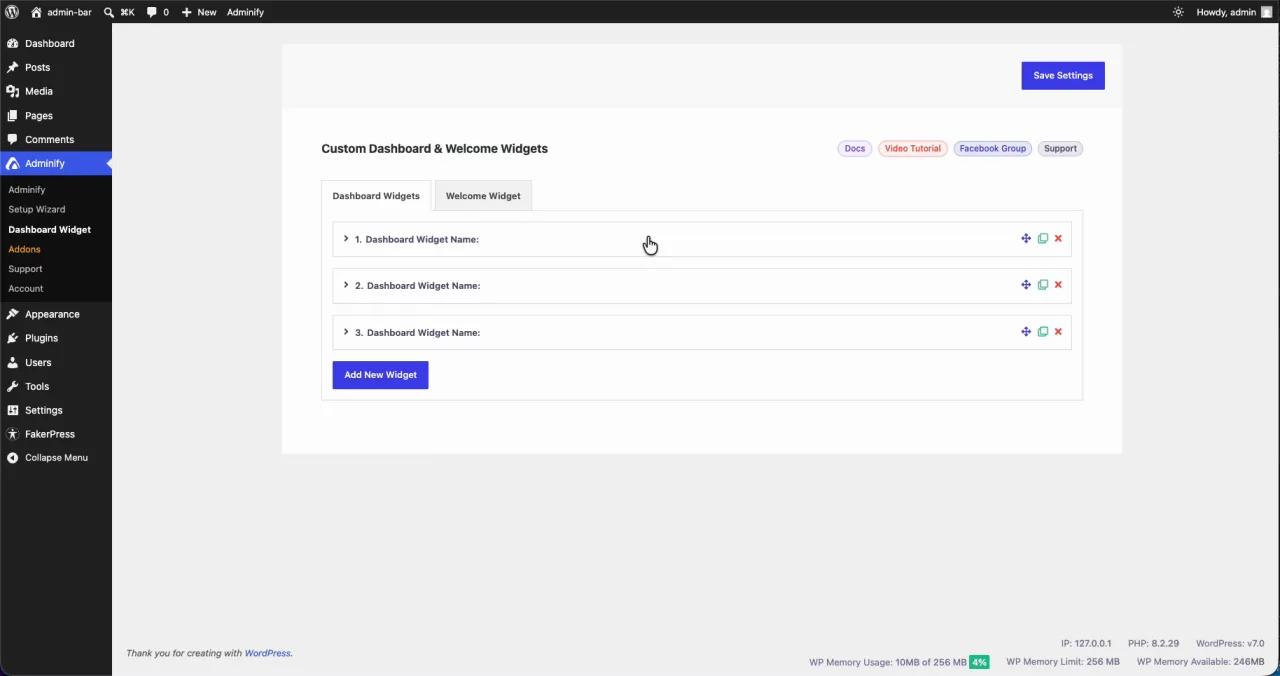
Step 2: Open the Dashboard Widget manager
Click Adminify → Dashboard Widget. The manager opens with two tabs: Dashboard Widgets (the main grid everyone sees) and Welcome Widget (the full-width panel across the top). Each existing widget shows up as a collapsible row you can drag to reorder, duplicate, or delete. Click Add New Widget to start one.
Step 3: Add a widget and choose a content type
Give the widget a Widget Title, then set its Widget Position to Normal (the wide left column) or Side (the narrow right column). Now pick a Content Type. This is where the no-code route pulls ahead of raw code. Instead of echoing HTML, you get six ready-made formats:
| Content Type | What it does | Best for |
|---|---|---|
| Editor | Full TinyMCE editor with headings, lists, and media | Welcome notes, guidelines, formatted text |
| Icon | An icon paired with a label and link | Quick-action buttons, shortcuts |
| Video | Self-hosted, YouTube, Vimeo, or iFrame embed | Client tutorials, onboarding walkthroughs |
| Shortcode | Renders any WordPress shortcode | Forms, reports, dynamic plugin output |
| RSS Feed | Pulls and lists items from any feed URL | Company news, changelogs, blog updates |
| Script | Custom JavaScript inside a <script> tag | Live clocks, counters, custom interactions |
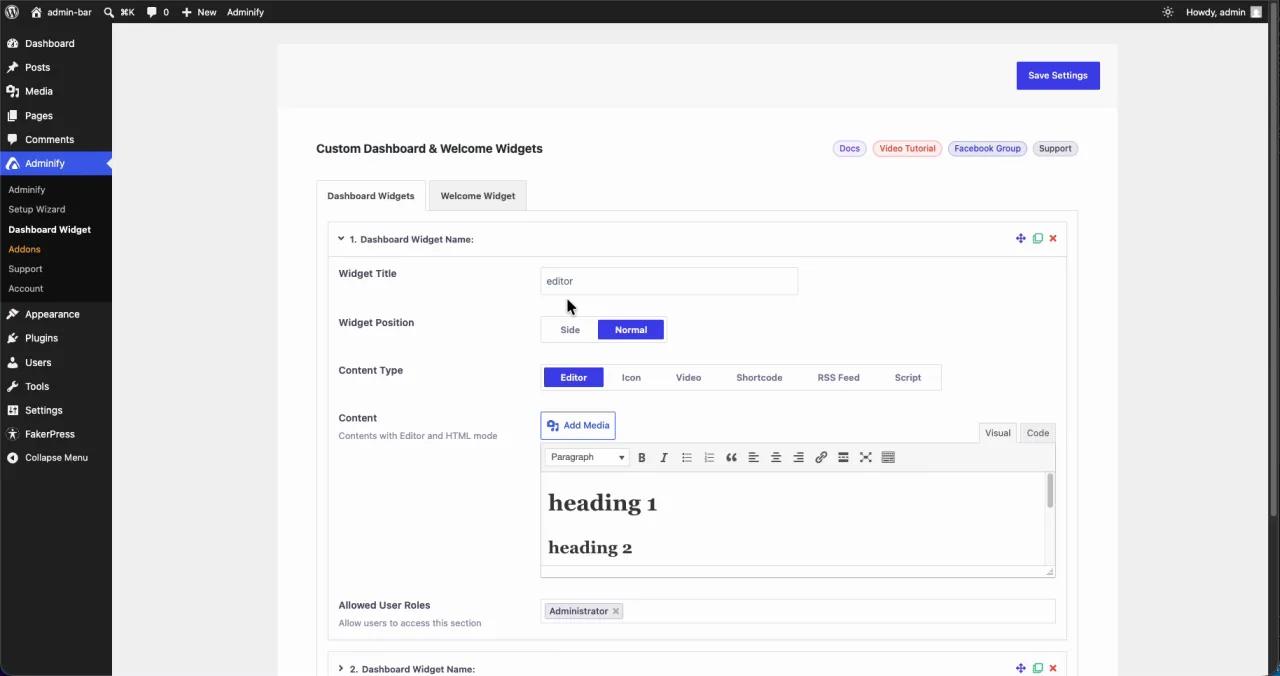
The Editor type, shown above, opens the editor you already know. Type, format, done. No callback, no escaping, no echo statements to debug.
Step 4: Restrict the widget to specific user roles
Every widget has an Allowed User Roles field at the bottom. Click it and pick one or more roles: Administrator, Editor, Author, Shop Manager, or any custom role on the site. Only those roles see the widget; everyone else gets a clean dashboard. It's the same idea as the current_user_can() check from Method 1, except you change it in two clicks with no redeploy. Leave it on Administrator for internal-only widgets, or add Author and Editor for editorial notes.
If you're running a handful of sites, role-based widgets paired with a tidy WordPress client dashboard means each client sees what's theirs and nothing else.
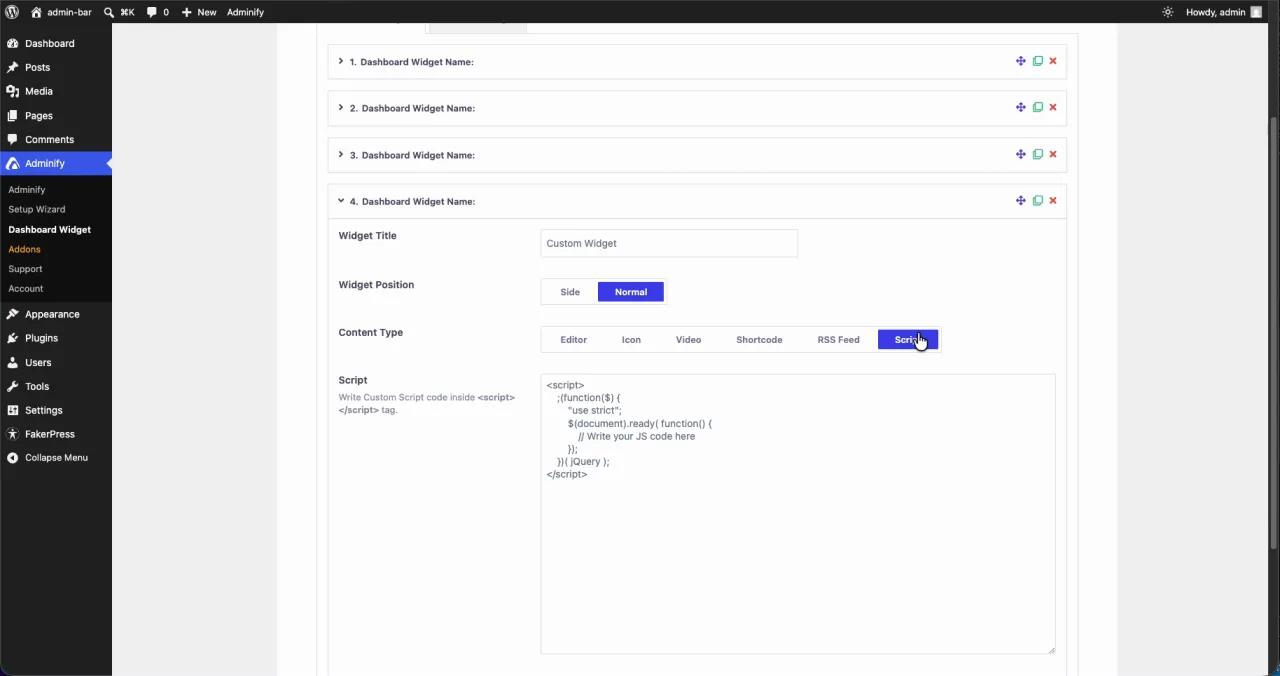
Step 5: Add a Script (JavaScript) widget
For interactive content, set the Content Type to Script. A code field shows up pre-filled with a safe jQuery wrapper. Write your JavaScript between the <script> tags: a live clock, a countdown, a button that fires an action. The widget renders the script inside its own box on the dashboard.
Here's a self-contained example that prints a live clock. It inserts itself right where the script sits, so it works no matter what wraps the widget:
1
2<script>
3(function() {
4 var clock = document.createElement('div');
5 clock.style.cssText = 'font-size:28px;font-weight:600;text-align:center;padding:16px 0;';
6 var s = document.currentScript;
7 s.parentNode.insertBefore(clock, s);
8 function tick() {
9 var n = new Date(), p = function(x){ return String(x).padStart(2,'0'); };
10 clock.textContent = p(n.getHours()) + ':' + p(n.getMinutes()) + ':' + p(n.getSeconds());
11 }
12 tick();
13 setInterval(tick, 1000);
14})();
15</script>
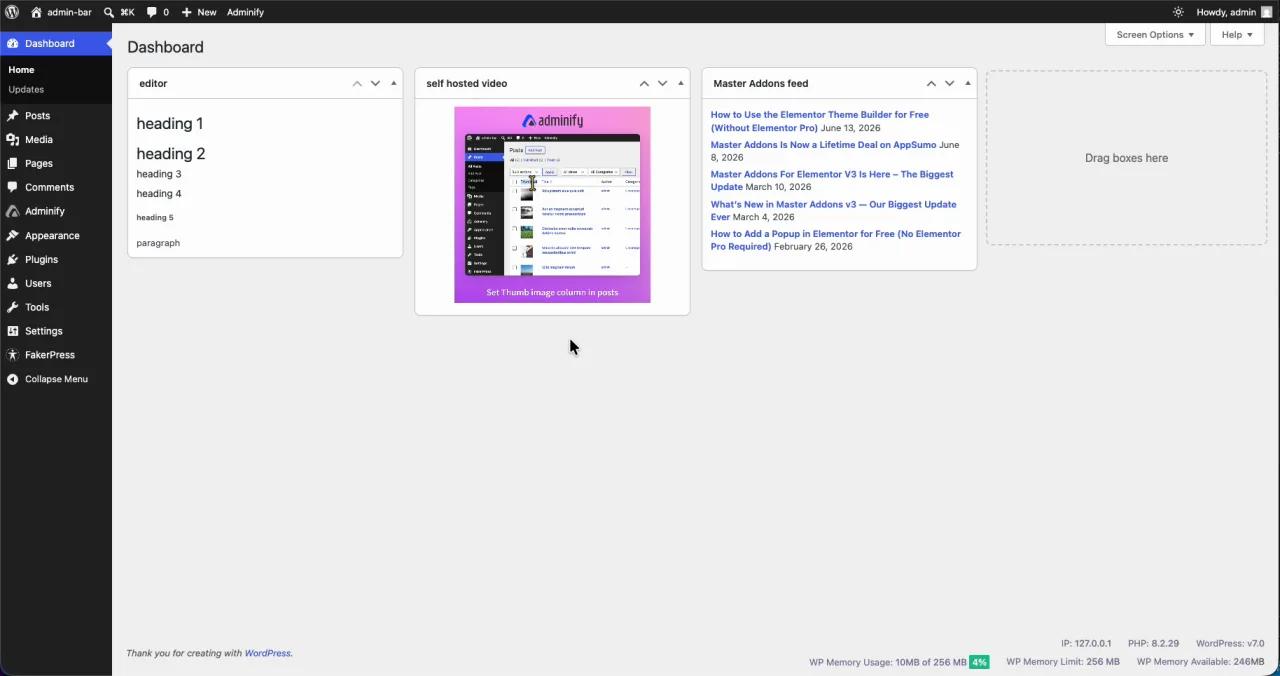
16Step 6: View the live dashboard
Hit Save Settings, then open Dashboard at the top of the sidebar. Your widgets now sit next to (or in place of) the native ones: an Editor widget, a self-hosted video, an RSS feed, each in the column and position you chose, visible only to the roles you allowed.
That's the whole loop: enable the feature, add a widget, pick a content type, set roles, save. Repeat for as many widgets as you need, and drag to reorder. To go further and clear out the default boxes you don't want, here's how to remove the WordPress welcome widget and the rest of the core clutter.
Code vs no-code: which should you use?
Both register real WordPress dashboard widgets. The difference is who maintains them and how fast you can change them.
| Factor | Code (wp_add_dashboard_widget) | WP Adminify (no-code) |
|---|---|---|
| Setup | Edit functions.php / build a plugin | Toggle a setting, click Add Widget |
| Content types | Whatever HTML you write | Editor, Icon, Video, Shortcode, RSS, Script |
| Role control | Manual capability checks | Visual role selector per widget |
| Editing later | Code change + deploy | Edit in the UI, save |
| Who can manage | Developers only | Any admin on the team |
| Survives theme switch | Only if in a plugin | Yes (plugin-based) |
Go with code when you want tight version control, the widget ships as part of a product, or you're avoiding plugin dependencies on purpose. Go no-code when non-developers need to manage widgets, when you want the extra content types without writing markup, or when WP Adminify is already handling the rest of your WordPress admin panel anyway.
Common issues and fixes
- Widget doesn't appear. Make sure registration is hooked to
wp_dashboard_setup, notadmin_init. In WP Adminify, check that the widget's Allowed User Roles include your role. - Script content does nothing. Some setups strip raw
<script>on save. Right-click the widget and Inspect to see if the tag survived. If it didn't, use a header/footer scripts tool or fall back to the code method. - Widget shows to the wrong users. In code, double-check the capability matches the role.
edit_others_pagesexcludes Authors. In WP Adminify, reopen the widget and look at the role chips. - Widget keeps landing in the wrong column. Position is a default, not a lock. Users can drag widgets around, and WordPress remembers each person's layout per account.
Frequently Asked Questions
How do I add a custom widget to the WordPress dashboard?
Register it with wp_add_dashboard_widget() hooked to wp_dashboard_setup in your theme's functions.php, or use a plugin like WP Adminify to add one visually. The function needs a unique ID, a title, and a callback that echoes the widget's content.
Can I show a dashboard widget only to certain user roles?
Yes. In code, wrap the registration in a current_user_can() capability check or test wp_get_current_user()->roles. In WP Adminify, each widget has an Allowed User Roles field where you pick exactly which roles can see it, no code needed.
What is the wp_dashboard_setup hook?
wp_dashboard_setup is the WordPress action that fires while the admin dashboard is being assembled. It's the right place to register or remove dashboard widgets, because it only runs on the dashboard screen and after the core widgets are set up.
Can a dashboard widget show a video or RSS feed?
Yes. With code, you embed the HTML yourself inside the callback. WP Adminify has dedicated Video (self-hosted, YouTube, Vimeo, iFrame) and RSS Feed content types, so you paste a URL and the widget renders the embed or feed for you.
Will custom dashboard widgets slow down my site?
No. Dashboard widgets only load inside wp-admin for logged-in users, never on the front end, so they don't touch visitor-facing page speed. Keep Script widgets light so they don't drag on the admin screen itself.
Do custom dashboard widgets survive a theme change?
Only if the code lives in a plugin rather than functions.php. Theme-based code disappears the moment you switch themes. Plugin-based tools like WP Adminify keep your widgets in place no matter which theme is active.
Conclusion
A custom dashboard widget turns the most-seen screen in WordPress into something your team or clients actually use. Quick recap:
- For developers:
wp_add_dashboard_widget()on thewp_dashboard_setuphook gives full control, with role limits viacurrent_user_can(). - For everyone else: WP Adminify's Dashboard & Welcome Widget builder adds six content types and a visual role selector with no code.
- Role-based access means each person sees only the widgets meant for them.
- Both methods ride the same native WordPress API underneath, so pick whichever workflow fits your team.
If you'd rather build and manage widgets visually, and tidy up the rest of the admin while you're in there, try WP Adminify and ship your first custom dashboard widget in a few minutes. For a bigger cleanup, pair it with our guide to building a custom user dashboard without coding.
Build the Rest of the Dashboard Around Your Widgets
Custom widgets work best on a dashboard that's already decluttered and branded. See the complete guide to customizing the WordPress dashboard, and the step-by-step widget doc for the exact settings used here.

Leave a Comment
Your email address will not be published