
WP Adminify
How to Create Custom Dashboard Widgets?
Follow these steps to create a custom dashboard widget using WP Adminify.
Step 1: How to Enable Custom Dashboard Widget Settings
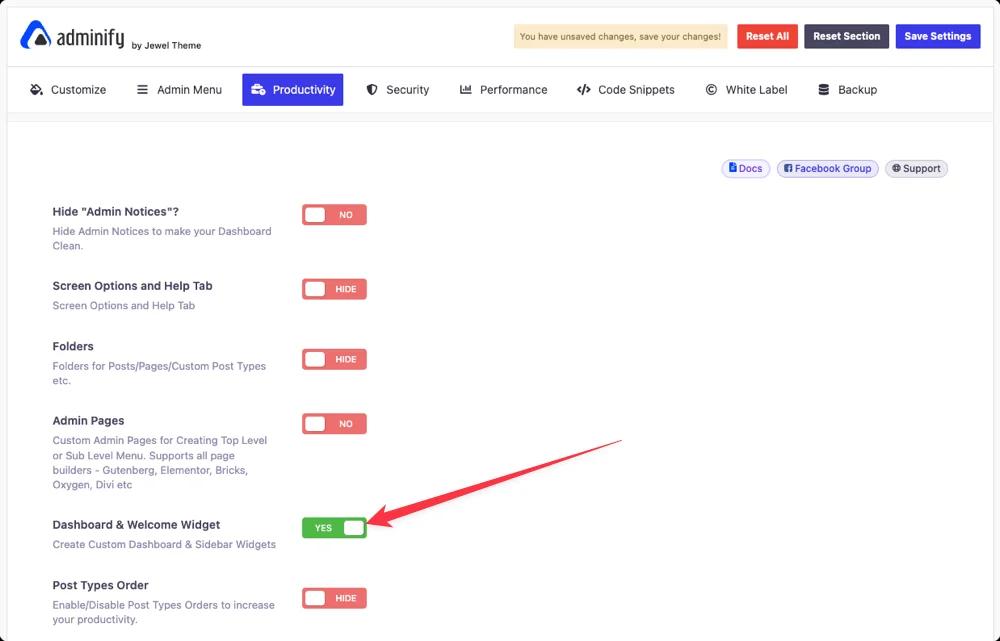
First, go to the following path: WP Adminify > Productivity
Then Enable the “Dashboard & Welcome Widget” settings. Click “Save Settings”.
Step 2: How to Access Dashboard Widgets Panel
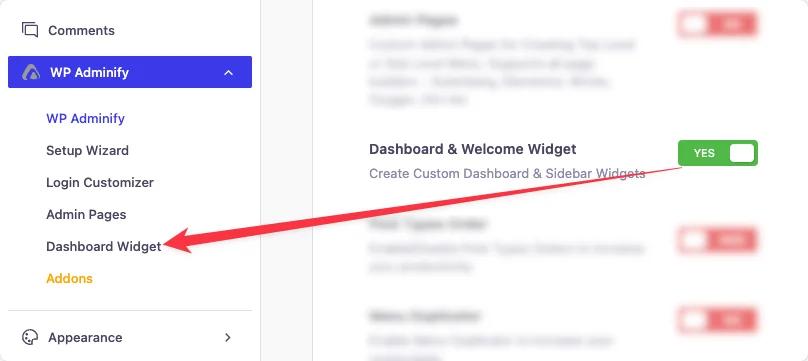
Once you refresh the page, you’ll see the “Dashboard Widget” under WP Adminify panel.
Click on it to access the dashboard widgets section.
Step 3: How to Add Dashboard Widgets
Now, to add a dashboard widget, select the “Dashboard Widget” panel. Then click the “Add New Widget” button.
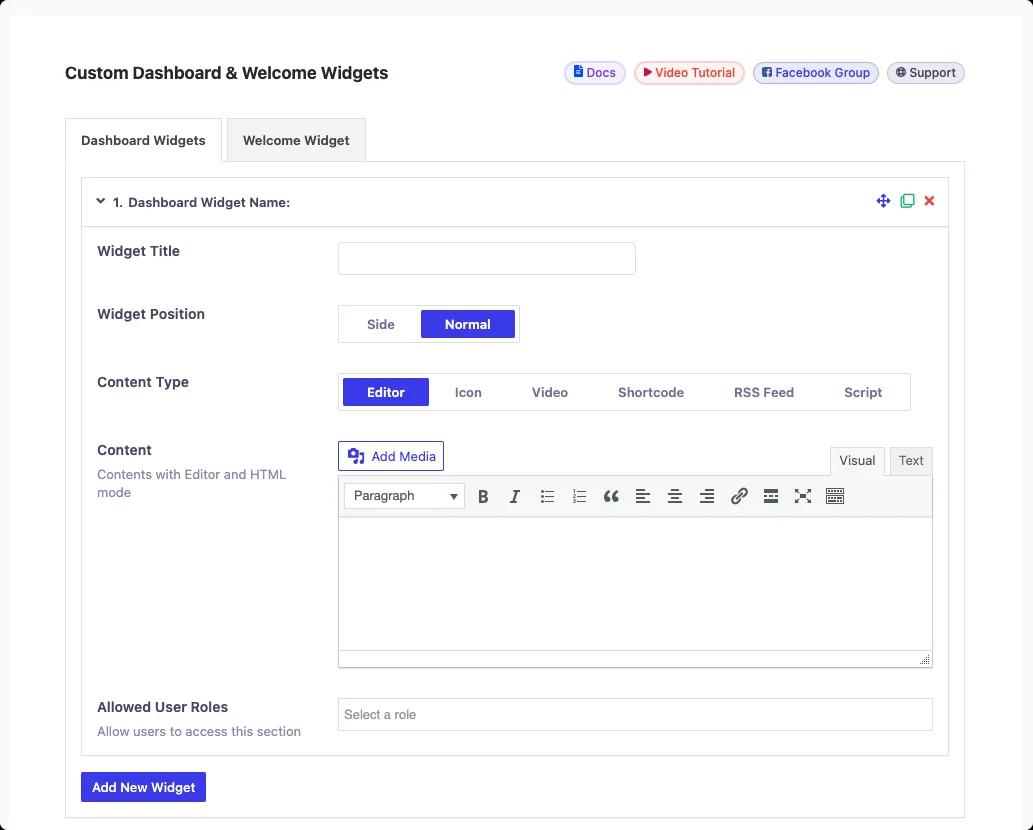
Now you can add the dashboard widget with following information.
Widget Title: Enter the title that will appear at the top of the widget.
Widget Position: Select where the widget should be placed.
- Side
- Normal
Content Type: Select how you want to display the content. You can choose from:
- Editor (Text/HTML)
- Icon
- Video
- Shortcode
- RSS Feed
- Script
Note: Depending on your content type, the interface will change:
For Editor: You’ll get a content editor. Here you can add your content visually or by code.
For Icon: You’ll get a button to add your icon. You can also add a tooltip text and add an URL.
For Video: You can select between Self Hosted / Youtube / Vimeo as a video type. You can also add video description and upload your own video in the upload video option.
For Shortcode: You’ll get a text box to add your shortcodes.
For RSS Feed: Here you can add the RSS feed URL. You can limit the number of posts displayed. Also, you can use the toggle button to Show Excerpt / Date / Author.
For Script: You’ll get the code editor, where you can write custom script codes.
You can also make the settings role based. To do that, select your desired roles from the “Allowed User Roles”.
You can add multiple widgets by clicking the “Add New Widget” multiple times. Also, you can drag and drop the positions of custom widgets.
Step 4: Save the Settings
Don’t forget to click the Save Changes button to apply your settings.
WP Adminify allows you to enhance and personalize your WordPress dashboard by creating custom widgets that can display various types of content. Whether you want to show important information, embed a video, or include a custom script, you can easily add it through custom dashboard widgets.
1. Access the Dashboard & Welcome Widget Settings
To start creating your custom dashboard widget:
- Log in to your WordPress dashboard.
- Navigate to WP Adminify > Dashboard & Welcome Widget.
2. Save Your Settings
click the Save button to save your settings.
3. Go to the Dashboard Widget Option on WP Adminify menu
In the WP Adminify options panel on the left hand side of the dashboard a new option “Dashboard Widget” will appear.
4. Click on Dashboard Widget
Click on the Dashboard Widget option and you’ll be taken to a new window where there will be two tabs Dashboard Widget and Welcome Widget. Click on the Dashboard Widget tab.
5. Add a New Widget
Once inside the Dashboard & Welcome Widget settings:
- Click the Add New Widget button to create a new custom widget.
6. Configure Widget Settings
You will now be presented with a form to configure your custom widget settings.
Widget Title
Enter the title for your widget. This title will be displayed at the top of the widget in the WordPress dashboard.
Widget Position
Choose the position for your widget. You have two options:
- Side: Place the widget in the narrow column on the right-hand side of the dashboard.
- Normal: Place the widget in the main, wider central section of the dashboard.
This lets you control how and where the widget will be positioned in relation to other widgets on the dashboard.
Content Type
Next, select the type of content that will appear in your custom widget. WP Adminify provides several content options:
- Editor: Use the WordPress editor to add text, images, or any custom HTML.
- Icon: Create a widget that displays an icon.
- Video: Embed video content directly into the widget.
- Shortcode: Use a WordPress shortcode to dynamically display content in the widget.
- RSS Feed: Display an RSS feed in your widget to show external content.
- Script: Add custom JavaScript or any other type of script to the widget for functionality.
Add Content
Depending on the content type you selected, the Content section will change to fit your choice:
- If you choose Editor, a text editor will appear where you can write or paste the desired content.
- If you selected Shortcode, a field will appear for you to enter the shortcode.
- For Video, you’ll get a video embed field.
- If you selected Script, an input field will be provided to add your custom JavaScript code.
Assign User Roles
You can control who can see the widget by selecting specific user roles. This allows you to customize the dashboard for different roles like:
- Administrators
- Editors
- Authors
- Contributors
- Subscribers
If you want the widget to be available to everyone, select the All Users option.
7. Save Your Widget
Once you’ve configured all the settings, scroll down and click the Save button to add the widget to your dashboard.
WP Adminify also gives you the settings to create custom welcome widgets. Do check it out if you think you'll need it.
Didn’t find what you were looking for? Get in touch!
Updated on September 25, 2024
Was this helpful to you?