

Jemee
Published: Mar 2, 2022
Updated: Sep 15, 2026
Try WP Adminify! This little tool lets you change your WordPress dashboard any way you like. Add new admin pages, move menu items, drop in custom widgets anything you can imagine!
How Do You Customize the WordPress Dashboard? (Quick Answer)
You customize the WordPress dashboard in one of three ways: with the built-in Screen Options and drag-and-drop controls for quick layout changes, with code in your theme's functions.php for full control, or with an admin customization plugin when you need menu editing, custom widgets, branding and per-role dashboards without writing PHP.
Free, built-in changes take about two minutes and cover hiding widgets, rearranging panels and picking an admin colour scheme. Anything client-facing, removing menu items per user role, replacing the WordPress logo, or building a branded client dashboard, needs either custom code or a plugin.
The 7 methods at a glance
| Method | What it changes | Needs code? | Free? |
|---|---|---|---|
| Screen Options | Show/hide dashboard widgets and columns | No | Yes (built in) |
| Drag and drop | Reorder dashboard widgets | No | Yes (built in) |
| Admin colour scheme | Dashboard colours, per user | No | Yes (built in) |
| Admin menu editor | Rename, reorder, hide sidebar menu items | No (with a plugin) | Free tier |
| Custom dashboard widgets | Add your own panels and content | wp_add_dashboard_widget, or a plugin | Free tier |
| White label / branding | Replace the WordPress logo, login page and footer text | No (with a plugin) | Paid |
| Per-role dashboards | A different admin view for clients vs editors vs admins | No (with a plugin) | Paid |
What WP Adminify does
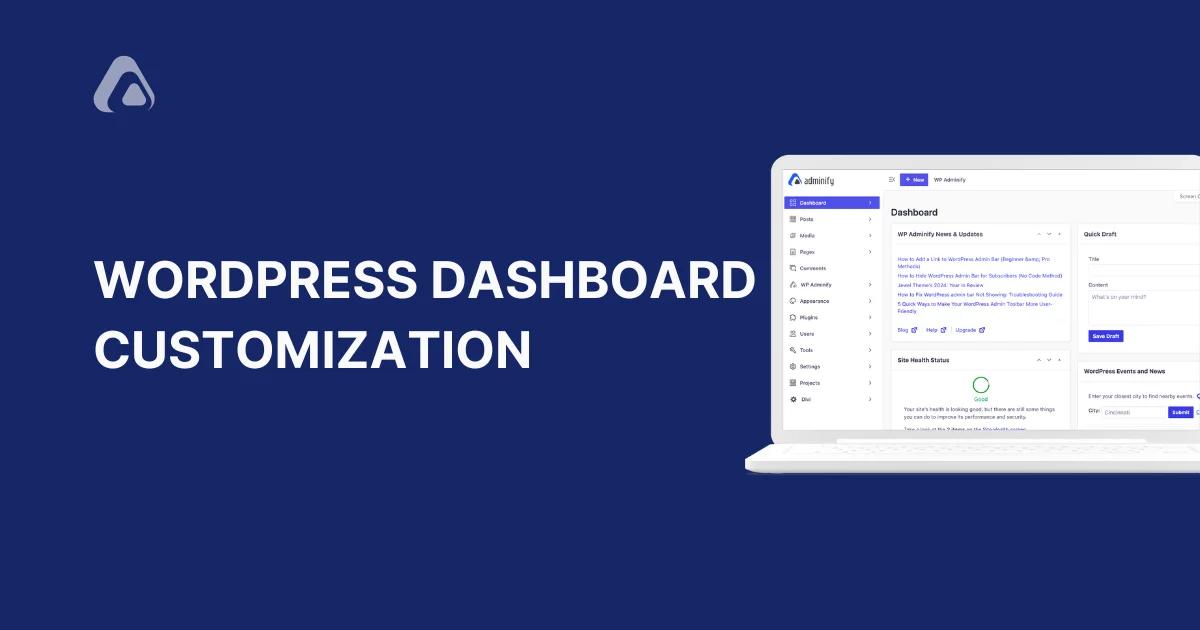
WP Adminify is a WordPress admin customization plugin that replaces the stock dashboard with a configurable one. It lets you rename, reorder and hide admin menu items per user role; remove or add dashboard widgets; apply dark mode and custom admin themes; white-label the logo, login page and footer; manage media in folders; and add sortable admin columns, all from a settings screen rather than PHP.
The core plugin is free on WordPress.org, where it has been downloaded 327,000+ times and holds a 4.3/5 rating from 107 reviews (version 4.2.21, tested up to WordPress 7.0.2). White label, per-role dashboards and the login customizer are Pro features, see pricing for current plans.
Getting started with WordPress Dashboard Customization
- Install WP Adminify & run Setup Wizard
- Pick your favorite colors and upload a logo.
- Drag remaining items into the perfect order.
- In just a few clicks, your dashboard will look and feel like it was made just for you!
Replace WordPress logo with yours
Right off the bat, let's get into the branding.
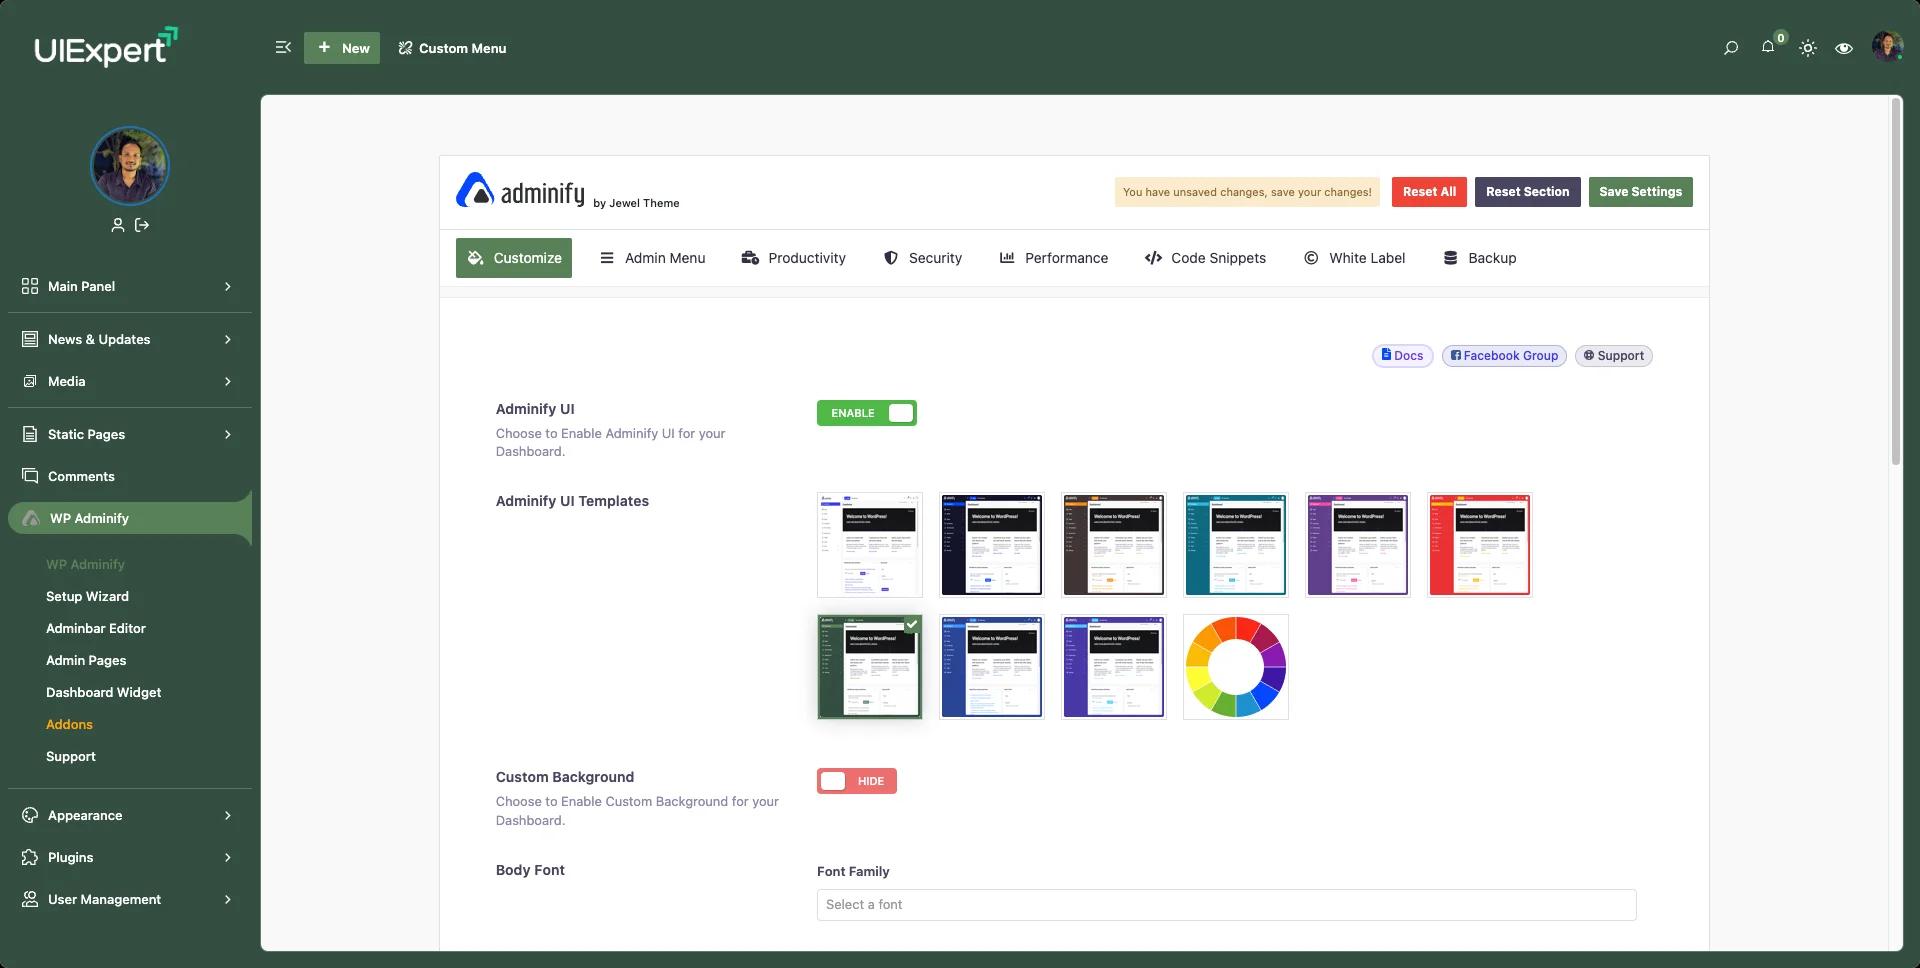
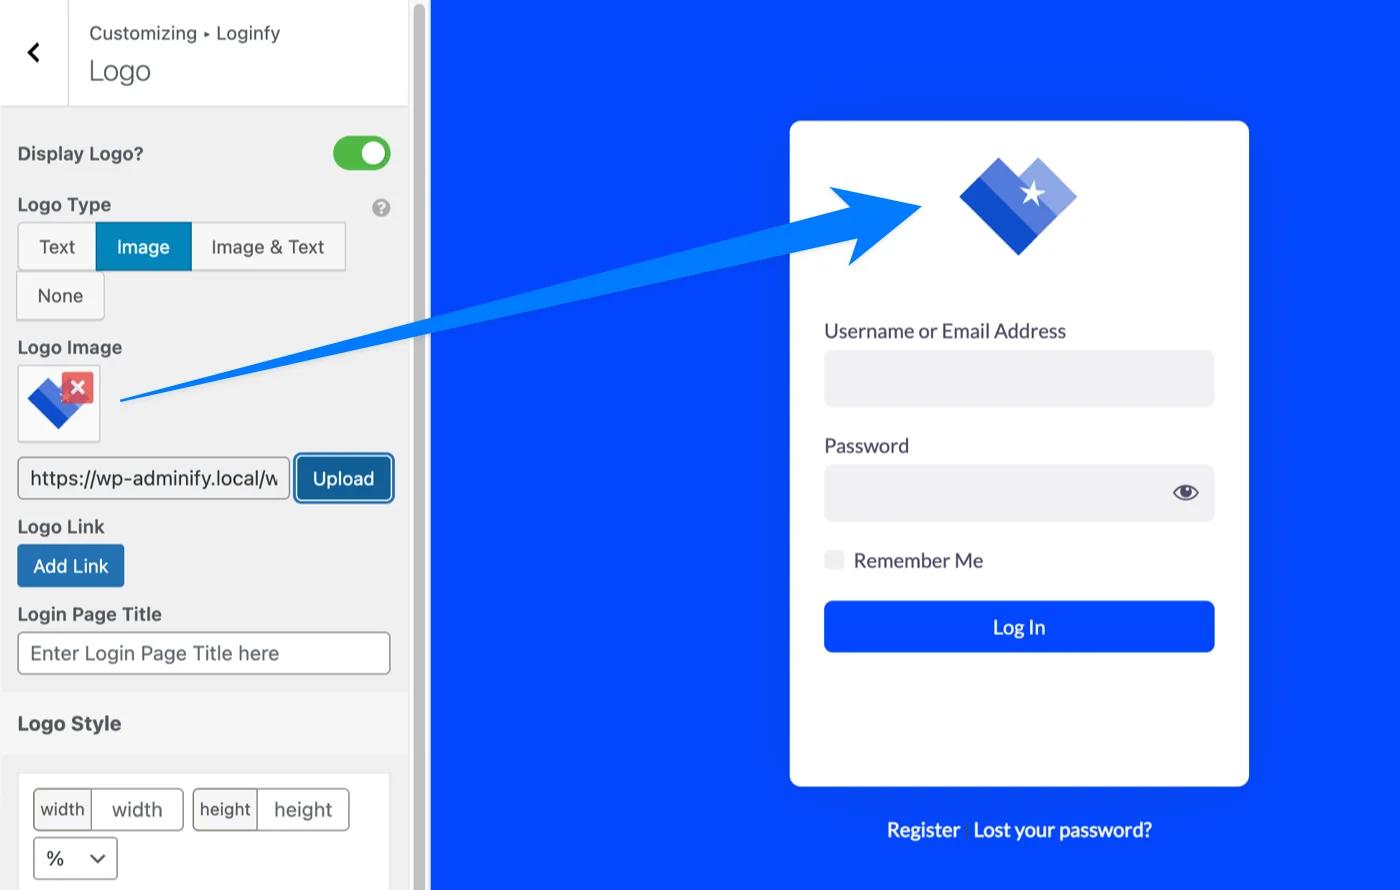
Get started your Dashboard customization journey with the basic option like changing logo, UI Template, Configure dark and light mode. Installing the Loginfy addon for customizing the login page. For a full comparison, see our guide to the best WordPress login page plugins.
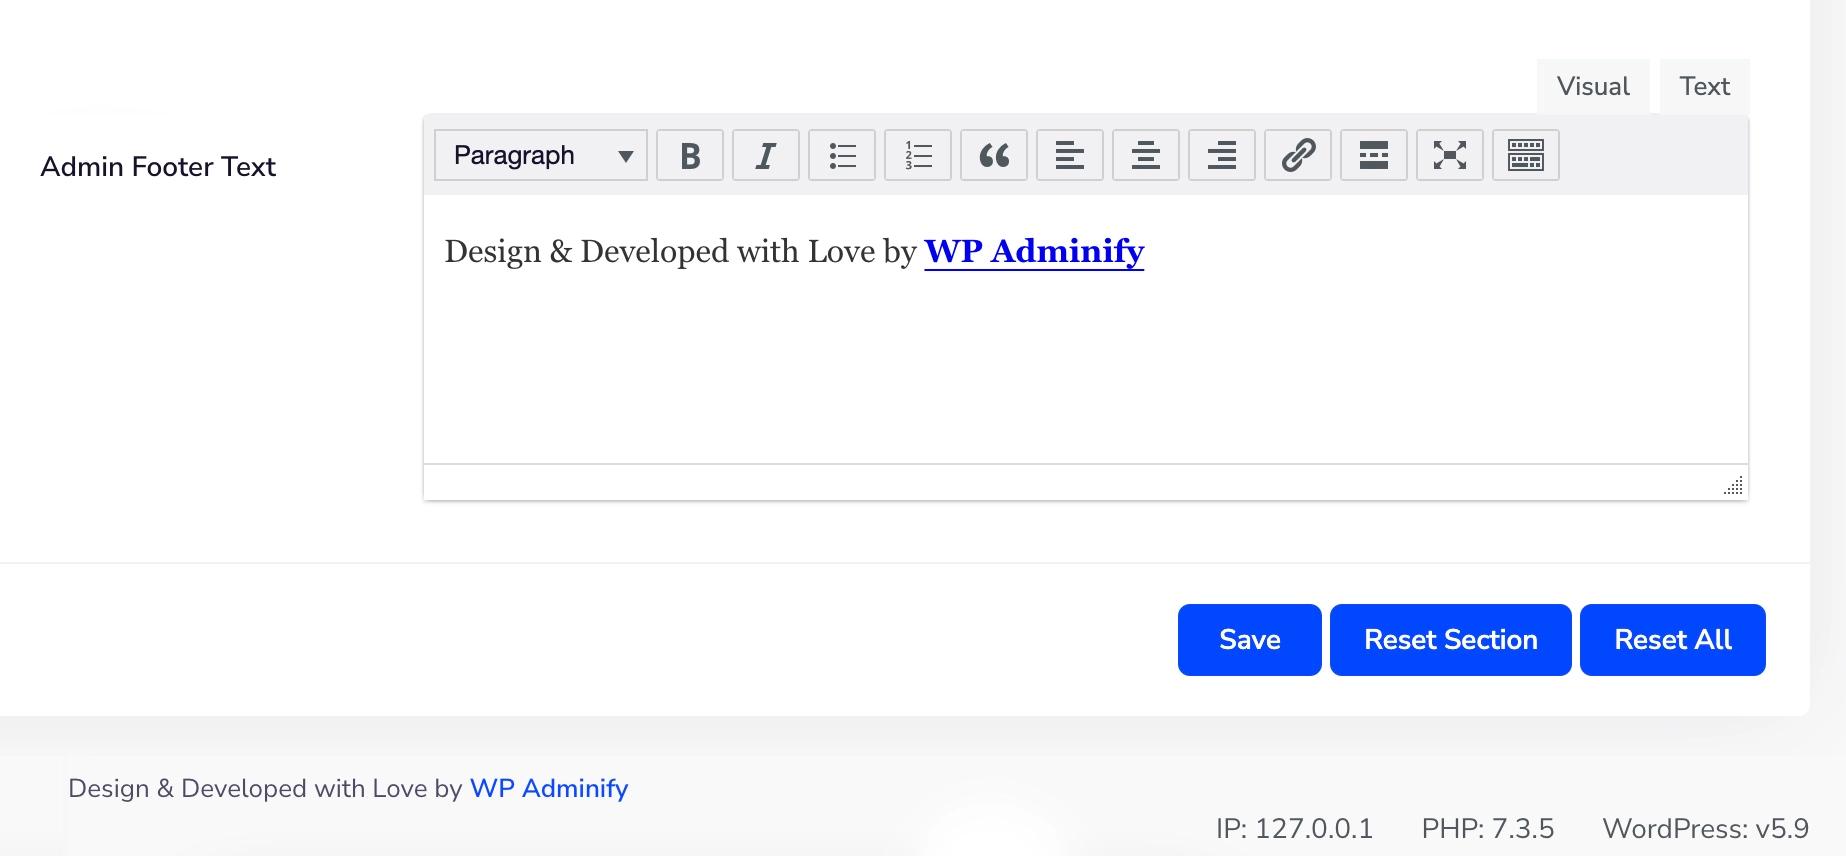
Admin Footer WordPress Branding Text
Navigate to WP Adminify Option Panel > White Label> Write footer text. Now write your copyright text inside "Admin Footer Text" area. This will change the WordPress Branding from your Dashboard Footer area.
Customize Dashboard Body Color
Inside the Adminify Option panel, you will see a customize tab. Inside this tab, there are 9 pre-built Adminify UI Templates. If you don't like any pre-built template, then just click on the color picker option and define your colors for Background, Button, Menu, and Notification yourself.
WordPress Admin Menu Editor
Customizing the WordPress dashboard sidebar menu is a great way to organize and streamline your site. Admin Menu Editor by WP Adminify can be used to edit the sidebar menu quickly and easily. This module allows you to hide, show, or re-order all of your WordPress admin panels. You can also import and export menus so that you can share them with other site owners as well as groups of users.
Modify Admin Menu item
Hover on WP Adminify menu then click on "Menu Editor". All your existing Admin menu items are ready to edit here. Just click on any menu item, then rename it, input icons, and url.
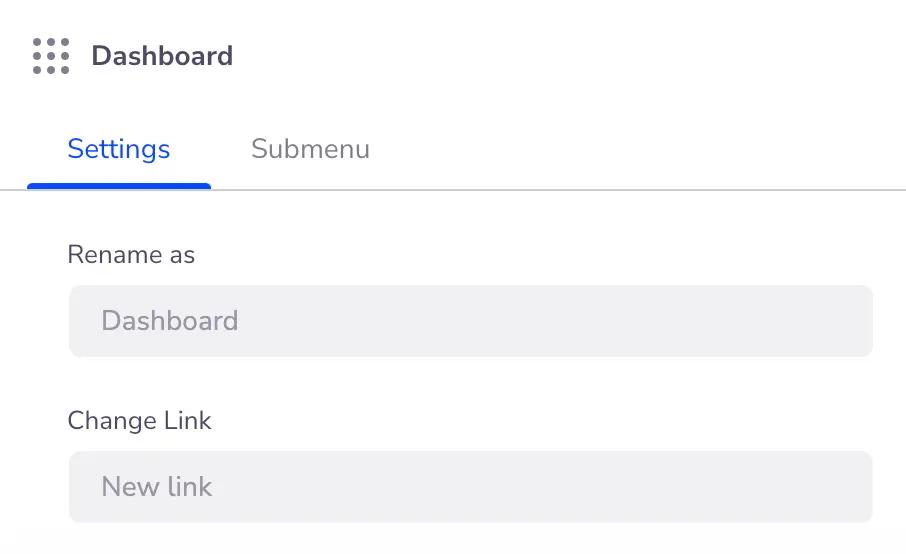
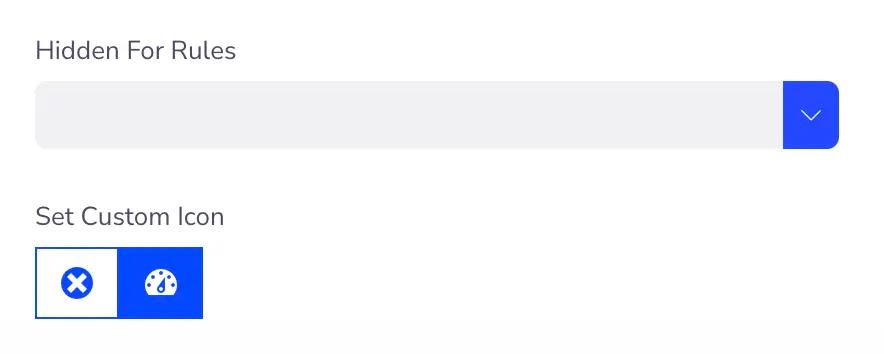
Hide Dashboard menu item for User rules
Click on "Hidden for Rules" option, select your desired user rules. Remember, it will hide that specific menu item from your selected user rules.
Custom WordPress admin page
With the Admin Page module, you can create an unlimited number of Admin Pages for your WordPress Dashboard. It lets you to add a custom page to your Dashboard and design it with any page builder like Elementor, Visual Composer, Gutenberg, etc. Define your custom Admin Page as a top label menu or submenu anytime.
If you like to edit this Custom WordPress Admin page using any page builder, then make sure to select "Admin Page" post type in your page builder settings panel.
Create New Admin Page
Login to your Website Dashboard and hover on WP Adminify. You will see a submenu item called "Admin Pages", click on this option. Now you are ready to create a new Admin Page. "Admin Pages" by WP Adminify is a post type, you can create unlimited Admin Pages and assign them as top level menu or submenu for existing admin menu items.
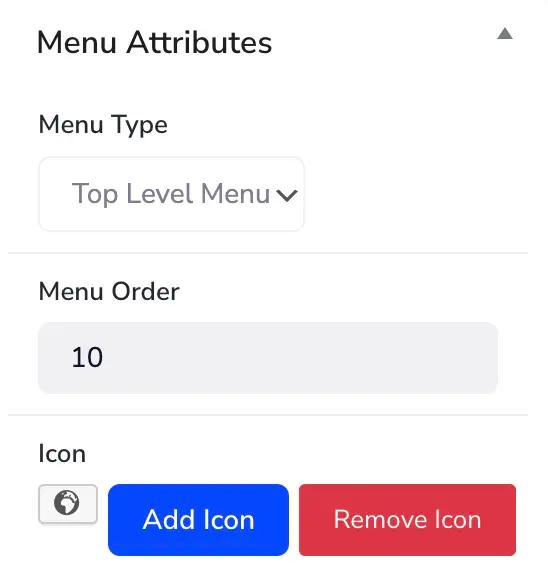
Admin Page as Main Menu or Submenu
Take a look at the right sidebar. There is a block for "Menu Attributes", You can select menu type as "Top Level Menu" or "Sub menu", then menu order value and custom icon for the admin page.
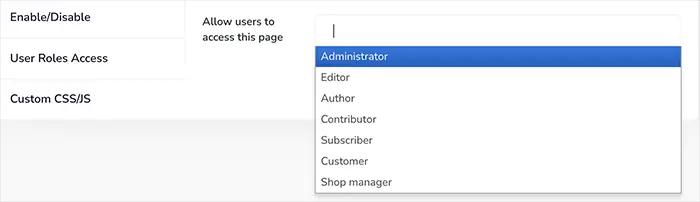
User Roles for Admin Page
You can enable or disable Page Title, Page Margin, Admin Notices for your New Admin page. Also able to define who can see your Admin Pages by using the "User Roles Access" option. Finally, if you need more customization, then feel free to write Custom CSS and JS for your Custom Admin Page.
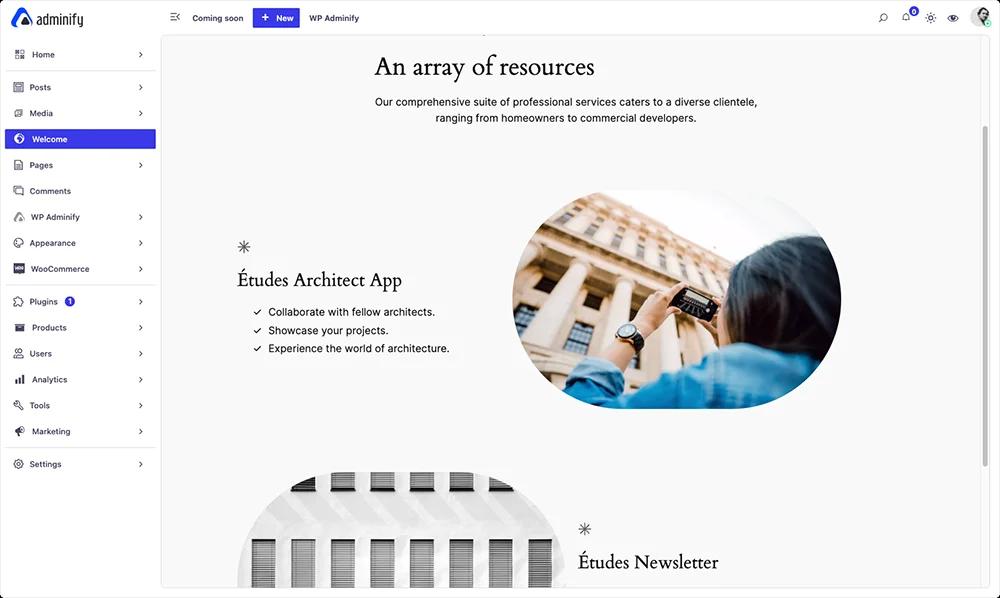
Create Custom Dashboard Widgets
Custom Dashboard Widget or a custom Welcome Panel is a great way to personalize your site Dashboard. Dashboard Widget module by WP Adminify offers the following features:
- Widget Position
- Default WordPress Editor
- Icon Widget
- Video Widget
- Shortcode For Widget
- RSS Feed
- Allowed User Roles selection
- Welcome Widget Design
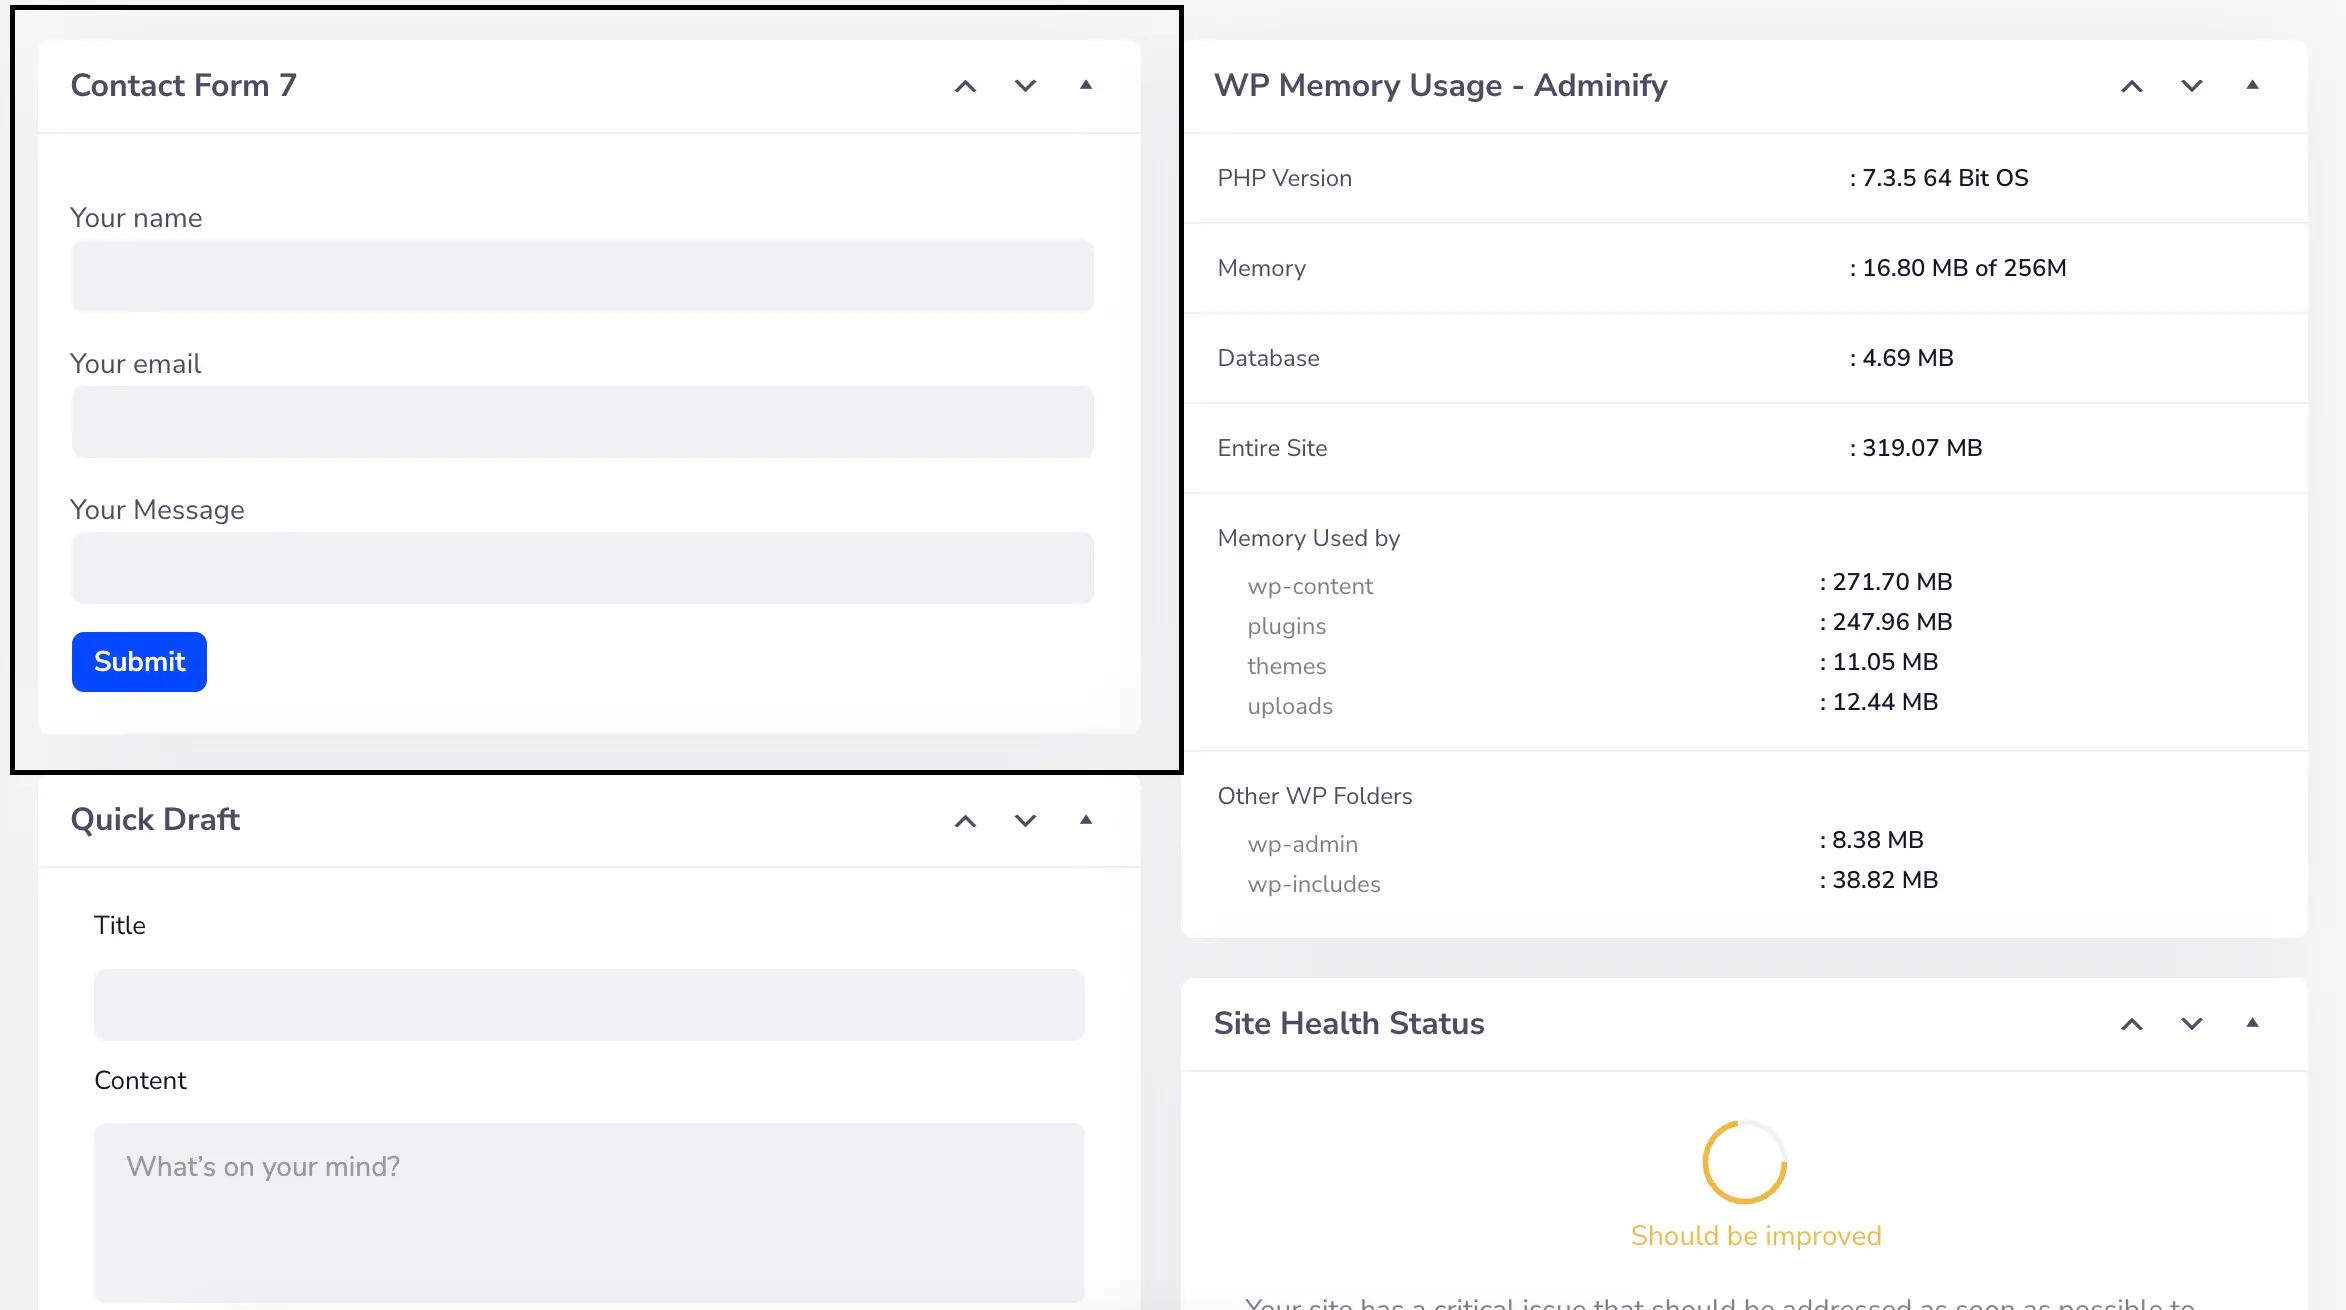
Contact Form 7 in Dashboard Widget
First, design your contact form the way you need. Then click on add new dashboard widget. Select the Widget type as "Shortcode". Now paste your Contact Form 7 Shortcode and save everything. Now navigate to your website Dashboard and reload it.
Dashboard Welcome Widget Customization
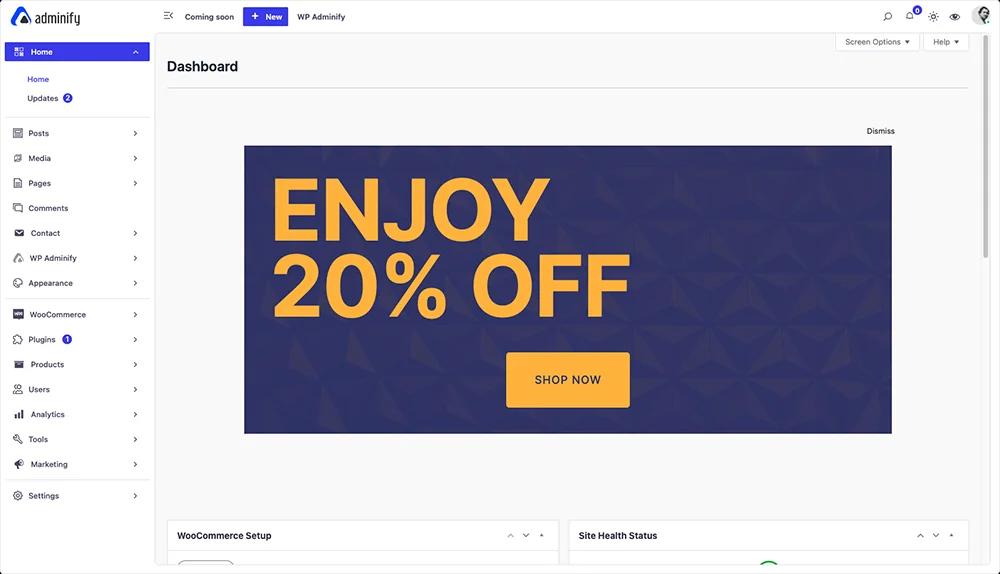
Design your new Welcome Widget via any page builder or the default WordPress editor. For default WP Editor, just create a new page and write down your all welcome widget content. Perhaps, you can design your page with any page builder and also use Elementor saved section too.
WordPress Admin Column Editor
You can easily show or hide Post or Page Admin Columns by using the default Screen Option.
What if you like to modify the column width and need more customization flexibility? Here Admin Column editor by WP Adminify will assist you.
Not only for post type but also you can modify taxonomies admin columns too. Just navigate to Admin Columns option and you will see something like the following screenshot.
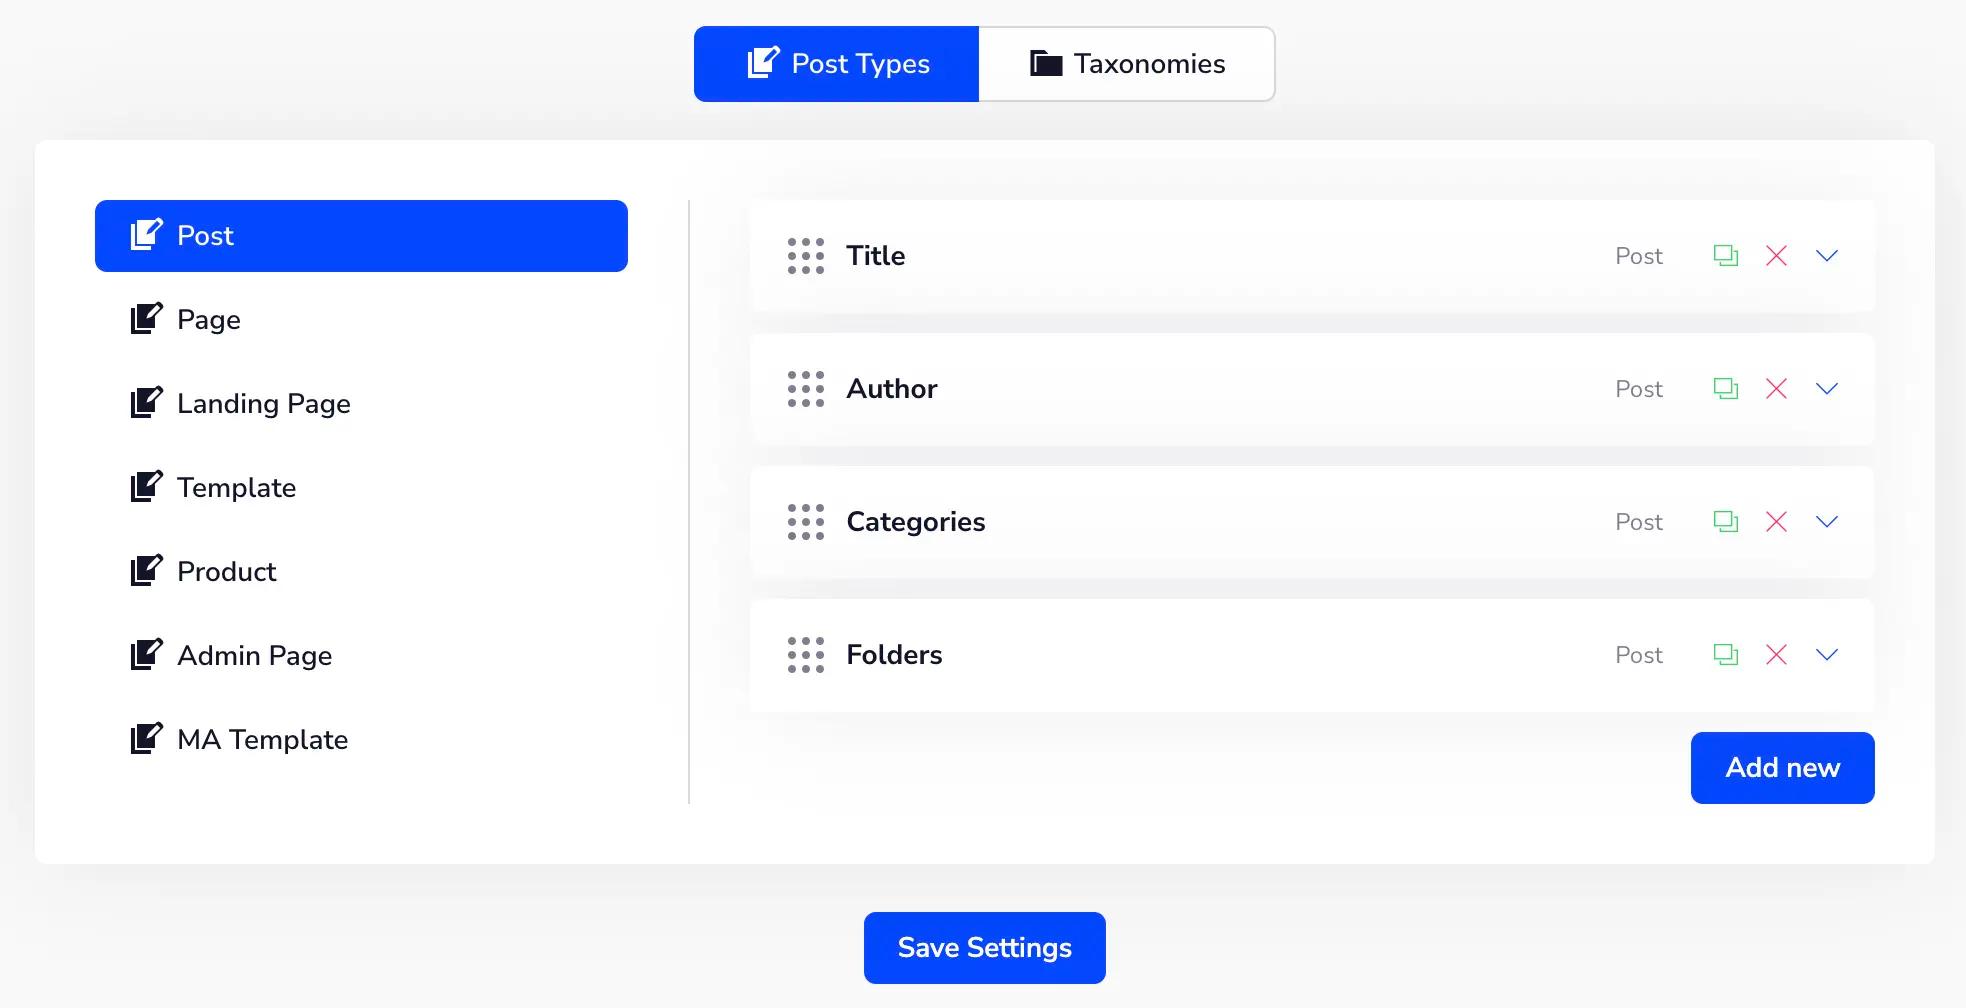
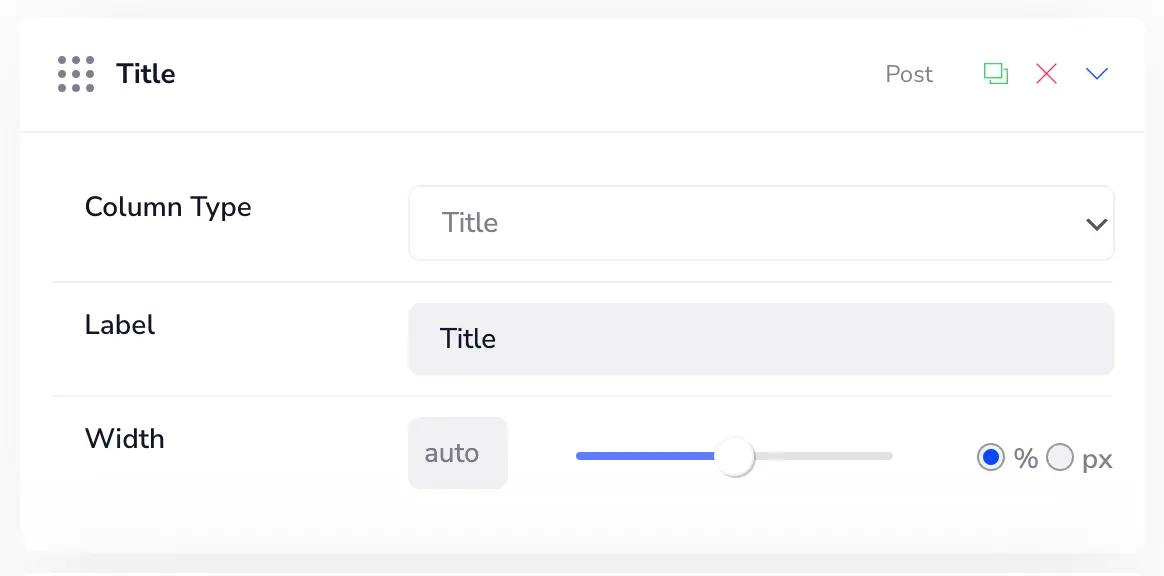
Select your desired post type and click on any existing column name which you like to modify. Here you can rename your admin column label text, select column type, and define width in px or percentage. You are free to remove all unwanted columns to make it cleaner and user-friendly.
Change WordPress Login URL
In short, it can enhance the security of your WordPress Website.
Have you been a victim of a brute force attack? If yes, then you know how painful it is. A Brute Force Attack is a form of hacking where an intruder tries to guess your password or username by systematically guessing different combinations.
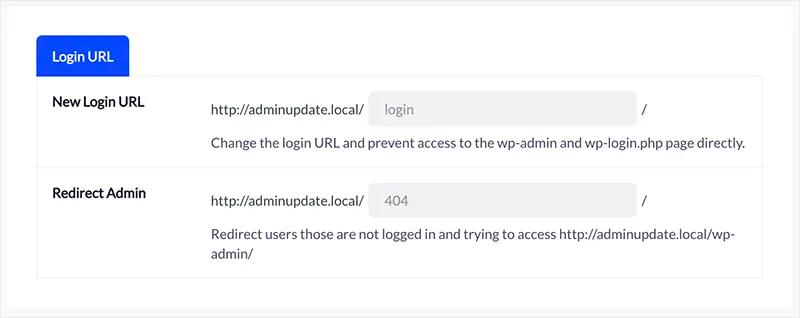
WP Adminify comes with URL Redirection feature. It will help you to change your WordPress login URL & boost your Dashboard Security. Enable this module from the WP Adminify modules manager. Then you will notice a new submenu called "Redirect URLs" under WP Adminify. Just click on this submenu and you are ready to set a new Login URL and redirect the default Admin URL.
WordPress Login Page Customizer
Your WordPress login page is often the first thing customers or user’s encounter when visiting your site. It’s where they enter their name and password. If those credentials are accepted, it takes them to the dashboard, which is where they will spend most of their time on your website. The login page has to be welcoming, informative for the users.
Login Customizer by WP Adminify lets you customize your WordPress login page via default customizer. You can visually check whatever you are doing inside your Editor. Some important features you will get in this WP Adminify login page customizer:
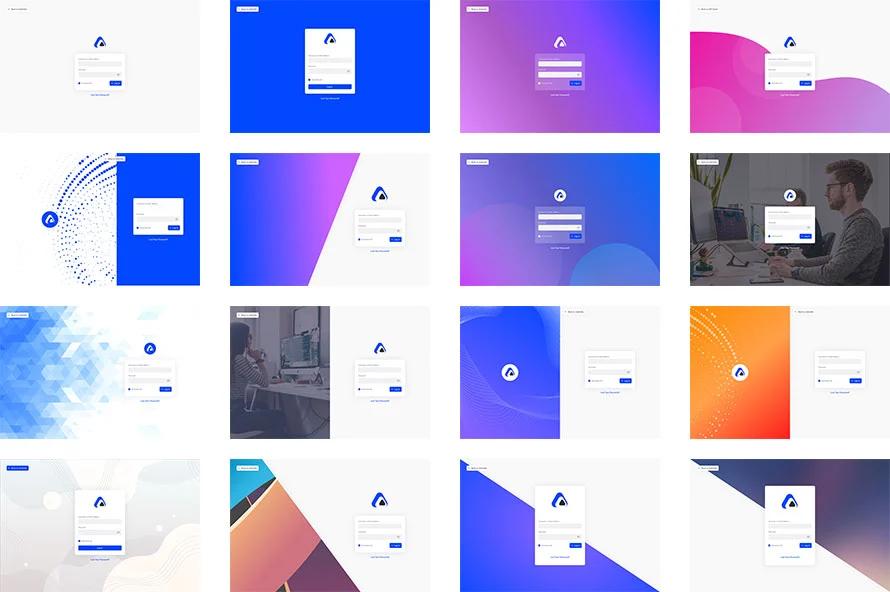
- 16 Pre-built Template
- Text Logo, Image Logo for login page
- Image, color, Slideshow, Video Background
- 2 Column Layout
- Login Form customization
- Login Form Fields Text customization
- Button Style
- Login shake remove
- Lost Your Password remove
- Back to website remove
- Error Message customization
- Google Fonts for Login page
After login to your Dashboard just navigate to WP Adminify> Login Customizer. It will redirect you to the login page customizer panel which looks something like the following screenshot.
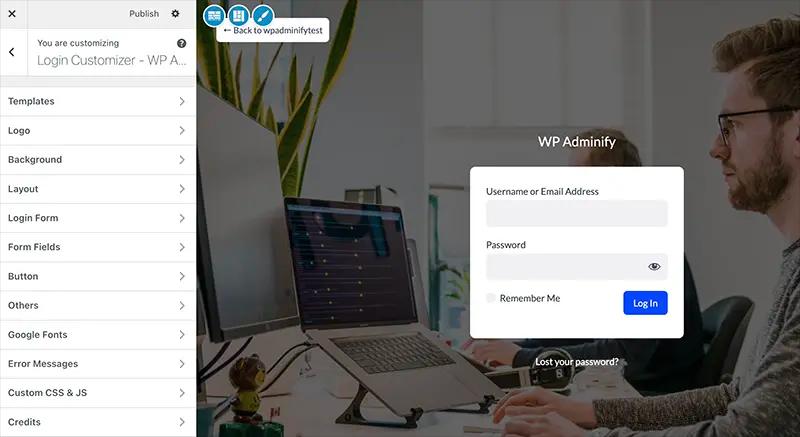
Select your desired template from 16 pre-built login page templates. Change your login page logo, background, layout, login form, fields content, button style, Customize error message and many more.
WordPress Dashboard Dark Mode
Light / Dark mode module by WP Adminify offers a one-click switcher to turn your WordPress Dashboard into Dark and Light mode. This is a great feature for those who work on Dashboard during the night.
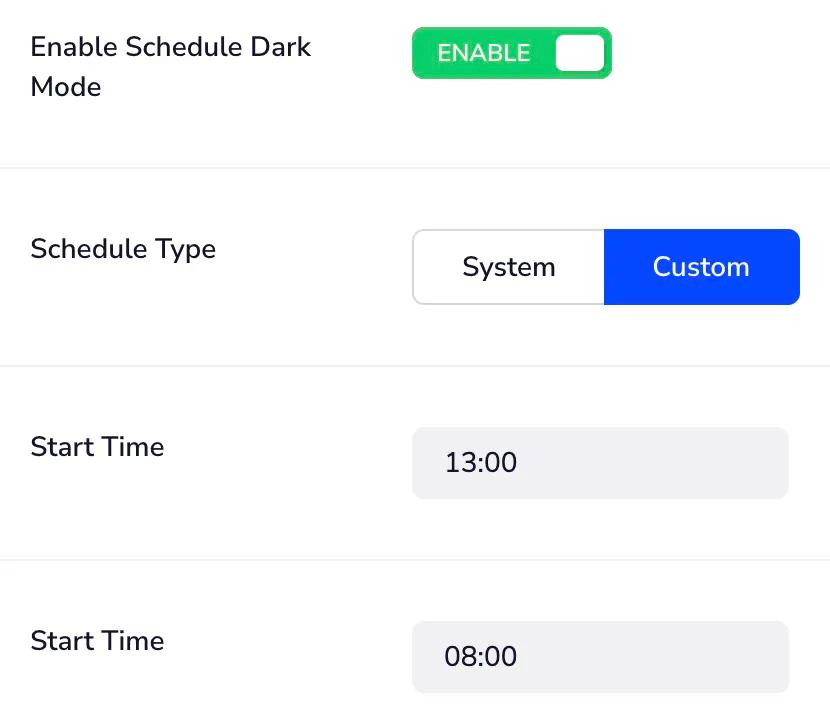
Not only one click switcher, but also you can schedule Dark Mode for WordPress Dashboard. There is an option to define Operating system-based dark mode too.
Navigate to WP Adminify Option panel and then click on Light/ Dark mode. Scroll down a little bit and define your specific time or turn on system-based mode.
Folder Plugin for Media & Post Type
The most common issue is people think that adding a page, post or image into a folder will change its URL. But it doesn’t. Folders by WP Adminify plugin create virtual folders, it doesn’t create actual folders in your server. You are free to delete or rename your folder whenever you need.
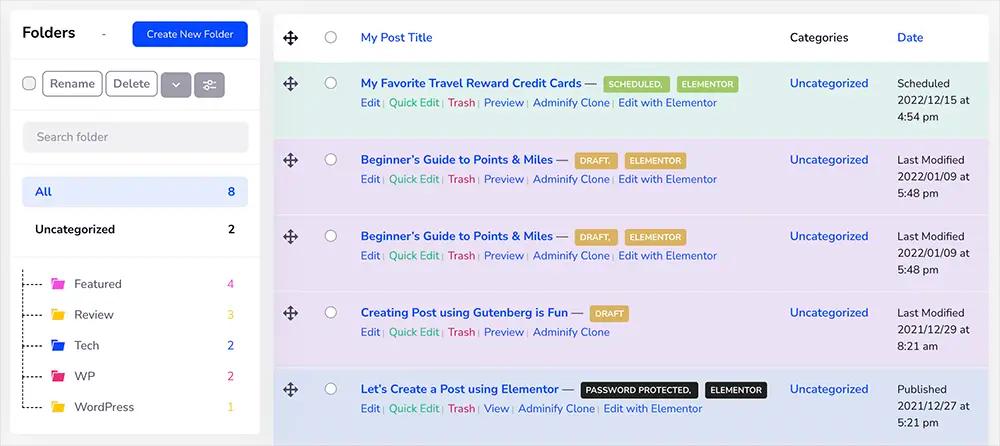
Using the plugin is simple! Once you install it, all you need to do to create your folder then drag your post type or media content. If you click the "create new" button, it will ask you to type your folder name. Input your folder name and then any items (such as post, page, post type, images, videos, or audio) can be added to those folders. Features you will get in this Folder Module:
- Unlimited folder
- Drag and drop any post type, and media library
- Drag and drop folders, change order, and tree view
- Search folder by names
- Sort your folders based on the name
- Rename folders
- Compatible with RTL Dashboard
Dashboard Admin Notice Removal
Have you ever noticed a plugin asks you to upgrade and starts showing a bunch of banner notices? Every time you close them out, they pop open again and distract you from your work.
WP Adminify offers a one-click WordPress Dashboard Notice removal option. If you like to get rid of all admin notices for different themes or plugins, then just turn on the option and reload your Dashboard. The following features you will get inside Disable Admin notice module.
- Hide All "Admin Notices"
- Remove Welcome Panel
- Remove "PHP Update Required" Notice
- WordPress Core/Theme/Plugin Notices
- Remove "Try Gutenberg" Panel
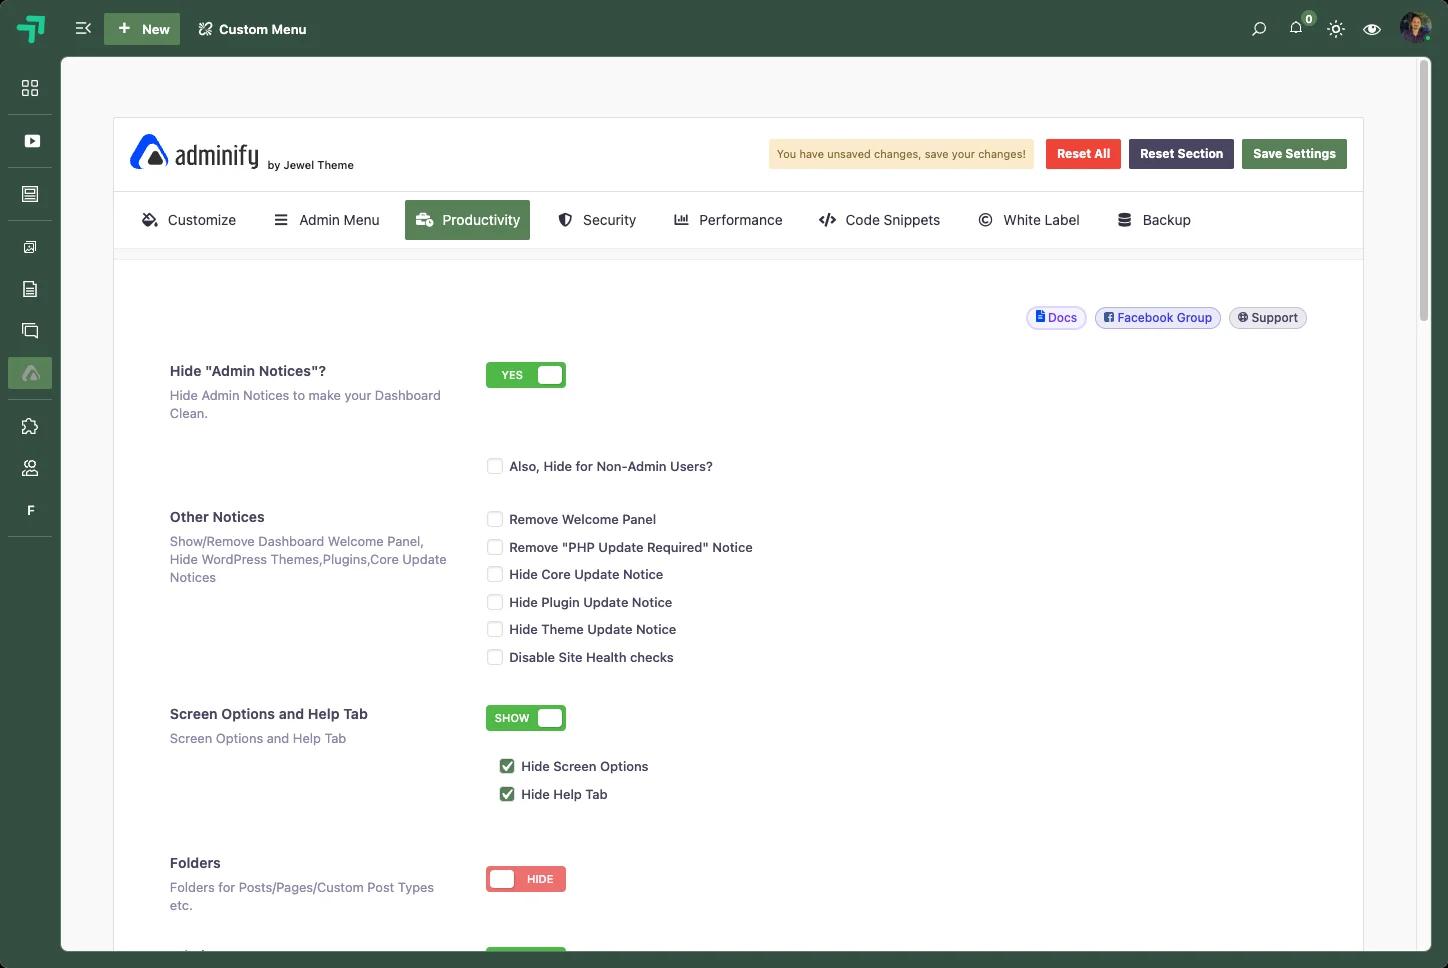
Watch this video to learn more about Disable Admin Notice. Each step is very simple and anyone can do this. Just don't miss the step as mentioned in the video.
WP Dashboard Activity Logs Module
Monitoring and tracking are essential for any business, and WordPress websites need to check each change. With the Activity Log module by WP Adminify, you'll be able to see everything happening on your WordPress website. In short, get a complete insight into exactly who does what and when.
Activity logs by WP Adminify come with a rich filter system. It tracks login, post changes, delete, upload, theme-plugin changes, activation, and many more.
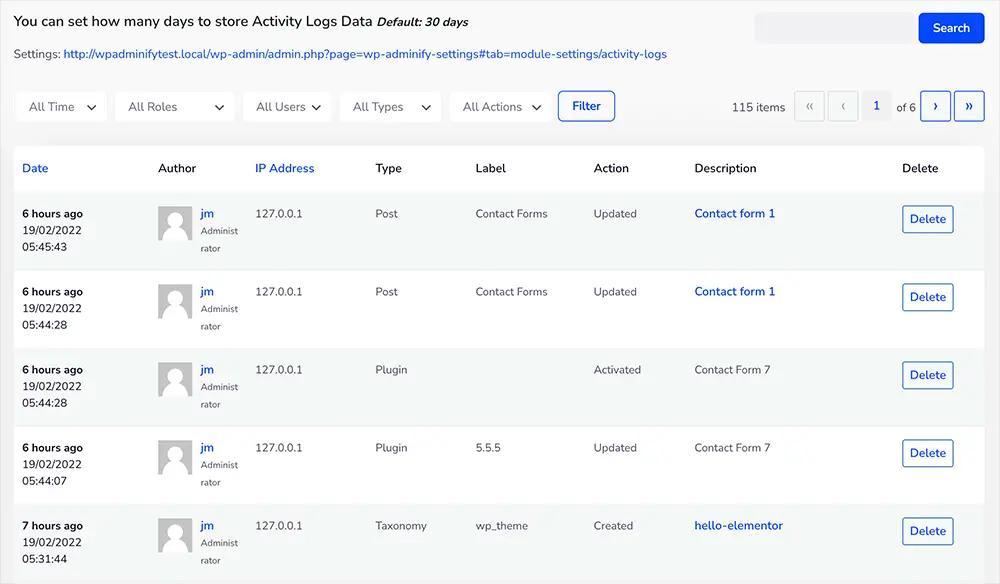
Let's take a look at the following features:
- WordPress Updates record
- Theme & Plugin active and deactivate info
- Post type information
- General Post and Page update, delete, create info
- Filter by specific user name or user role
- Filter by a time duration
- User login and log out information
- and many more
WordPress Admin Dashboard without Plugins
While plugins offer easy customization options, you can modify your WordPress dashboard using built-in features and custom code. Here are several ways to customize your dashboard without relying on plugins:
Screen Options
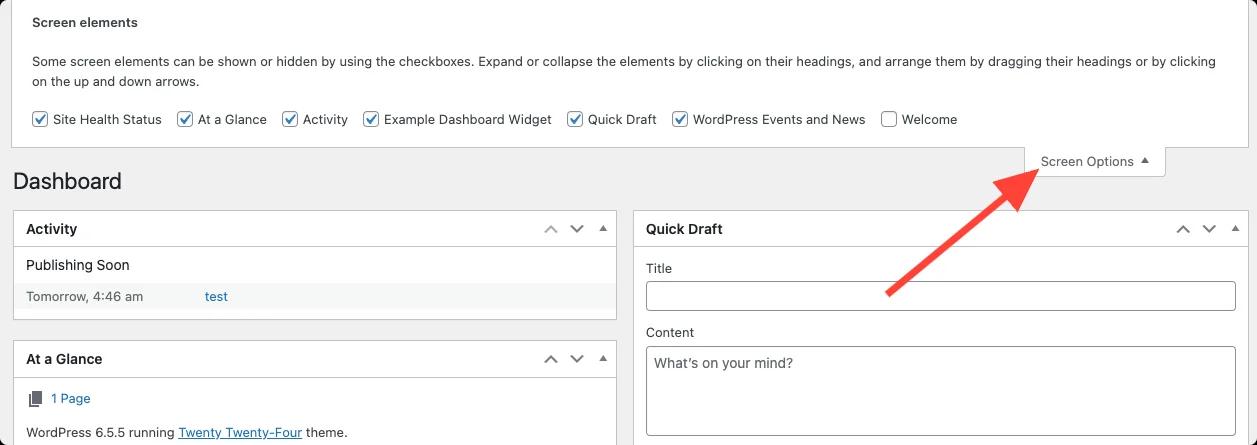
At the top-right of most dashboard pages, you'll find a "Screen Options" tab.
Click it to show/hide various dashboard elements, rearrange widgets, or adjust the number of items displayed.
Drag and Drop
Many dashboard elements can be rearranged by simply dragging and dropping them.
This allows you to prioritize the information most important to you.
Remove Dashboard Widgets
Add this code to your theme's functions.php file to remove all default Dashboard widget:
1
2function wporg_remove_all_dashboard_metaboxes() {
3	// Remove Welcome panel
4	remove_action( 'welcome_panel', 'wp_welcome_panel' );
5	// Remove the rest of the dashboard widgets
6	remove_meta_box( 'dashboard_primary', 'dashboard', 'side' );
7	remove_meta_box( 'dashboard_quick_press', 'dashboard', 'side' );
8	remove_meta_box( 'health_check_status', 'dashboard', 'normal' );
9	remove_meta_box( 'dashboard_right_now', 'dashboard', 'normal' );
10	remove_meta_box( 'dashboard_activity', 'dashboard', 'normal');
11}
12add_action( 'wp_dashboard_setup', 'wporg_remove_all_dashboard_metaboxes' );
13
Reference: https://developer.wordpress.org/apis/dashboard-widgets/#removing-default-dashboard-widgets
Add Custom Dashboard Widgets
Create your own widgets with this code in functions.php:
1
2/**
3 * Add a widget to the dashboard.
4 *
5 * This function is hooked into the 'wp_dashboard_setup' action below.
6 */
7function wporg_add_dashboard_widgets() {
8	wp_add_dashboard_widget(
9		'wporg_dashboard_widget',                          // Widget slug.
10		esc_html__( 'Example Dashboard Widget', 'wporg' ), // Title.
11		'wporg_dashboard_widget_render'                    // Display function.
12	);
13}
14add_action( 'wp_dashboard_setup', 'wporg_add_dashboard_widgets' );
15
16/**
17 * Create the function to output the content of our Dashboard Widget.
18 */
19function wporg_dashboard_widget_render() {
20	// Display whatever you want to show.
21	esc_html_e( "Howdy! I'm a great Dashboard Widget.", "wporg" );
22}
23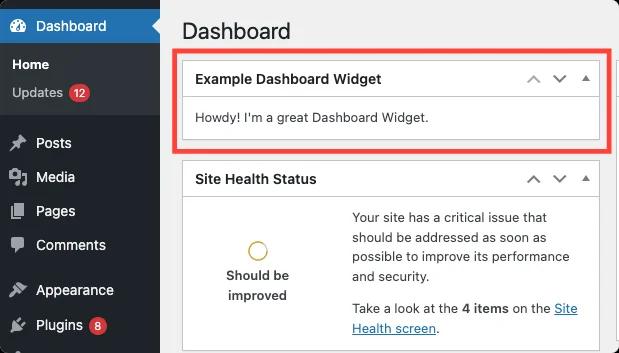
Customize the Admin Color Scheme
Users can choose from predefined color schemes in their profile settings.
To add a custom color scheme, use the wp_admin_css_color() function in your theme's functions.php file.
1
2function custom_admin_color_scheme() {
3    wp_admin_css_color(
4        'my_custom_scheme', // Unique slug for your scheme
5        __('My Custom Scheme', 'textdomain'), // Display name
6        get_template_directory_uri() . '/my_custom_scheme.css', // Path to your CSS file
7        array('#737373', '#ffcd00', '#c7a589', '#9ea476'), // Color values
8        array('base' => '#f3f2f1', 'focus' => '#fff', 'current' => '#fff') // Additional styles
9    );
10}
11add_action('admin_init', 'custom_admin_color_scheme');
12
We are not done yet. Now to get the final output, create an Admin color scheme CSS file. Checkout the following CSS code, and feel free to customize the color based on your demand. The following CSS is a minified version, you can uniminify this code and customize it.
1
2#adminmenu,
3#adminmenuback,
4#adminmenuwrap,
5#wpadminbar {
6    background: #737373;
7}
8body {
9    background: #fff;
10}
11a {
12    color: #0073aa;
13}
14.wp-core-ui input[type="reset"]:active,
15.wp-core-ui input[type="reset"]:hover,
16a:active,
17a:focus,
18a:hover {
19    color: #0096dd;
20}
21#post-body #visibility:before,
22#post-body .misc-pub-post-status:before,
23#post-body .misc-pub-revisions:before,
24.curtime #timestamp:before,
25span.wp-media-buttons-icon:before {
26    color: currentColor;
27}
28input[type="checkbox"]:checked::before {
29    content: url("data:yourimagehere");
30}
31input[type="radio"]:checked::before {
32    background: #ffcd00;
33}
34input[type="checkbox"]:focus,
35input[type="color"]:focus,
36input[type="date"]:focus,
37input[type="datetime-local"]:focus,
38input[type="datetime"]:focus,
39input[type="email"]:focus,
40input[type="month"]:focus,
41input[type="number"]:focus,
42input[type="password"]:focus,
43input[type="radio"]:focus,
44input[type="search"]:focus,
45input[type="tel"]:focus,
46input[type="text"]:focus,
47input[type="time"]:focus,
48input[type="url"]:focus,
49input[type="week"]:focus,
50select:focus,
51textarea:focus {
52    border-color: #585858;
53    box-shadow: 0 0 0 1px #585858;
54}
55.wp-core-ui .button,
56.wp-core-ui .button-secondary {
57    color: #c7a589;
58    border-color: #c7a589;
59}
60.wp-core-ui .button-secondary:focus,
61.wp-core-ui .button-secondary:hover,
62.wp-core-ui .button.focus,
63.wp-core-ui .button.hover,
64.wp-core-ui .button:focus,
65.wp-core-ui .button:hover {
66    border-color: #bf9878;
67    color: #bf9878;
68}
69.wp-core-ui .button-secondary:focus,
70.wp-core-ui .button.focus,
71.wp-core-ui .button:focus {
72    border-color: #c7a589;
73    color: #bf9878;
74    box-shadow: 0 0 0 1px #c7a589;
75}
76.wp-core-ui .button:active {
77    background: #bf9878;
78    border-color: #bf9878;
79}
80.wp-core-ui .button.active,
81.wp-core-ui .button.active:focus,
82.wp-core-ui .button.active:hover {
83    border-color: #bf9878;
84    color: #bf9878;
85    box-shadow: inset 0 2px 5px -3px #bf9878;
86}
87.wp-core-ui .button-primary {
88    background: #c7a589;
89    border-color: #c7a589;
90    color: #fff;
91}
92.wp-core-ui .button-primary:focus,
93.wp-core-ui .button-primary:hover {
94    background: #ccad93;
95    border-color: #c29d7f;
96    color: #fff;
97}
98.wp-core-ui .button-primary:focus {
99    box-shadow: 0 0 0 1px #fff, 0 0 0 3px #c7a589;
100}
101.wp-core-ui .button-primary:active {
102    background: #bf9878;
103    border-color: #bf9878;
104    color: #fff;
105}
106.wp-core-ui .button-primary.active,
107.wp-core-ui .button-primary.active:focus,
108.wp-core-ui .button-primary.active:hover {
109    background: #c7a589;
110    color: #fff;
111    border-color: #ae7d55;
112    box-shadow: inset 0 2px 5px -3px #37271a;
113}
114.wp-core-ui .button-primary.button-primary-disabled,
115.wp-core-ui .button-primary.disabled,
116.wp-core-ui .button-primary:disabled,
117.wp-core-ui .button-primary[disabled] {
118    color: #d1ccc7 !important;
119    background: #ba906d !important;
120    border-color: #ba906d !important;
121    text-shadow: none !important;
122}
123.wp-core-ui .button-group > .button.active {
124    border-color: #c7a589;
125}
126.wp-core-ui .wp-ui-primary,
127.wrap .add-new-h2:hover,
128.wrap .page-title-action:hover,
129body.more-filters-opened .more-filters {
130    color: #f2ff8d;
131    background-color: #737373;
132}
133.view-switch a.current:before,
134.wp-core-ui .wp-ui-text-primary {
135    color: #737373;
136}
137#adminmenu a:hover,
138#adminmenu li.menu-top:hover,
139#adminmenu li.opensub > a.menu-top,
140#adminmenu li > a.menu-top:focus,
141.wp-core-ui .wp-ui-highlight {
142    color: #f2ff8d;
143    background-color: #585858;
144}
145#adminmenu .wp-has-current-submenu .wp-submenu a:focus,
146#adminmenu .wp-has-current-submenu .wp-submenu a:hover,
147#adminmenu .wp-has-current-submenu.opensub .wp-submenu a:focus,
148#adminmenu .wp-has-current-submenu.opensub .wp-submenu a:hover,
149#adminmenu .wp-has-current-submenu.opensub .wp-submenu li.current a:focus,
150#adminmenu .wp-has-current-submenu.opensub .wp-submenu li.current a:hover,
151#adminmenu .wp-submenu a:focus,
152#adminmenu .wp-submenu a:hover,
153#adminmenu .wp-submenu li.current a:focus,
154#adminmenu .wp-submenu li.current a:hover,
155#adminmenu a.wp-has-current-submenu:focus + .wp-submenu a:focus,
156#adminmenu a.wp-has-current-submenu:focus + .wp-submenu a:hover,
157#adminmenu a.wp-has-current-submenu:focus + .wp-submenu li.current a:focus,
158#adminmenu a.wp-has-current-submenu:focus + .wp-submenu li.current a:hover,
159#collapse-button:focus,
160#collapse-button:hover,
161#wpadminbar #wp-admin-bar-user-info a:hover .display-name,
162#wpadminbar .menupop .menupop > .ab-item:hover:before,
163#wpadminbar .quicklinks .ab-sub-wrapper .menupop.hover > a,
164#wpadminbar .quicklinks .ab-sub-wrapper .menupop.hover > a .blavatar,
165#wpadminbar .quicklinks .menupop ul li a:focus,
166#wpadminbar .quicklinks .menupop ul li a:focus strong,
167#wpadminbar .quicklinks .menupop ul li a:hover,
168#wpadminbar .quicklinks .menupop ul li a:hover strong,
169#wpadminbar .quicklinks .menupop.hover ul li a:focus,
170#wpadminbar .quicklinks .menupop.hover ul li a:hover,
171#wpadminbar .quicklinks li a:focus .blavatar,
172#wpadminbar .quicklinks li a:hover .blavatar,
173#wpadminbar li #adminbarsearch.adminbar-focused:before,
174#wpadminbar li .ab-item:focus .ab-icon:before,
175#wpadminbar li .ab-item:focus:before,
176#wpadminbar li a:focus .ab-icon:before,
177#wpadminbar li.hover .ab-icon:before,
178#wpadminbar li.hover .ab-item:before,
179#wpadminbar li:hover #adminbarsearch:before,
180#wpadminbar li:hover .ab-icon:before,
181#wpadminbar li:hover .ab-item:before,
182#wpadminbar.mobile .quicklinks .ab-icon:before,
183#wpadminbar.mobile .quicklinks .ab-item:before,
184#wpadminbar.nojs .quicklinks .menupop:hover ul li a:focus,
185#wpadminbar.nojs .quicklinks .menupop:hover ul li a:hover,
186#wpadminbar:not(.mobile) > #wp-toolbar a:focus span.ab-label,
187#wpadminbar:not(.mobile) > #wp-toolbar li.hover span.ab-label,
188#wpadminbar:not(.mobile) > #wp-toolbar li:hover span.ab-label,
189.folded #adminmenu .wp-has-current-submenu .wp-submenu a:focus,
190.folded #adminmenu .wp-has-current-submenu .wp-submenu a:hover,
191.theme-browser .theme.add-new-theme a:focus span:after,
192.theme-browser .theme.add-new-theme a:hover span:after,
193.wp-core-ui .wp-ui-text-highlight,
194.wp-pointer .wp-pointer-content h3:before {
195    color: #585858;
196}
197#wpadminbar #wp-admin-bar-recovery-mode,
198.wp-core-ui .wp-ui-notification {
199    color: #f2ff8d;
200    background-color: #ccaf0b;
201}
202.view-switch a:hover:before,
203.wp-core-ui .wp-ui-text-notification {
204    color: #ccaf0b;
205}
206#adminmenu div.wp-menu-image:before,
207#collapse-button,
208#wpadminbar #adminbarsearch:before,
209#wpadminbar .ab-icon,
210#wpadminbar .ab-icon:before,
211#wpadminbar .ab-item:after,
212#wpadminbar .ab-item:before,
213#wpadminbar .menupop .menupop > .ab-item:before,
214#wpadminbar .quicklinks li .blavatar,
215#wpadminbar.mobile .quicklinks .hover .ab-icon:before,
216#wpadminbar.mobile .quicklinks .hover .ab-item:before,
217.wp-core-ui .wp-ui-text-icon,
218.wp-responsive-open #wpadminbar #wp-admin-bar-menu-toggle .ab-icon:before,
219div#wp-responsive-toggle a:before {
220    color: #f3f1f1;
221}
222#adminmenu .wp-has-current-submenu.opensub .wp-submenu li.current a,
223#adminmenu .wp-submenu li.current a,
224#adminmenu a,
225#adminmenu a.current:hover div.wp-menu-image:before,
226#adminmenu a.wp-has-current-submenu:focus + .wp-submenu li.current a,
227#adminmenu li a:focus div.wp-menu-image:before,
228#adminmenu li.menu-top:hover div.wp-menu-image:before,
229#adminmenu li.opensub div.wp-menu-image:before,
230#adminmenu li.opensub > a.menu-top div.wp-menu-image:before,
231#adminmenu li.wp-has-current-submenu a:focus div.wp-menu-image:before,
232#adminmenu li.wp-has-current-submenu div.wp-menu-image:before,
233#adminmenu li.wp-has-current-submenu.opensub div.wp-menu-image:before,
234#adminmenu li:hover div.wp-menu-image:before,
235#wpadminbar #wp-admin-bar-recovery-mode .ab-item,
236#wpadminbar #wp-admin-bar-recovery-mode a.ab-item,
237#wpadminbar #wp-admin-bar-user-info .display-name,
238#wpadminbar .ab-item,
239#wpadminbar a.ab-item,
240#wpadminbar:not(.mobile) li:hover #adminbarsearch:before,
241#wpadminbar:not(.mobile) li:hover .ab-icon:before,
242#wpadminbar:not(.mobile) li:hover .ab-item:after,
243#wpadminbar:not(.mobile) li:hover .ab-item:before,
244#wpadminbar > #wp-toolbar span.ab-label,
245#wpadminbar > #wp-toolbar span.noticon,
246.ie8 #adminmenu li.opensub div.wp-menu-image:before,
247.widgets-chooser li.widgets-chooser-selected:before,
248.widgets-chooser li.widgets-chooser-selected:focus:before,
249body.more-filters-opened .more-filters:before,
250body.more-filters-opened .more-filters:focus:before,
251body.more-filters-opened .more-filters:hover:before {
252    color: #f2ff8d;
253}
254.about-wrap .nav-tab-active,
255.nav-tab-active,
256.nav-tab-active:hover {
257    background-color: #fff;
258    border-bottom-color: #fff;
259}
260#adminmenu .wp-has-current-submenu .wp-submenu,
261#adminmenu .wp-has-current-submenu.opensub .wp-submenu,
262#adminmenu .wp-submenu,
263#adminmenu a.wp-has-current-submenu:focus + .wp-submenu,
264#wpadminbar .menupop .ab-sub-wrapper,
265.folded #adminmenu .wp-has-current-submenu .wp-submenu,
266.wp-responsive-open #wpadminbar #wp-admin-bar-menu-toggle a {
267    background: #616161;
268}
269#adminmenu li.wp-has-submenu.wp-not-current-submenu.opensub:hover:after {
270    border-right-color: #616161;
271}
272#adminmenu .wp-has-current-submenu .wp-submenu a,
273#adminmenu .wp-has-current-submenu.opensub .wp-submenu a,
274#adminmenu .wp-submenu .wp-submenu-head,
275#adminmenu .wp-submenu a,
276#adminmenu a.wp-has-current-submenu:focus + .wp-submenu a,
277#wpadminbar #wp-admin-bar-user-info .username,
278#wpadminbar .ab-submenu .ab-item,
279#wpadminbar .quicklinks .menupop ul li a,
280#wpadminbar .quicklinks .menupop.hover ul li a,
281#wpadminbar.nojs .quicklinks .menupop:hover ul li a,
282.folded #adminmenu .wp-has-current-submenu .wp-submenu a {
283    color: #ccd585;
284}
285ul#adminmenu a.wp-has-current-submenu:after,
286ul#adminmenu > li.current > a.current:after {
287    border-right-color: #fff;
288}
289#adminmenu li.current a.menu-top,
290#adminmenu li.wp-has-current-submenu .wp-submenu .wp-submenu-head,
291#adminmenu li.wp-has-current-submenu a.wp-has-current-submenu,
292.folded #adminmenu li.current.menu-top {
293    color: #f2ff8d;
294    background: #585858;
295}
296#adminmenu .awaiting-mod,
297#adminmenu .update-plugins {
298    color: #f2ff8d;
299    background: #ccaf0b;
300}
301#adminmenu li a.wp-has-current-submenu .update-plugins,
302#adminmenu li.current a .awaiting-mod,
303#adminmenu li.menu-top:hover > a .update-plugins,
304#adminmenu li:hover a .awaiting-mod {
305    color: #f2ff8d;
306    background: #616161;
307}
308#wpadminbar {
309    color: #f2ff8d;
310}
311#wpadminbar .ab-top-menu > li.menupop.hover > .ab-item,
312#wpadminbar.nojq .quicklinks .ab-top-menu > li > .ab-item:focus,
313#wpadminbar.nojs .ab-top-menu > li.menupop:hover > .ab-item,
314#wpadminbar:not(.mobile) .ab-top-menu > li:hover > .ab-item,
315#wpadminbar:not(.mobile) .ab-top-menu > li > .ab-item:focus {
316    color: #585858;
317    background: #616161;
318}
319#wpadminbar .quicklinks .menupop ul.ab-sub-secondary,
320#wpadminbar .quicklinks .menupop ul.ab-sub-secondary .ab-submenu {
321    background: #858585;
322}
323#wpadminbar > #wp-toolbar > #wp-admin-bar-top-secondary > #wp-admin-bar-search #adminbarsearch input.adminbar-input:focus {
324    color: #f2ff8d;
325    background: #858585;
326}
327#wpadminbar .ab-top-menu > #wp-admin-bar-recovery-mode.hover > .ab-item,
328#wpadminbar.nojq .quicklinks .ab-top-menu > #wp-admin-bar-recovery-mode > .ab-item:focus,
329#wpadminbar:not(.mobile) .ab-top-menu > #wp-admin-bar-recovery-mode:hover > .ab-item,
330#wpadminbar:not(.mobile) .ab-top-menu > #wp-admin-bar-recovery-mode > .ab-item:focus {
331    color: #f2ff8d;
332    background-color: #b89e0a;
333}
334#wpadminbar .quicklinks li#wp-admin-bar-my-account.with-avatar > a img {
335    border-color: #858585;
336    background-color: #858585;
337}
338.wp-pointer .wp-pointer-content h3 {
339    background-color: #585858;
340    border-color: #4b4b4b;
341}
342.wp-pointer.wp-pointer-top .wp-pointer-arrow,
343.wp-pointer.wp-pointer-top .wp-pointer-arrow-inner,
344.wp-pointer.wp-pointer-undefined .wp-pointer-arrow,
345.wp-pointer.wp-pointer-undefined .wp-pointer-arrow-inner {
346    border-bottom-color: #585858;
347}
348.media-item .bar,
349.media-progress-bar div {
350    background-color: #585858;
351}
352.details.attachment {
353    box-shadow: inset 0 0 0 3px #fff, inset 0 0 0 7px #585858;
354}
355.attachment.details .check {
356    background-color: #585858;
357    box-shadow: 0 0 0 1px #fff, 0 0 0 2px #585858;
358}
359.media-selection .attachment.selection.details .thumbnail {
360    box-shadow: 0 0 0 1px #fff, 0 0 0 3px #585858;
361}
362.mce-container.mce-menu .mce-menu-item-normal.mce-active,
363.mce-container.mce-menu .mce-menu-item-preview.mce-active,
364.mce-container.mce-menu .mce-menu-item.mce-selected,
365.mce-container.mce-menu .mce-menu-item:focus,
366.mce-container.mce-menu .mce-menu-item:hover,
367.theme-browser .theme.active .theme-name,
368.theme-browser .theme.add-new-theme a:focus:after,
369.theme-browser .theme.add-new-theme a:hover:after {
370    background: #585858;
371}
372.theme-filter.current,
373.theme-section.current {
374    border-bottom-color: #737373;
375}
376.widgets-chooser li.widgets-chooser-selected,
377body.more-filters-opened .more-filters:focus,
378body.more-filters-opened .more-filters:hover {
379    background-color: #585858;
380    color: #f2ff8d;
381}
382.wp-responsive-open div#wp-responsive-toggle a {
383    border-color: transparent;
384    background: #585858;
385}
386
387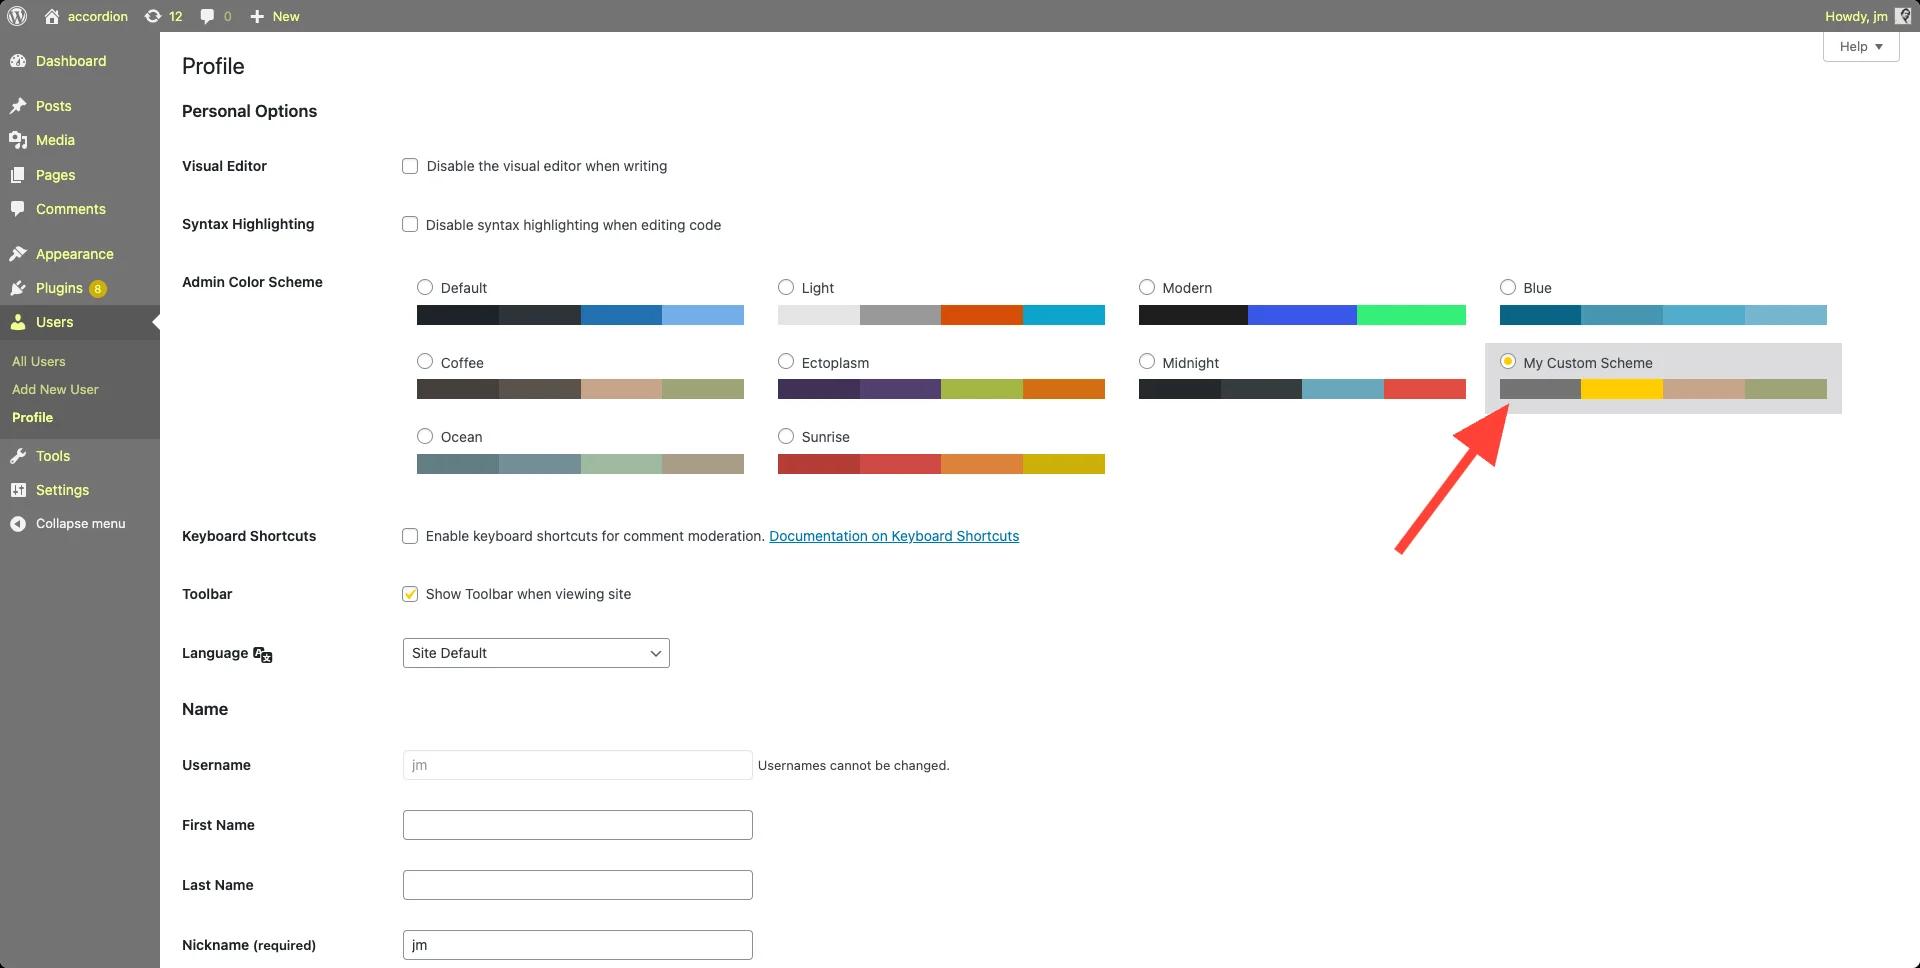
Modify the Admin Footer
Change the admin footer text with this code:
1
2function custom_admin_footer() {
3    echo 'Powered by <a href="http://www.wordpress.org" rel="nofollow noopener">WordPress</a> | Customized by Your Name';
4}
5add_filter('admin_footer_text', 'custom_admin_footer');
6
Hide Admin Menu Items
You can hide all unwanted admin menu items by the following line of code. But as a recommendation, you can check out the Admin Menu Editor by WP Adminify, which will help you to hide admin menu items based on their user role, change text, icons, and create a custom menu. For a worked example, see how to hide the Comments menu from the WordPress admin panel with both the code snippet and the plugin.
1
2function remove_menu_items() {
3    remove_menu_page('edit.php'); // Removes Posts
4    remove_menu_page('edit-comments.php'); // Removes Comments
5}
6add_action('admin_menu', 'remove_menu_items');
7
Custom CSS
Add custom CSS to style your dashboard:
1
2function custom_admin_styles() {
3    echo '<style>#your_CSS_here</style>';
4}
5add_action('admin_head', 'custom_admin_styles');
6
Related Reading
- Admin Menu Editor - Rearrange & hide menu items
- Dashboard UI Templates - 9 pre-built designs
- Custom Dashboard Widgets - Add welcome panels
- White Label WordPress - Rebrand for clients
- Login Page Customizer - Brand your login
Role-Based Dashboards for Clients and Teams
A custom WordPress dashboard gets far more useful the moment you tailor it per user role. An administrator needs everything; an editor needs posts and media; your client usually needs a simple, branded client dashboard that can't break anything. When you customize your WordPress dashboard around roles, support requests drop and the whole content workflow gets faster.
Three building blocks make this work. First, the admin menu editor lets you hide admin menu items by user role, so each role sees only what it needs. Second, custom dashboard widgets replace the default screens with role-specific welcome panels, onboarding notes for editors, support contacts for clients. Third, the white label module re-brands the admin bar, login page and footer, which matters when you create a custom WordPress dashboard for client handoffs. For the complete agency playbook on rebranding every corner of wp-admin, read our white label WordPress guide.
If you're comparing tools for this, the same role-based approach is what separates full dashboard suites from single-purpose plugins, see our WP Adminify vs Ultimate Dashboard comparison for how the two handle roles, widgets and white labeling. And unlike page builder templates that only restyle the frontend, dashboard customization changes the workspace your team actually works in every day.
How Do You Customize the WordPress Admin Dashboard Step by Step? (Updated July 2026)
Open Screen Options on the dashboard home to hide or reorder panels, set your colour scheme under Users → Profile, then add an admin plugin when you need menu editing, branding or per-role views. The table below shows exactly where each setting lives on any WordPress site.
Where does each dashboard setting live?
Most people lose time hunting for the right screen rather than making the change. Use this as a lookup table: the middle column is what ships with the default WordPress dashboard, the right column is the equivalent screen in WP Adminify when the built-in route needs code.
| What you want to change | Built-in WordPress location | With WP Adminify |
|---|---|---|
| Hide or reorder dashboard widgets | Dashboard → Screen Options (top right), then drag the panels | WP Adminify → Custom Dashboard Widgets |
| Change admin colours / dark mode | Users → Profile → Admin Color Scheme | WP Adminify Option Panel → Light/Dark mode |
| Rename, reorder or hide sidebar menu items per user role | remove_menu_page() in functions.php | WP Adminify → Admin Menu |
| Replace the WordPress logo and admin footer text | Custom filters in functions.php | WP Adminify Option Panel → White Label |
| Redesign the WordPress login page | login_enqueue_scripts hook plus custom CSS | WP Adminify → Login Customizer |
| Change the columns in post, page and user list tables | manage_posts_columns filter | WP Adminify → Admin Columns |
| Build custom admin pages or a client dashboard | add_menu_page() in code | WP Adminify → UI Templates |
How do you create a custom WordPress dashboard for a client in 6 steps?
A client-ready admin area takes about fifteen minutes. Work in this order, layout first, permissions second, branding last, so you are not re-hiding menu items after you have already set roles.
- Strip the default dashboard. Log in, open Screen Options on the Dashboard home and untick WordPress Events, Activity and Quick Draft. This alone removes most of the noise from the WordPress admin area.
- Add the panels the client actually needs. A support link, a how-to video or your contact details. Use
wp_add_dashboard_widget()in code, or add them from Custom Dashboard Widgets if you would rather not touch PHP. - Trim the sidebar per user role. Hide Plugins, Tools and Settings from editors and clients so they cannot break the site. If items vanish for the wrong people afterwards, see WordPress admin menu not showing.
- Tidy the admin bar. Remove the WordPress logo menu and any plugin entries the client will never use. The WordPress admin bar editor lets you hide, reorder, and add items without code.
- Apply your branding. Swap the logo, admin footer text and colours for the agency's. This is the step that turns a generic install into something you can hand over, see the white label module for what can be rebranded.
- Customise the login page. The login screen is the first thing the client sees, so match it to the dashboard you just built.
Do you need a plugin to customize the WordPress admin dashboard?
No. Steps 1 and 4 are built into WordPress, and every other step can be written by hand with the hooks listed in the table. A plugin is worth it once you are repeating the same work across several sites, or when per-role rules and branding would otherwise mean maintaining custom code on every WordPress site you manage.
If you are choosing between tools, we compare the options side by side in best WordPress dashboard plugins, narrow it to the sidebar in best WordPress admin menu plugin, and put WP Adminify head to head with Ultimate Dashboard. Feature limits per plan are on the pricing page.
WordPress Dashboard Customization, FAQs
How do I customize my WordPress dashboard?
Use Screen Options to show or hide widgets, drag and drop to rearrange, or install WP Adminify for full control over colors, menus, and branding.
What is the best dashboard customization plugin?
WP Adminify offers 60+ features including menu editor, white label, custom widgets, dark mode, and login page customization.
Can I create a custom dashboard for clients?
Yes. WP Adminify lets you white label the admin, hide menus per role, add custom welcome widgets, and rebrand the login page.
How do I change the WordPress dashboard theme?
WordPress has no built-in admin-theme switcher, so you change the dashboard look with a plugin. WP Adminify ships nine ready-made admin templates: open WP Adminify, pick an Adminify UI theme, then fine-tune colours, logo, and fonts. The change applies only to wp-admin, not your site's front-end theme.
Why does my WordPress dashboard look different?
Usually an admin-customization plugin or a theme is restyling wp-admin. WP Adminify, Ultimate Dashboard, or a saved admin colour scheme can replace the default look. Check Plugins for anything admin-related, and in WP Adminify switch the Adminify UI toggle off to return to the stock WordPress dashboard.
How do I hide unnecessary items from the WordPress admin?
For a quick cleanup, use Screen Options at the top right of the dashboard to hide widgets and columns. To remove menu items, meta boxes, or notices for specific user roles, use an admin plugin: WP Adminify's menu editor hides items per role so clients see only what they need.
How do I create a custom menu in the WordPress dashboard?
Use an admin menu editor to rename, reorder, hide or add items, no code needed, or register menus programmatically with add_menu_page(). The step-by-step for both methods is in our custom admin menu guide.
How do I organize pages in the WordPress dashboard?
Two features help: folders (group pages, posts and media into drag-and-drop folders) and custom admin columns (sort and filter by the fields you care about). Both are covered in the folders doc and the admin columns editor.
How do I customise the WordPress admin dashboard?
Exactly the same way, customise (British spelling) and customize (American) mean the same thing here, and every step on this page applies. Use Screen Options and drag-and-drop for the built-in changes, or a plugin like WP Adminify when you need menu editing, custom widgets, branding, dark mode or per-role dashboards.