
Most WordPress tutorials tell you to drop a snippet into functions.php the moment you want a new screen in wp-admin. That works until the page has to actually look like something: a client welcome screen, an internal SOP hub, a branded onboarding page. Now you're writing HTML by hand inside a PHP callback. This guide takes a faster route. You'll learn how to create a custom admin page in WordPress and design it visually with Elementor, no code required, using the Admin Pages feature in WP Adminify. By the end you'll have a fully designed page living in your admin sidebar, with its own menu item, icon, and role-based access.
What is a custom admin page in WordPress?
A custom admin page is a screen that lives inside the WordPress dashboard (the wp-admin area) with its own item in the left-hand admin menu. Unlike a regular post or page, it's only visible to logged-in users and sits behind the login wall. Developers usually register these pages with the add_menu_page() and add_submenu_page() functions, then render the content inside a callback.
The catch is that the callback expects you to echo raw markup. No visual editor, no layout system, no styling out of the box. So while spinning up a blank admin page takes a few lines of PHP, building one that actually looks professional means writing and maintaining your own HTML and CSS. That's the gap a page builder closes.
Why build a custom admin page?
Custom admin pages solve one specific problem: the default WordPress dashboard is generic, and your clients or teammates rarely need everything it shows. A purpose-built screen gives them exactly what they need on login.
- Client onboarding. Agencies hand off sites with a branded "Start Here" page that explains how to update content, who to contact, and where billing lives, instead of dropping clients into a raw dashboard.
- Internal documentation. Keep standard operating procedures, brand guidelines, or support contacts one click away inside the admin, where your team already works.
- Custom tools and embeds. Surface a Looker Studio report, an internal form, or a knowledge base directly in
wp-adminwithout sending people to an external tab. - White-label polish. A designed admin page reinforces your brand and makes a handed-off site feel finished instead of like a stock WordPress install.
This pairs naturally with a custom WordPress client dashboard. The admin page becomes the landing spot, and the dashboard widgets fill in the details.
Method 1: The manual code method (add_menu_page)
If you're a developer and only need a bare screen, the native WordPress approach is the registration hook. Add this to your theme's functions.php or a small plugin:
1
2<pre><code>function adminify_register_custom_page() {
3 add_menu_page(
4 'About Us', // Page title (browser tab)
5 'About Us', // Menu label in the sidebar
6 'manage_options', // Capability required to see it
7 'about-us', // Unique menu slug
8 'adminify_render_page',// Callback that prints the content
9 'dashicons-info', // Dashicon for the menu item
10 25 // Menu position
11 );
12}
13add_action('admin_menu', 'adminify_register_custom_page');
14
15function adminify_render_page() {
16 echo '<div class="wrap">';
17 echo '<h1>About Us</h1>';
18 echo '<p>Everything you build here is hand-written HTML.</p>';
19 echo '</div>';
20}</code></pre>
21This registers the menu item and prints a heading. It works, and the official add_menu_page() reference documents every argument. But look at what's missing: layout, columns, images, buttons, spacing, responsiveness. All of it is now your job, in PHP strings, edited over FTP. For anything past a text dump this gets expensive fast, and it's not something you can hand to a non-technical client to maintain.
Method 2: The no-code method with WP Adminify + Elementor
WP Adminify's Admin Pages feature registers the page for you and hands the content over to a page builder. You enable the feature, create a page, choose where it sits in the menu, then click Edit with Elementor and design it like any front-end page. WP Adminify supports Gutenberg, Elementor, Bricks, Oxygen, and Divi, so you can use whichever builder your stack already runs.
The walkthrough below uses Elementor on a WordPress 7.0 install. The whole thing takes a few minutes and never touches a code file. Here's each step.
Step 1: Enable the Admin Pages feature
From your WordPress dashboard, go to Adminify → Productivity. Scroll to the Admin Pages row and switch its toggle to YES. The description spells out what it does: "Custom Admin Pages for Creating Top Level or Sub Level Menu. Supports all page builders — Gutenberg, Elementor, Bricks, Oxygen, Divi etc." Click Save Settings in the top right.
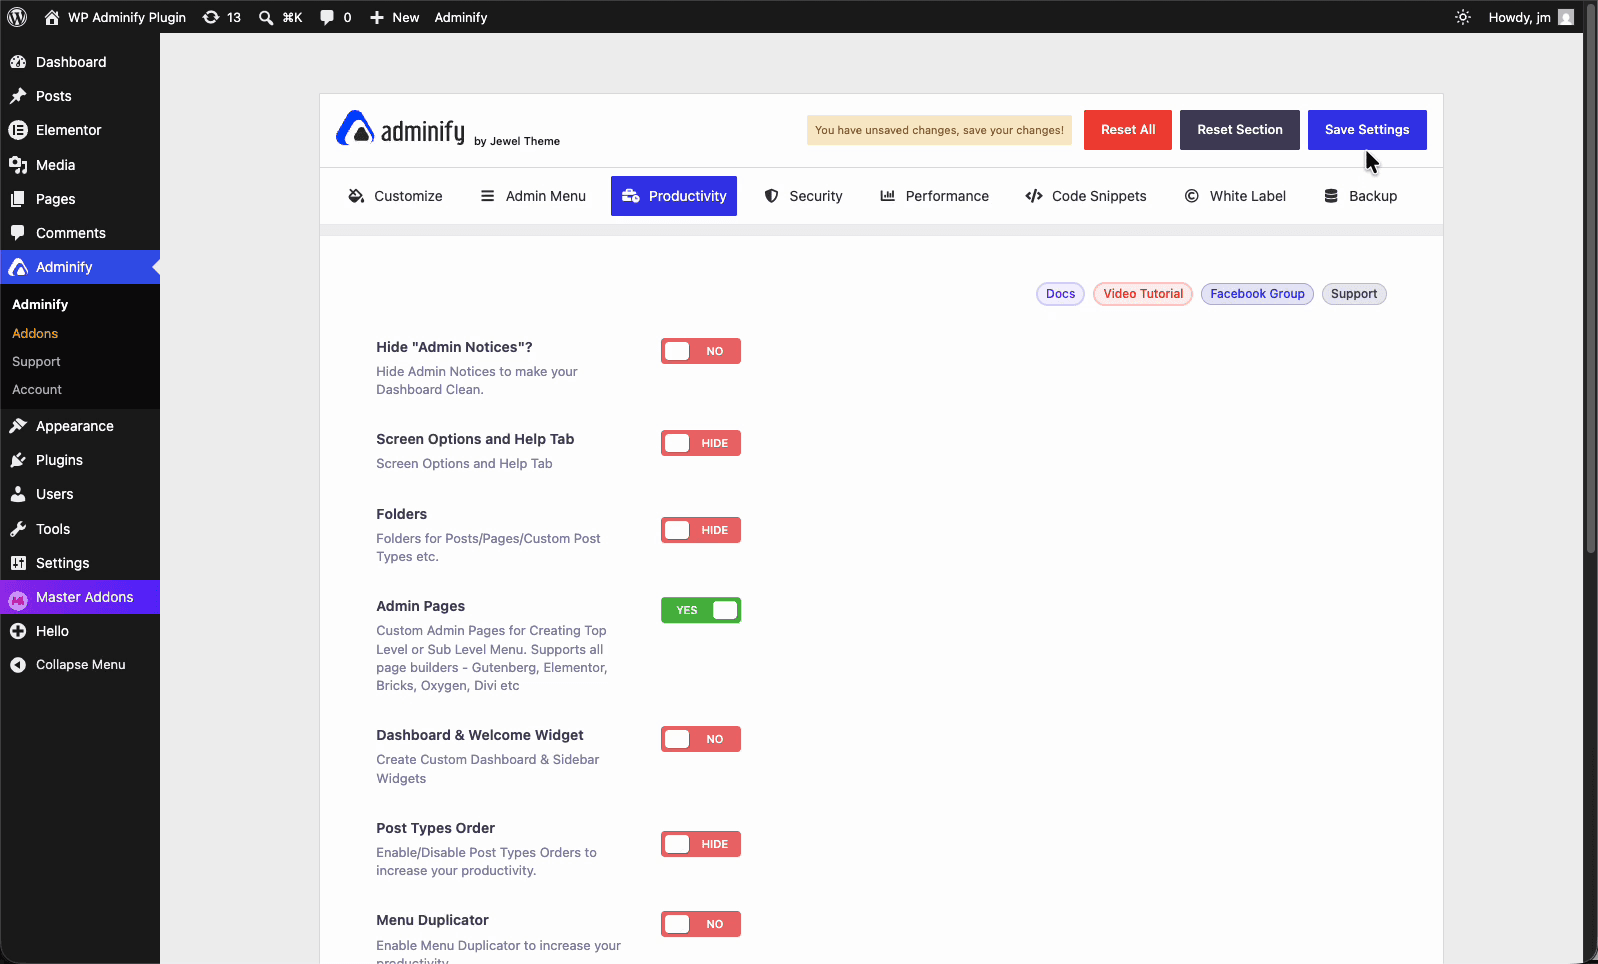
This one toggle unlocks the rest of the workflow. Until it's on, the Admin Pages screen and the Elementor integration stay hidden. The feature sits next to the other productivity tools like the admin columns editor and post duplicator, so it's worth a look at those while you're on this tab.
Step 2: Add a new admin page
Once the feature is active, open the Admin Pages screen. It starts empty, with one obvious call to action: an Add Admin Page button at the top, and a table that will list every page you create along with its menu icon, parent menu, and the user roles allowed to see it.
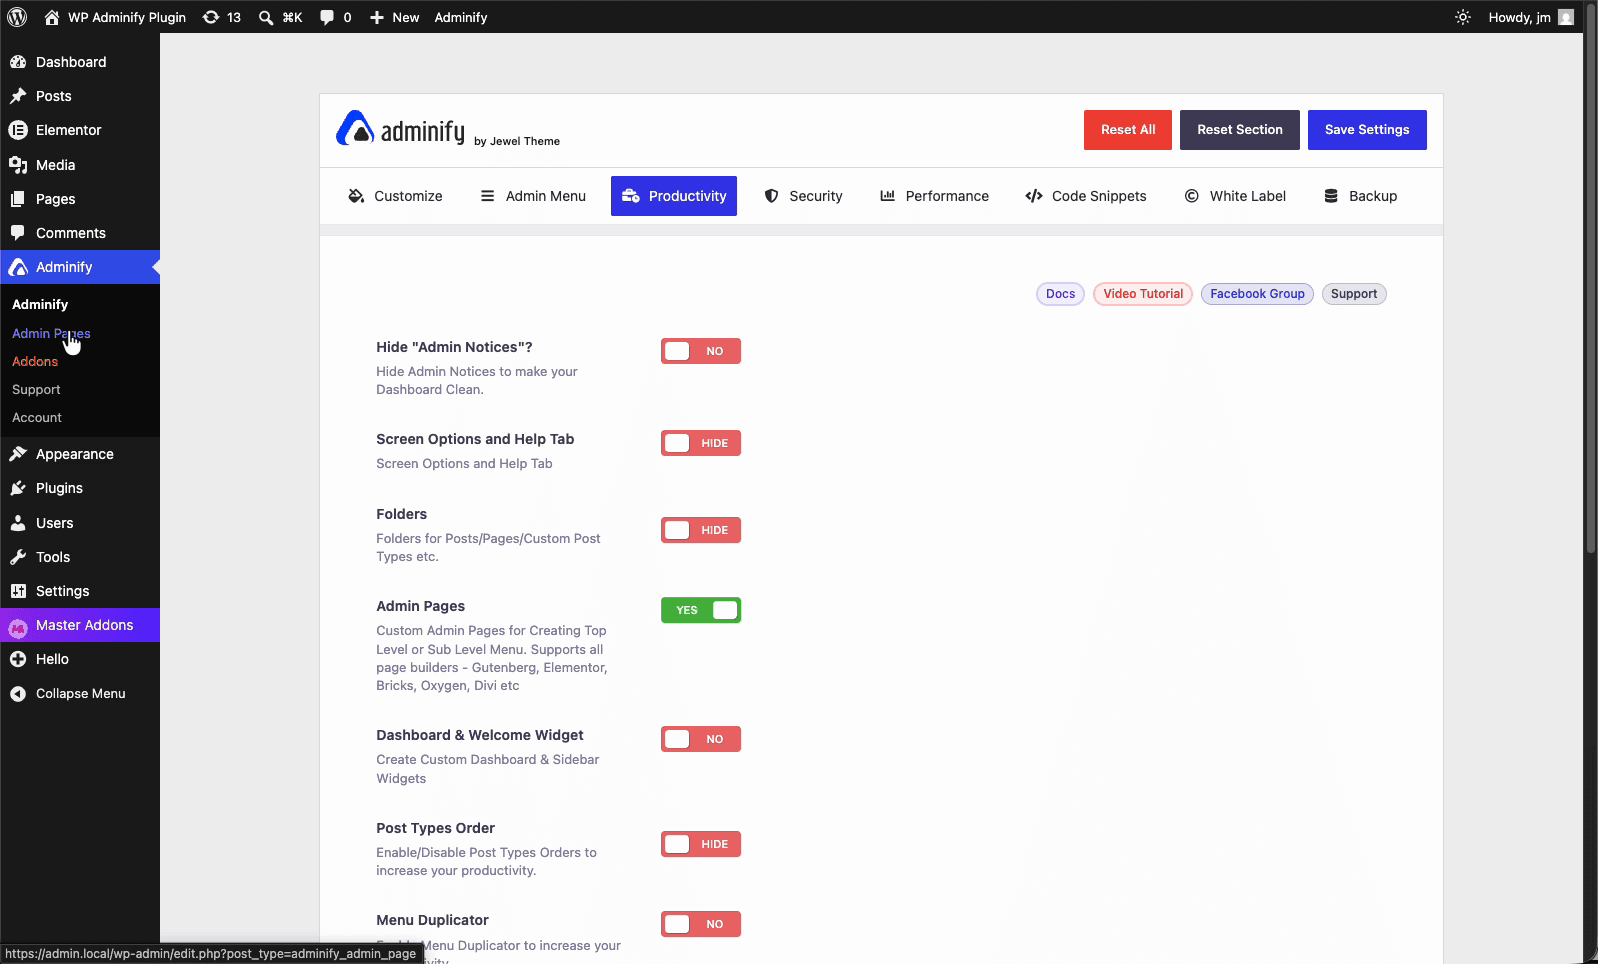
Click Add Admin Page. This opens a familiar block editor with one extra panel on the right labeled Admin Page. Give the page a title (this walkthrough builds an "About Us" page) and WP Adminify auto-generates a slug from it. Everything else is configured from that right-hand panel and the meta boxes below the editor, which we'll cover next.
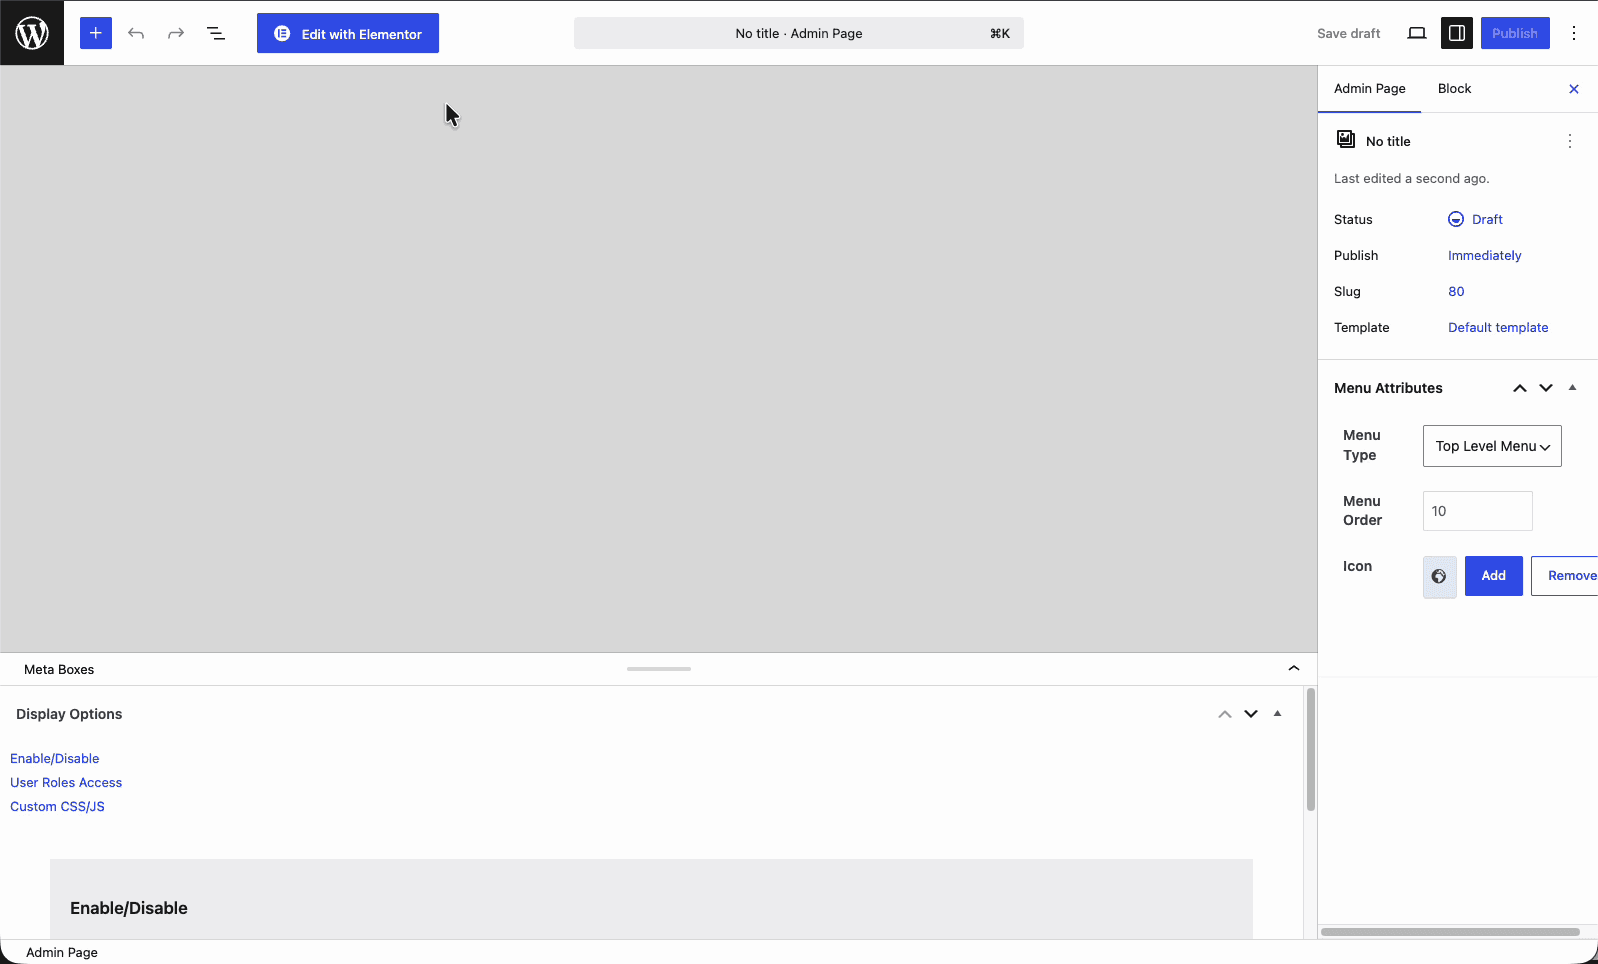
Step 3: Set the menu attributes (type, order, icon)
The Menu Attributes section in the Admin Page panel controls where and how the page shows up in your admin sidebar. Three settings matter here:
- Menu Type. Pick Top Level Menu to add a brand-new item to the main sidebar, or Sub Level Menu to nest the page under an existing menu (under Settings or Tools, say). Top level is best for pages clients should notice. Sub level keeps secondary pages tidy.
- Menu Order. A number that decides where the item sits vertically in the sidebar. Lower numbers float higher. Default is 10. Drop it to 2 or 3 to push the page near the top, above Posts and Media.
- Icon. Click Add to pick an icon for the menu item. This is the equivalent of the Dashicon you'd otherwise pass to
add_menu_page(), except you choose it visually instead of by slug.
If you're building several related screens, this is also where the structure of your custom admin menu takes shape. Use a top-level parent page and nest the rest underneath it as sub-level menus for a clean hierarchy.
Step 4: Configure display options
Below the editor sits a Meta Boxes area with a Display Options panel. This is where you strip away the default WordPress chrome so your design renders cleanly, without the usual admin framing fighting your layout. The Enable/Disable tab gives you three toggles:
- Remove Page Title hides the default heading WordPress prints at the top, so your Elementor hero section starts at the very top.
- Remove Page Margin removes the default padding around the content area, letting full-width designs reach edge to edge.
- Remove Admin Notices suppresses plugin and update notices on this page, which keeps a client-facing screen free of clutter.
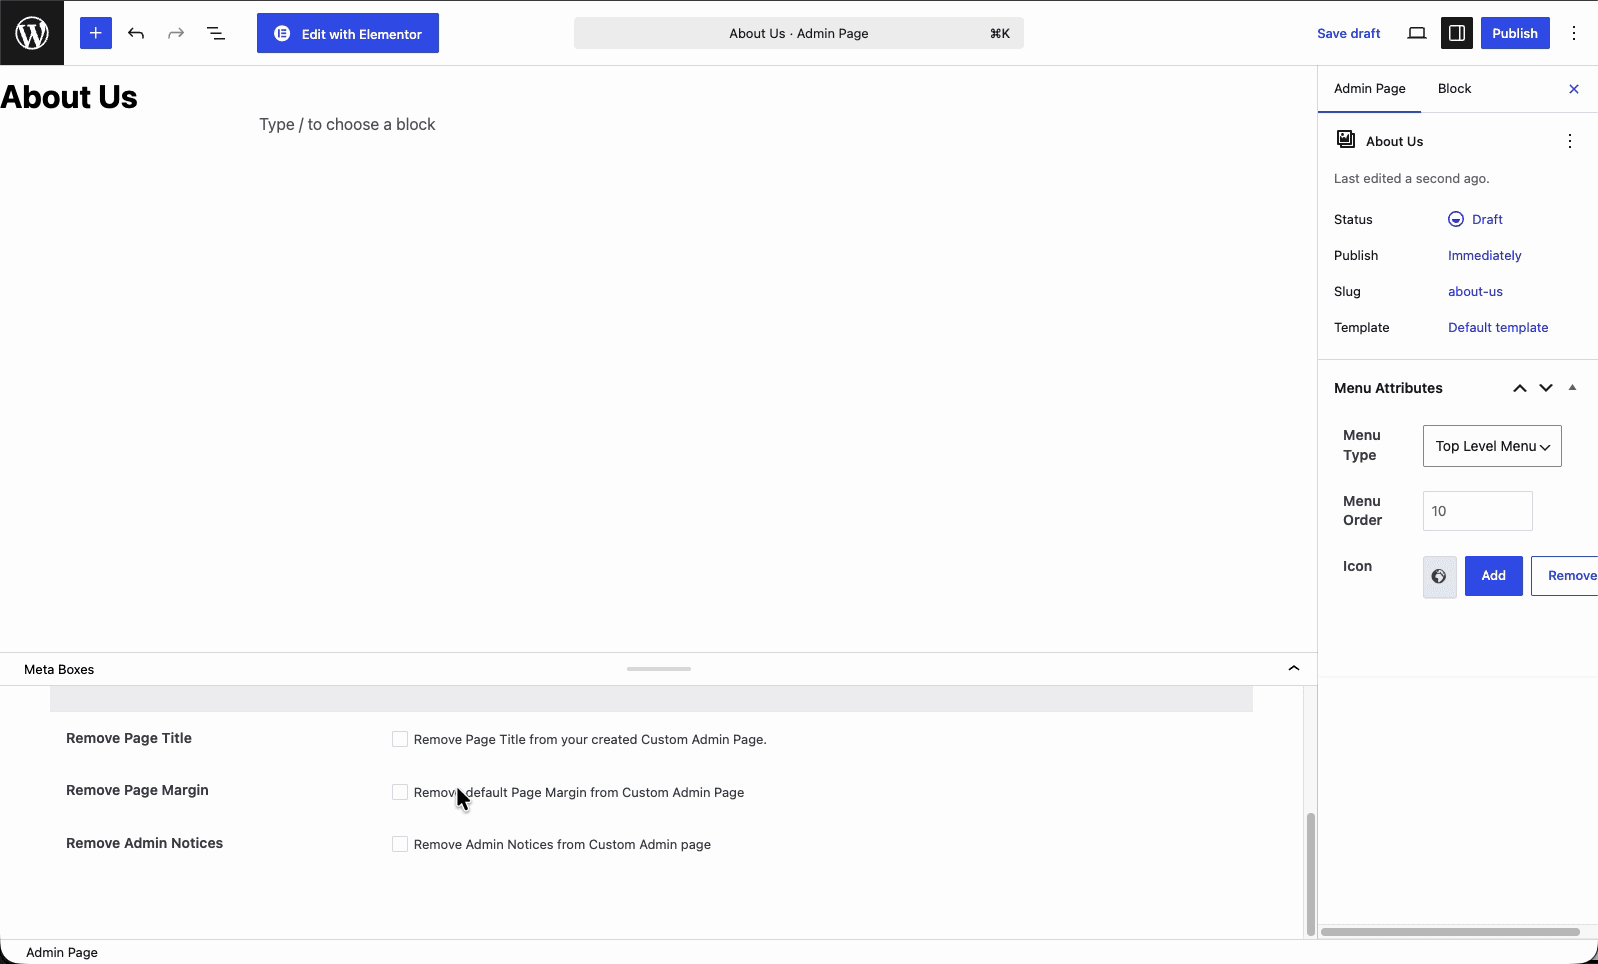
For a branded look, turn on all three. You end up with an admin page that behaves like a blank canvas rather than a standard settings screen. If you'd rather keep the native title and spacing (for an internal docs page where consistency with the rest of wp-admin matters), leave them unchecked. There's also a Custom CSS/JS tab here if you ever need to fine-tune beyond what the builder offers.
Step 5: Restrict access by user role
The User Roles Access tab decides who can see the page. In the Allow users to access this page field, add the roles that should have access. Administrator is selected by default. Add Editor, Author, or any custom role from your role setup, and remove Administrator if the page is meant only for a specific group.

This is a real advantage over the hand-coded route. With add_menu_page(), access is tied to a single capability string like manage_options, and supporting multiple roles means writing extra capability checks. Here you pick roles from a list. A client onboarding page can be visible to the client's Editor account but hidden from your agency's developer logins, and a sensitive internal page can be locked to Administrators only, all without code.
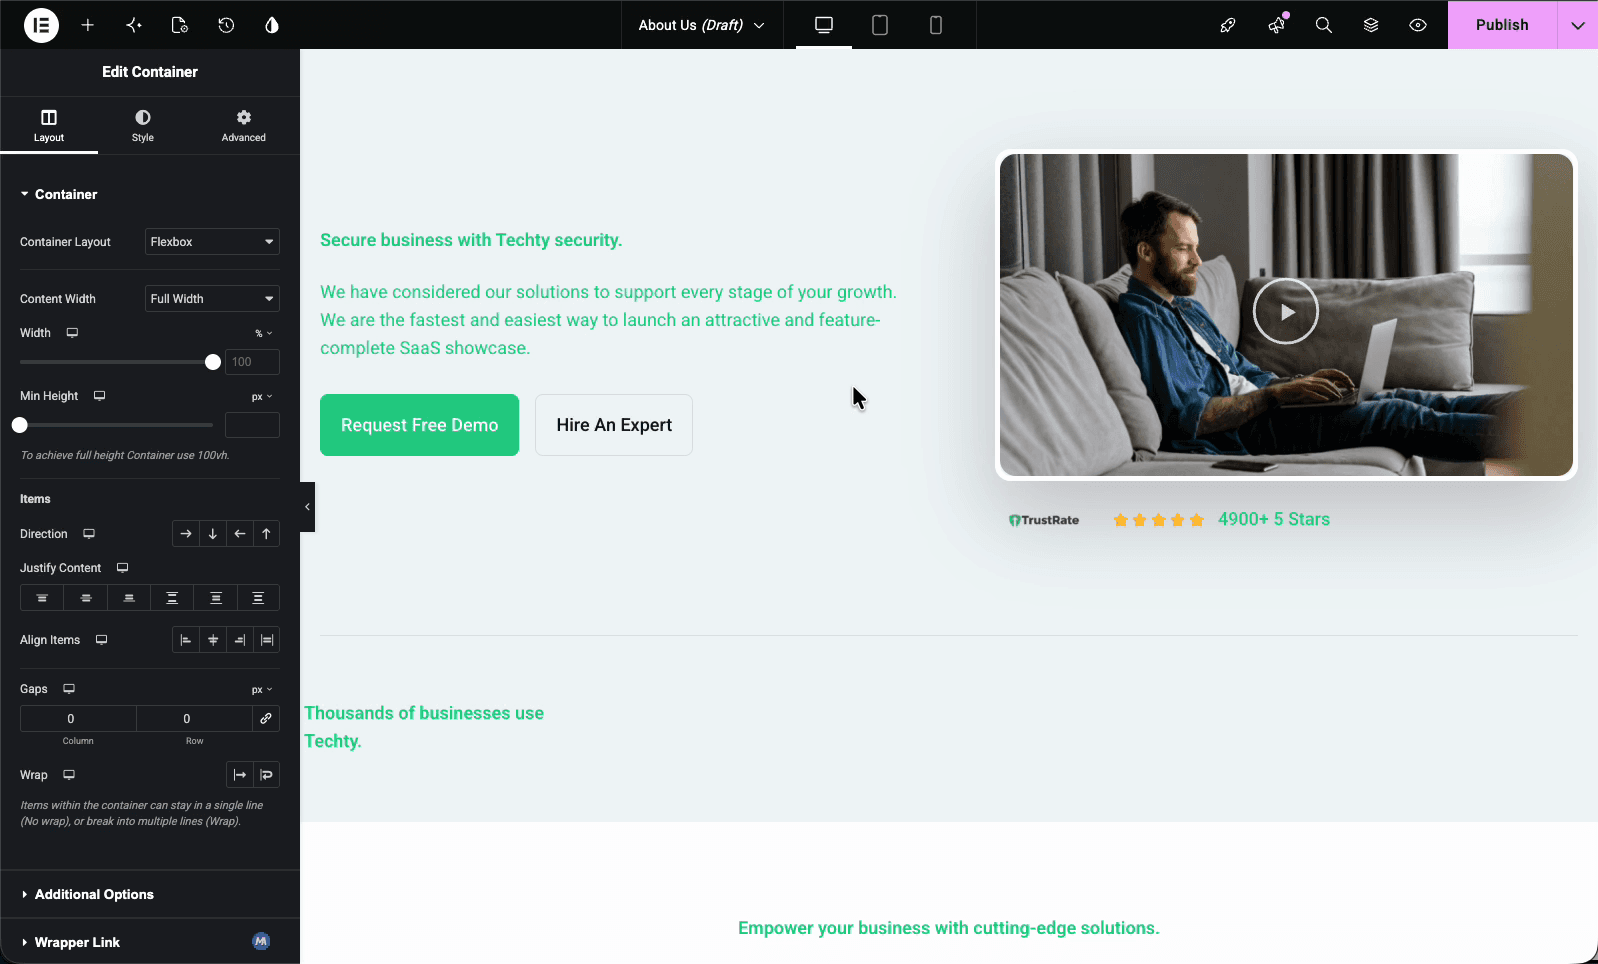
Step 6: Design the page with Elementor
Now the part that makes this worth doing. At the top of the editor, click Edit with Elementor. WP Adminify loads the page inside the Elementor editor exactly as if it were a front-end page. You get the full widget panel (containers, headings, images, buttons, videos, dividers) plus the template library, so you can drop in a pre-built block and adapt it instead of starting blank.
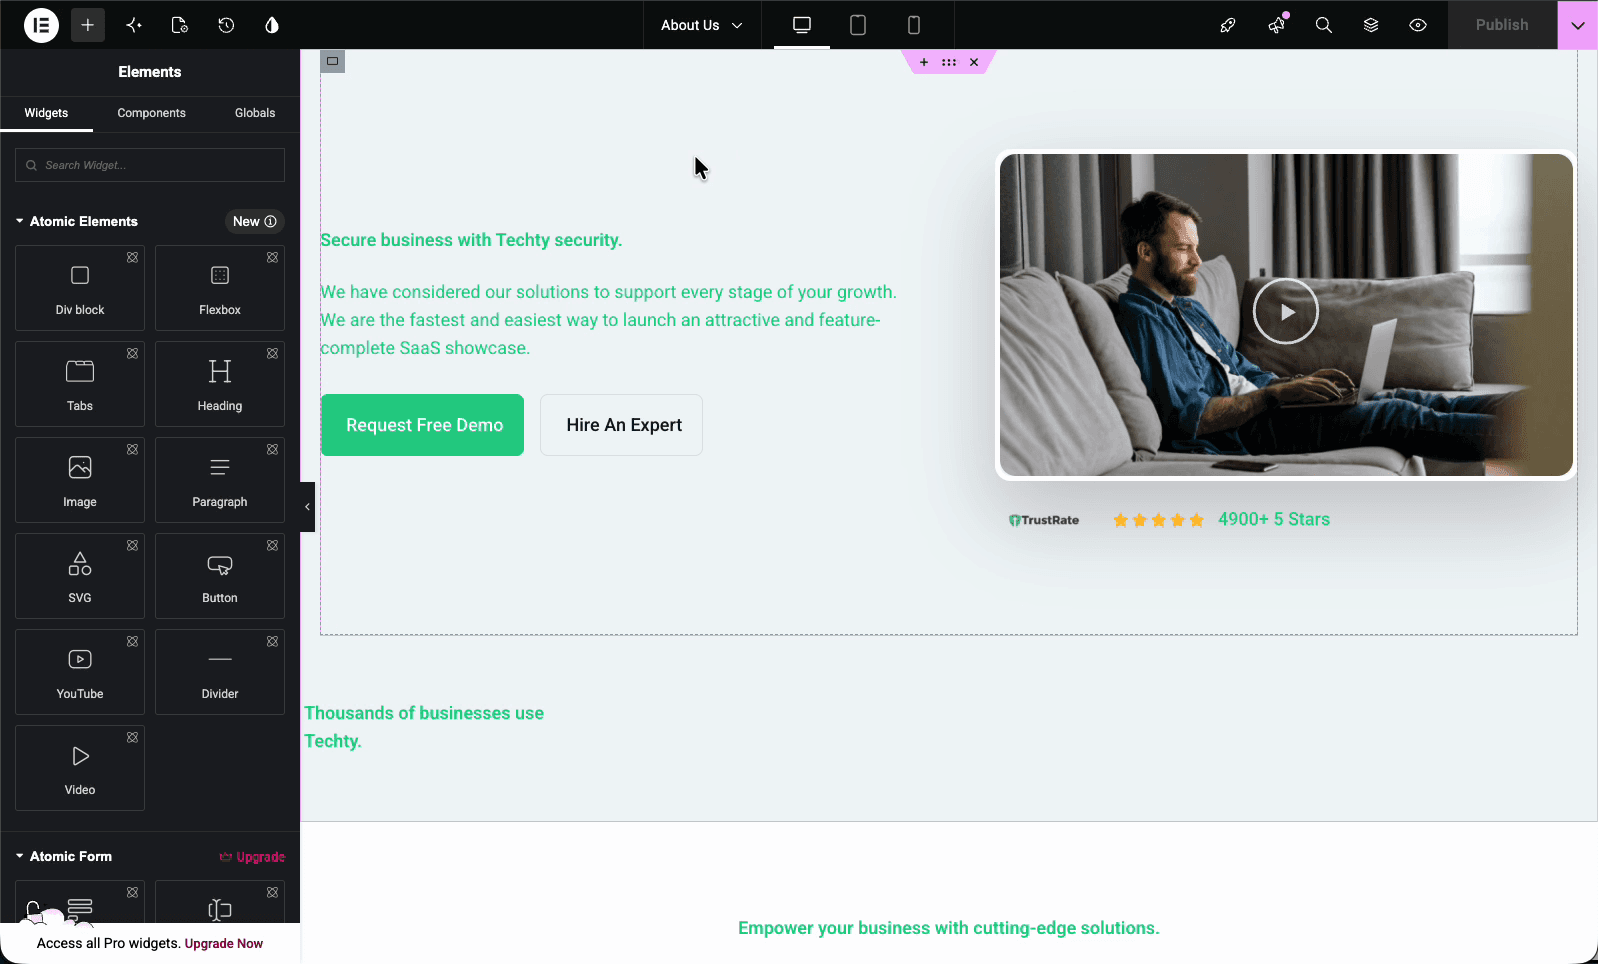
Build the page like you would any landing page. Drag in a container, add a hero with a heading and call-to-action buttons, embed a video, lay out feature columns. Because the display options from Step 4 stripped the default title and margins, your design fills the admin content area naturally. This is the whole reason the workflow exists: a non-developer can produce a screen that would otherwise need hand-written markup inside a PHP callback.
The same no-code idea powers a custom user dashboard without coding. If you've used a builder to design a front-end page, you already know everything you need to design an admin one. When the layout looks right, hit Publish in Elementor.
Step 7: Publish and view the live admin page
After publishing, your new item shows up in the WordPress admin sidebar with the icon you chose. Click it, and the Elementor-designed page renders right there inside wp-admin: heading, video, buttons, columns, all of it, framed by the normal admin chrome but built entirely with your layout.
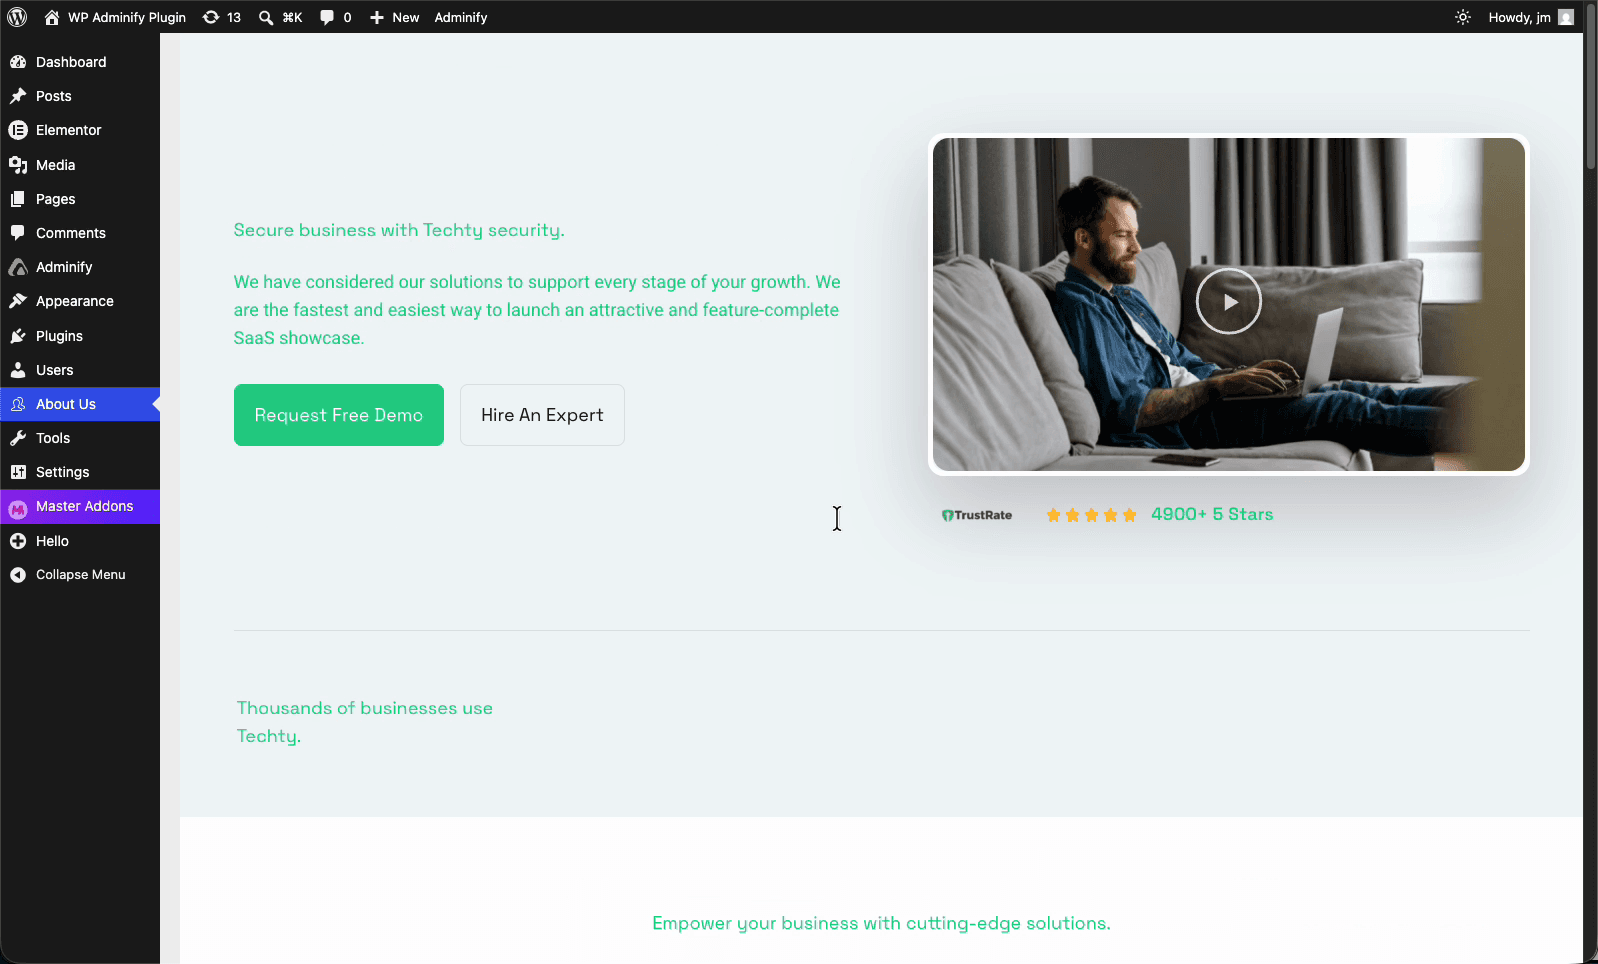
That's the full loop. Enable the feature, create the page, set the menu and access, design in Elementor, publish. No FTP, no functions.php, no hand-written HTML, and the page is editable any time by reopening it in the builder. You can hand a client an account that logs straight into a screen built for them.
Code method vs no-code method
Both approaches register a real admin page. The difference is who can build it and how much it costs to maintain.
| Factor | Manual code (add_menu_page) | WP Adminify + Elementor |
|---|---|---|
| Skill required | PHP and HTML | None, visual builder |
| Layout and design | Hand-coded HTML/CSS | Drag-and-drop in Elementor |
| Menu position and icon | Function arguments | Visual fields and icon picker |
| Role-based access | Single capability + custom checks | Multi-role selector |
| Editing later | Edit code over FTP | Reopen in the builder |
| Client can maintain it | No | Yes |
The code method is fine for a developer who needs a quick utility screen and will never restyle it. The no-code method wins the moment the page needs to look designed, support multiple roles, or get edited by someone who doesn't write PHP.
Common issues and fixes
- The "Edit with Elementor" button is missing. Check that Elementor is installed and active, and that you saved the admin page as a draft first. The builder hands off from an existing post, so the page has to exist before Elementor can open it.
- The page doesn't show in the sidebar. Re-check the User Roles Access tab. If your current role isn't on the allow list, the menu item is hidden from you by design. Add your role and refresh.
- The design has unwanted spacing at the top. Go back to the Display Options meta box, turn on Remove Page Title and Remove Page Margin, then update the page.
- Two menu items collide in the same position. Adjust the Menu Order number so each page has a distinct value. Identical orders can render in an unpredictable sequence.
Frequently Asked Questions
Can you create a custom admin page in WordPress without coding?
Yes. With WP Adminify's Admin Pages feature you enable the option under Productivity, click Add Admin Page, then design the page with Elementor, Gutenberg, Bricks, Oxygen, or Divi. The plugin registers the menu item and renders your design inside wp-admin, so no PHP or HTML is required.
Does this work with Elementor free or only Elementor Pro?
It works with the free version of Elementor. The Admin Pages feature loads the admin page into whatever Elementor build you have installed. Elementor Pro adds more widgets and template kits, but the core ability to design and publish a custom admin page doesn't depend on it.
How is this different from add_menu_page in functions.php?
The add_menu_page() function registers a blank admin screen that you fill with hand-written HTML inside a PHP callback. WP Adminify registers the same kind of page but lets you build the content visually with a page builder, set the menu position and icon through form fields, and control access by user role, all without writing code.
Can I control which user roles see the custom admin page?
Yes. Each admin page has a User Roles Access setting where you list the roles allowed to view it. Administrator is selected by default, and you can add or remove roles like Editor or Author. This keeps client-facing or internal pages visible only to the right people.
Can I add the page as a submenu under an existing menu?
Yes. In the Menu Attributes section, set Menu Type to Sub Level Menu to nest the page under an existing parent, or keep it as Top Level Menu to add a new item to the main sidebar. The Menu Order field then controls its vertical position.
Will the custom admin page slow down my dashboard?
The page only loads when a permitted user opens it, so it doesn't affect other admin screens. As with any Elementor page, keep the design lean: compress images and avoid heavy embeds to hold load times down. For wider admin performance, check WP Adminify's Heartbeat and asset controls.
Conclusion
Building a custom admin page in WordPress no longer means living inside functions.php. WP Adminify's Admin Pages feature handles the registration, menu placement, role control, and rendering for you, and Elementor gives you a real design surface inside the dashboard.
- Enable Admin Pages under Adminify → Productivity.
- Create the page and set its menu type, order, and icon visually.
- Use display options and user roles access to control how it looks and who sees it.
- Design with Elementor and publish, no code at any step.
If you manage client sites or your own multi-author setup, a branded admin page is one of the highest-impact, lowest-effort upgrades you can ship. Try it with WP Adminify's Custom Admin Page feature, then pair it with a clean admin menu editor setup to round out the experience.
Admin Pages Are Better on a Custom Dashboard
A custom admin page lands best inside a dashboard that already feels like yours. The guide to customizing the WordPress dashboard ties it together — menus, widgets, branding — and the admin pages doc covers every setting.
Leave a Comment
Your email address will not be published