


Moving four thousand media files one at a time is roughly a day of work. Moving the same four thousand in filtered batches is about ninety minutes. Same plugin, same library, same person. The difference is entirely technique.
Here's the fast approach: how to select large ranges properly, which filters do the grouping for you, when to drop to WP-CLI instead, and how to dodge the timeouts that make people give up halfway.
Bulk moving needs somewhere to move things to. If you have not picked a folder plugin yet, start with the best WordPress media folder plugins; the drag-and-drop target in the steps below is WP Adminify's media folder tree.
Before you start
Back up files and database. Virtual folders never touch your files, but you're running bulk operations on production data and it costs nothing to be able to undo.
Make sure folders exist. WordPress has no native folder feature, so bulk moving needs either a folder plugin or a registered media taxonomy. If neither exists yet, start with how to create folders in the WordPress Media Library.
One reassurance: with taxonomy-based folders, a bulk move changes database relationships only. Files stay exactly where they are on disk and no image URL changes, so this is safe on a live site.
Step 1: stay in grid view
Most advice tells you to switch the Media Library to list view before doing bulk work. With WP Adminify you don't have to. Grid view is where nearly everyone already works, and everything below happens right there: narrow the grid, select a range, drag it onto a folder.
Switching views isn't a free move either. List view throws away the thumbnails, which are the thing you actually use to recognise an image, and it sends you through Screen Options to raise items-per-page before a range selection is even worth attempting.
Step 2: narrow the grid first
This is the whole technique. Don't work through the library sequentially. Use the toolbar to cut the grid down to one coherent group, then move the lot in a single action.
Four controls sit across the top, and they stack.
Search
Media search covers the filename, title, caption, and description. Type a client name, product code, or campaign name and the grid collapses to matching files instantly.
It doesn't cover alt text. If your files are named IMG_4471.jpg this won't save you, which is the practical argument for renaming before upload.
Filter by media type
Set All media items to Documents and every PDF appears together. Most sites file all their PDFs in two or three moves. Repeat for audio, video, and spreadsheets.
Filter by date
Files uploaded in the same week usually belong together: a launch, a campaign, a product shoot. Pick a month from All dates, scan, move the batch.
Filter by folder
The All folders dropdown limits the grid to one folder, or to everything still unsorted. Filtering to unsorted is the quickest way to see what's actually left to file.
Step 3: select the range in the grid
Once the grid shows one coherent group:
- Click Bulk select in the toolbar.
- Click the first thumbnail.
- Shift-click the last thumbnail. Everything between the two selects at once.
- Click any individual thumbnail to toggle the few that don't belong.
This is what makes grid view workable for real bulk jobs. Clicking a hundred thumbnails one at a time is exactly why people give up and retreat to list view. Shift-click turns the same hundred into two clicks.
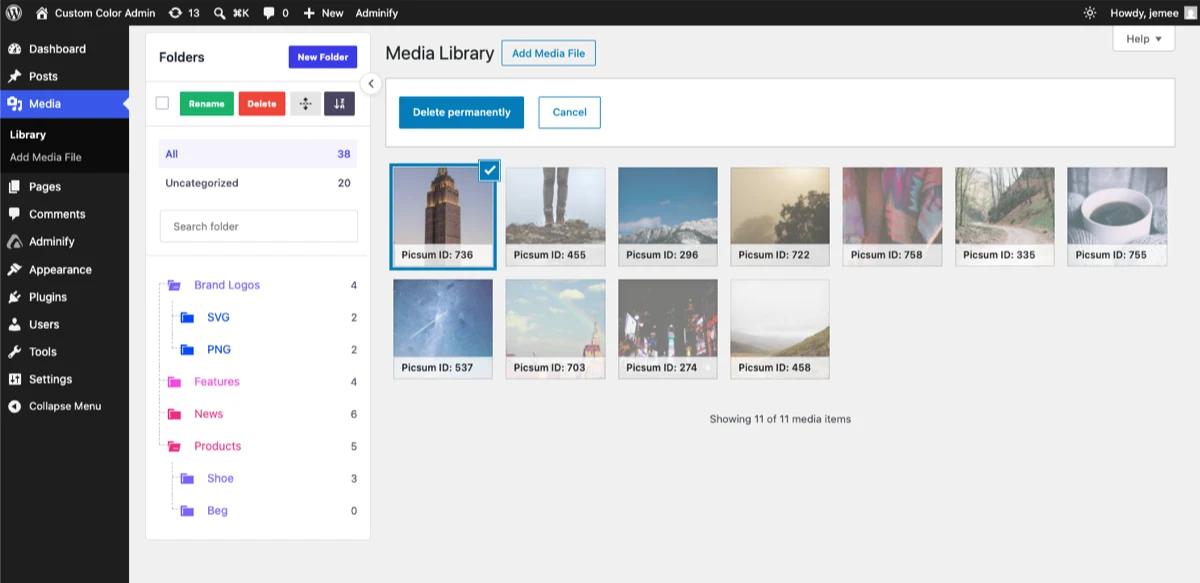
Step 4: drag the selection onto a folder
With the range selected, drag it onto any folder in the tree on the left. A tooltip follows the cursor telling you how many files you're carrying, and the folder highlights as you hover so you can see where they'll land.
Drop, and the counts next to each folder update straight away. The target goes up, Uncategorized goes down. That live count is your confirmation the move worked, which saves reloading the page to check.
Subfolders are drop targets too, so you can go straight into Brand Logos > PNG without stopping at the parent.
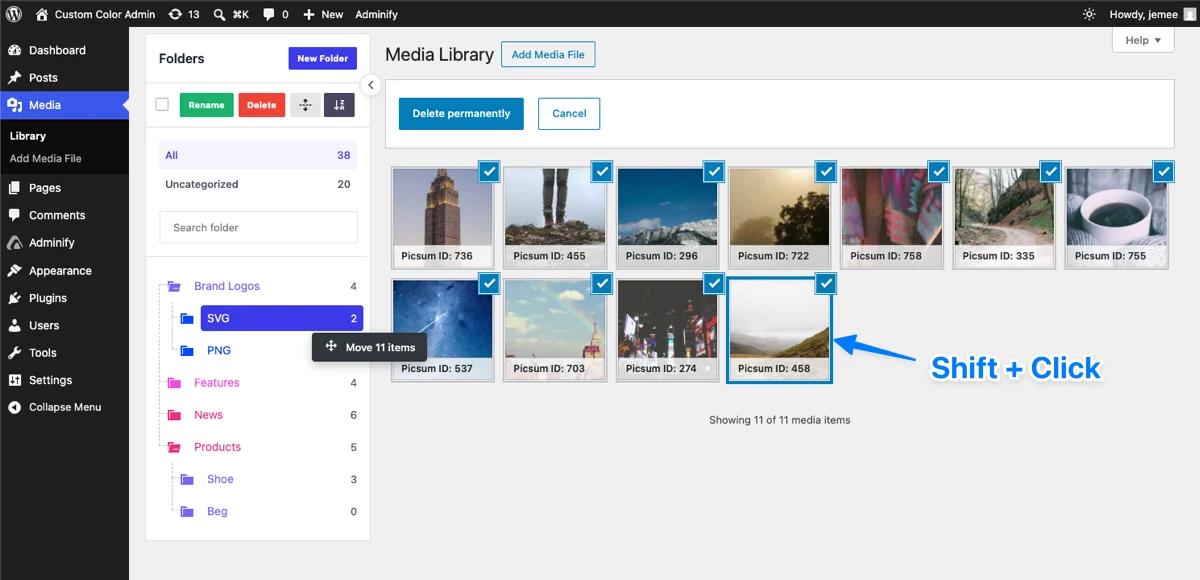
Eleven files in two clicks and one drag. Moving 200 works exactly the same way. Moving them individually is 200 drags and about forty minutes. Every minute spent narrowing the grid first saves ten in dragging.
Step 5: work top-down
Fill top-level folders first and leave subfolders until afterwards. Once a top-level folder is populated you can see what's actually in it, and the right subdivisions become obvious instead of guessed.
Then stop at roughly 80%. Leave stragglers in an Unsorted folder. Chasing completion is what makes people abandon these projects three-quarters of the way through, and the long tail is mostly files nobody will search for again.
Bulk moving thousands of files with WP-CLI
Past a few thousand files, or when the browser keeps timing out, the command line is faster and more reliable. Because folders are taxonomy terms, assigning them is a standard term operation.
First, confirm the taxonomy your folder plugin uses:
wp db query "SELECT taxonomy, COUNT(*) AS terms
             FROM wp_term_taxonomy GROUP BY taxonomy;"
If your folders show up here, they're taxonomy-based and everything below applies. Substitute your plugin's taxonomy name for media_folder.
List the folders and their term IDs:
wp term list media_folder --fields=term_id,name,parent --format=tableAssign every PDF to a folder in one command:
# Dry run first — see what would be affected
wp post list --post_type=attachment \
             --post_mime_type=application/pdf \
             --format=count

# Then assign
wp post list --post_type=attachment \
             --post_mime_type=application/pdf \
             --format=ids \
| xargs -n 50 -I {} wp post term set {} media_folder documents
Assign by filename pattern, which is handy when a naming convention exists:
wp post list --post_type=attachment \
             --s=acme \
             --format=ids \
| xargs -n 50 -I {} wp post term set {} media_folder acme-corp
For anything more complex, a short script gives you full control:
/**
 * Assign attachments uploaded in a date range to a folder term.
 * Run via: wp eval-file assign-folder.php
 */
$attachments = get_posts( array(
    'post_type'      => 'attachment',
    'post_status'    => 'inherit',
    'posts_per_page' => -1,
    'fields'         => 'ids',
    'date_query'     => array(
        array( 'after' => '2026-01-01', 'before' => '2026-03-31' ),
    ),
) );

foreach ( $attachments as $id ) {
    // false = replace existing folder; true = append
    wp_set_object_terms( $id, 'q1-campaign', 'media_folder', false );
}

WP_CLI::success( sprintf( 'Assigned %d attachments.', count( $attachments ) ) );
Test on staging first. A wrong wp_set_object_terms() call across 10,000 attachments runs in seconds and takes hours to unpick.
Avoiding timeouts
Most bulk-move failures are PHP limits rather than plugin bugs.
| Symptom | Cause | Fix |
|---|---|---|
| Page hangs, then errors on a large batch | max_execution_time reached | Move 100 at a time instead of 500 |
| Some files moved, some did not | Request died partway | Re-run on the remainder; smaller batches |
| Blank screen after bulk action | memory_limit exhausted | Raise it, or use WP-CLI which has its own limit |
| Everything is slow regardless of batch size | Database or host performance | See why WordPress admin is slow |
WP-CLI sidesteps most of this, since it runs outside the web request and browser and PHP web timeouts don't apply.
Bulk organizing with WP Adminify
WP Adminify's media folders are stored as a hierarchical taxonomy, so bulk moves are term assignments. Files never move on disk and no URL changes, which is why this is safe to run on a live site during business hours.
The whole workflow, without leaving grid view:
- Enable the media folder module and create your top-level folders.
- Open Media > Library and stay in the default grid.
- Narrow the grid with search, media type, date, or the folder filter.
- Click Bulk select.
- Click the first thumbnail, then shift-click the last to take the whole range.
- Drag the selection onto a folder or subfolder and drop.
- Check the folder counts, then go again for the next batch.
Here's why that matters. Grid is the default view and it's where most people already work. Being able to filter, range-select and drop without switching views, without opening Screen Options, and without losing your thumbnails is the difference between bulk organising being something you do and something you keep putting off.
Setup is under creating folders for post types, and the wider strategy is in how to organize your media library with folders.
Bulk Media Organization FAQs
How do I select multiple files in the WordPress Media Library?
In grid view, click Bulk select in the toolbar, click the first thumbnail, then shift-click the last one. Everything between the two selects at once, and clicking any individual thumbnail toggles it. No need to switch to list view.
Can I bulk move media files into folders?
Yes, if you have a folder plugin. Because folders are taxonomy terms, a bulk move is a term assignment rather than a file operation, so files never move on disk and image URLs never change. For very large batches, WP-CLI is faster and avoids browser timeouts entirely.
Why does my bulk move time out?
Almost always PHP's max_execution_time or memory_limit rather than the plugin. Reduce the batch size to around 100 files and try again. If it keeps failing, use WP-CLI, which runs outside the web request and isn't subject to those limits.
How do I bulk move thousands of media files?
Use WP-CLI. Query attachments by MIME type, search term, or date, then pipe the IDs into wp post term set in chunks. This handles tens of thousands of files reliably where the browser interface would time out repeatedly. Dry-run the query first and test on staging.
Will bulk moving files break my images?
No, with taxonomy-based folders, which is what most folder plugins use. Only a database relationship changes, so every image URL stays identical. The one approach that does break images is physically moving files into different directories on the server.
Conclusion
Bulk organizing is a sequencing problem. People who find it takes days are working file by file. People who find it takes an afternoon are letting filters do the grouping.
- Stay in grid view. Narrow it, shift-click the range, drag it onto a folder.
- Narrow first, then select. One drag beats two hundred.
- Drop to WP-CLI past a few thousand files. No browser timeouts, no partial batches.
- Stop at 80%. Leave the tail in Unsorted rather than abandoning the project.
For the full organization strategy, covering structure design, naming rules, and what to do afterwards, see how to organize your WordPress media library with folders.



Your email address will not be published