You've built custom fields with ACF for your WordPress posts - publisher names, prices, ratings, deadlines - but all that data is locked behind the edit screen. Every time you need to check a value, you click into the post, scroll to the meta box, then click back. Multiply that by 50 posts and you've lost half your morning.
ACF admin columns solve this by pulling your custom field data directly into the WordPress post list table. Instead of opening each post individually, you see your ACF data right alongside the title, date, and author - at a glance, sortable, and scannable. In this guide, you'll learn two ways to add ACF fields to admin columns: the no-code method using the Admin Columns Editor in WP Adminify, and the developer approach using PHP hooks.
What Are ACF Admin Columns?
ACF admin columns are custom columns added to the WordPress post list table (the screen at Posts > All Posts or any custom post type) that display values from Advanced Custom Fields. By default, WordPress only shows Title, Author, Categories, Tags, and Date in the post list. ACF admin columns extend this table to show any custom field data - text fields, select dropdowns, date pickers, true/false values, relationship fields, and more.
For example, if you run a real estate site with ACF fields for "Price," "Bedrooms," and "Status," ACF columns would let you see all three values for every listing without opening a single post. This turns your post list from a basic index into a functional data dashboard.
The concept works across all post types - standard posts, pages, WooCommerce products, and any custom post type (CPT) you've registered. Whether you're managing an ordered set of custom post types or a simple blog, ACF columns give you the visibility that the default WordPress admin lacks.
Why You Need ACF Fields in Your Admin Columns
Displaying ACF data in admin columns isn't about aesthetics - it's about operational efficiency. Here's what changes when you add ACF fields to your post list:
Faster Content Review
Instead of clicking into each post to verify custom field values, you scan the list table. For a site with 200+ posts, this turns a 30-minute review into a 3-minute scan. Content managers, editors, and site owners all benefit - especially on client dashboards where you've built custom workflows around ACF data.
Better Editorial Workflow
When your team uses ACF fields for editorial metadata — things like "Review Status," "Assigned Editor," or "Publish Priority" — having those values visible in the post list turns WordPress into a lightweight project management tool. You can quickly spot which posts are stuck in "Draft Review" or which ones are missing required field values.
Quick Data Auditing
ACF columns make it trivially easy to spot missing or incorrect data. If your "Price" column shows a blank for 12 out of 50 products, you know exactly which posts need attention - no CSV exports, no database queries, no opening posts one by one. Combined with other essential admin columns like Post ID and featured image thumbnails, your post list becomes a comprehensive content audit tool.
Improved Client Handoffs
If you're building WordPress sites for clients, ACF columns make the backend immediately understandable. A client managing their own "Events" post type can see the Event Date, Venue, and Ticket Price without understanding ACF's edit interface. It reduces training time and support requests.
Method 1: Add ACF Fields to Admin Columns Using WP Adminify (No Code)
The Admin Columns Editor addon for WP Adminify provides a visual interface for adding ACF fields as admin columns — no code, no functions.php edits. It supports ACF Free and ACF Pro, including field types like text, number, select, date picker, true/false, image, and relationship fields.
Prerequisites
Before you start, make sure you have:
- Advanced Custom Fields (ACF) installed and activated - either the free version or ACF Pro
- At least one ACF field group created and assigned to a post type
- WP Adminify installed with the Admin Columns Editor addon activated
Step 1: Create Your ACF Field Group
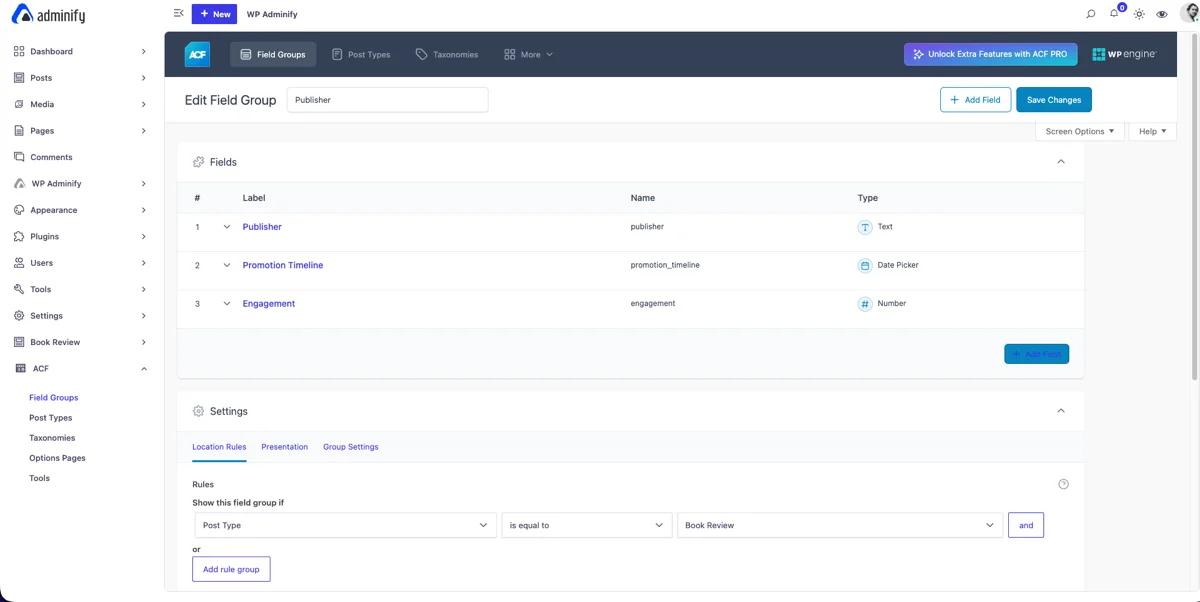
If you haven't already set up your ACF fields, go to ACF > Field Groups > Add New. Create a field group with the fields you want to display as columns.
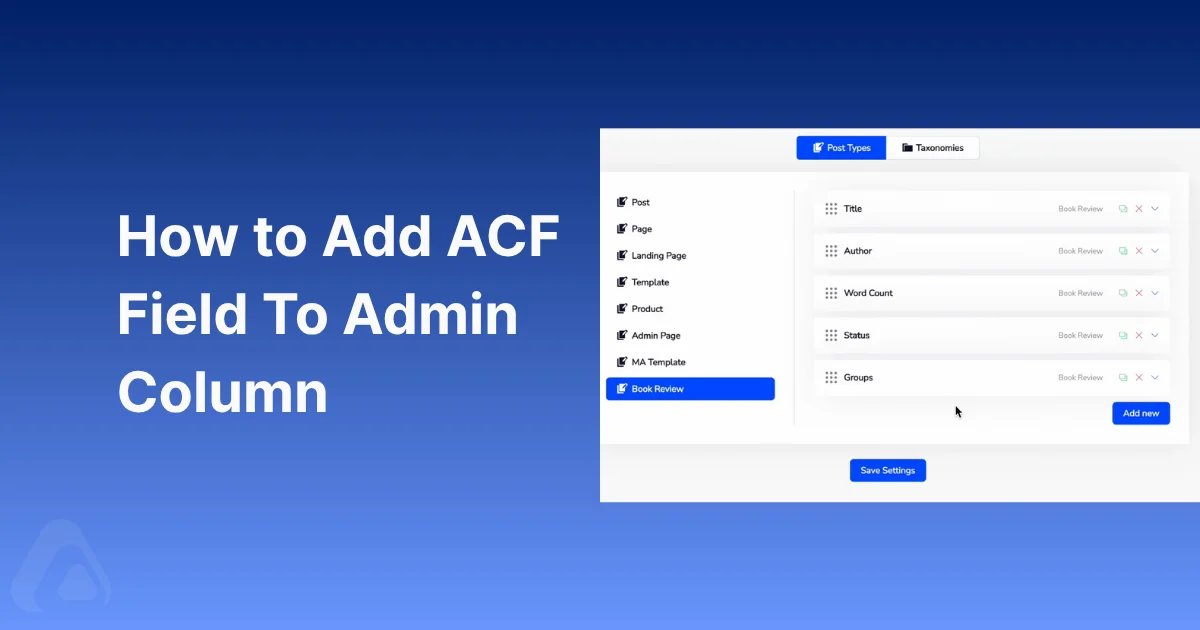
For this walkthrough, let's say you're building a "Book Reviews" custom post type with three fields:
- Publisher (Text field)
- Promotion Timeline (Date Picker field)
- Engagement (Number field)
Under Location Rules, set the field group to appear on your target post type (e.g., "Post Type is equal to Book Review"). This step is critical — if the location rule doesn't match the post type you want columns for, the ACF fields won't appear as column options in the next step.
Troubleshooting: If your ACF fields don't show up in the Admin Columns Editor later, double-check that your location rules target the correct post type. Also verify that the field group's status is set to "Active," not "Inactive."
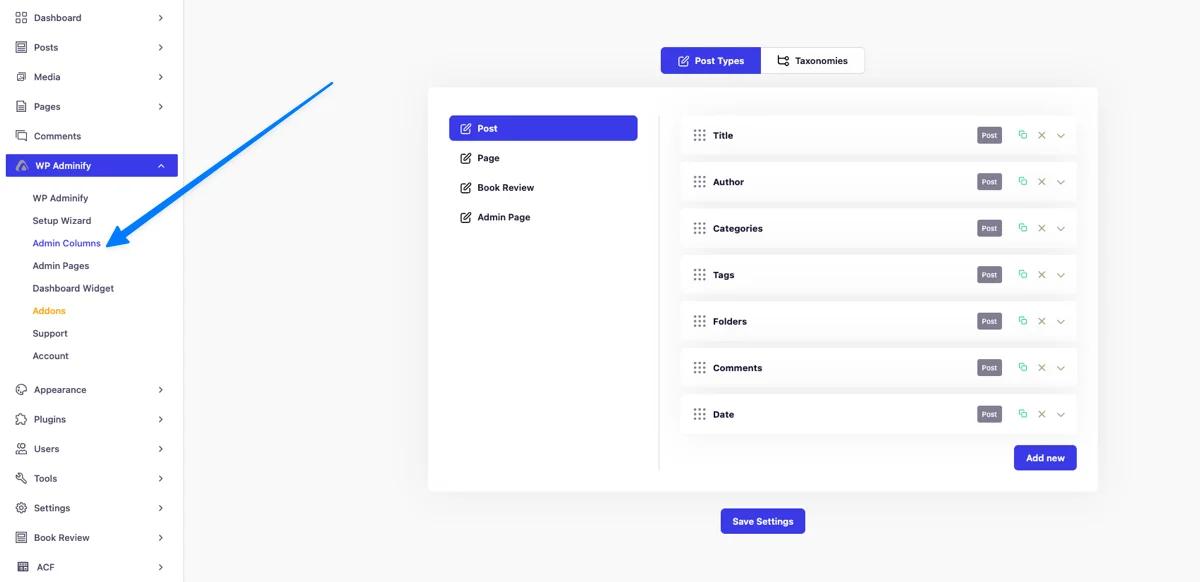
Step 2: Open the Admin Columns Editor
Navigate to WP Adminify > Admin Columns. You'll see a list of all available post types. Select the post type where your ACF fields are assigned (e.g., "Book Reviews").
Step 3: Add ACF Fields as Columns
Click Add New Column. In the column type selector, you'll see tabs for different column sources - Default, Custom, and ACF. Click the ACF tab to see all ACF fields assigned to this post type.
Select the field you want (e.g., "Publisher"), customize the column label if needed, and click Save. Repeat for each field you want visible in the post list.
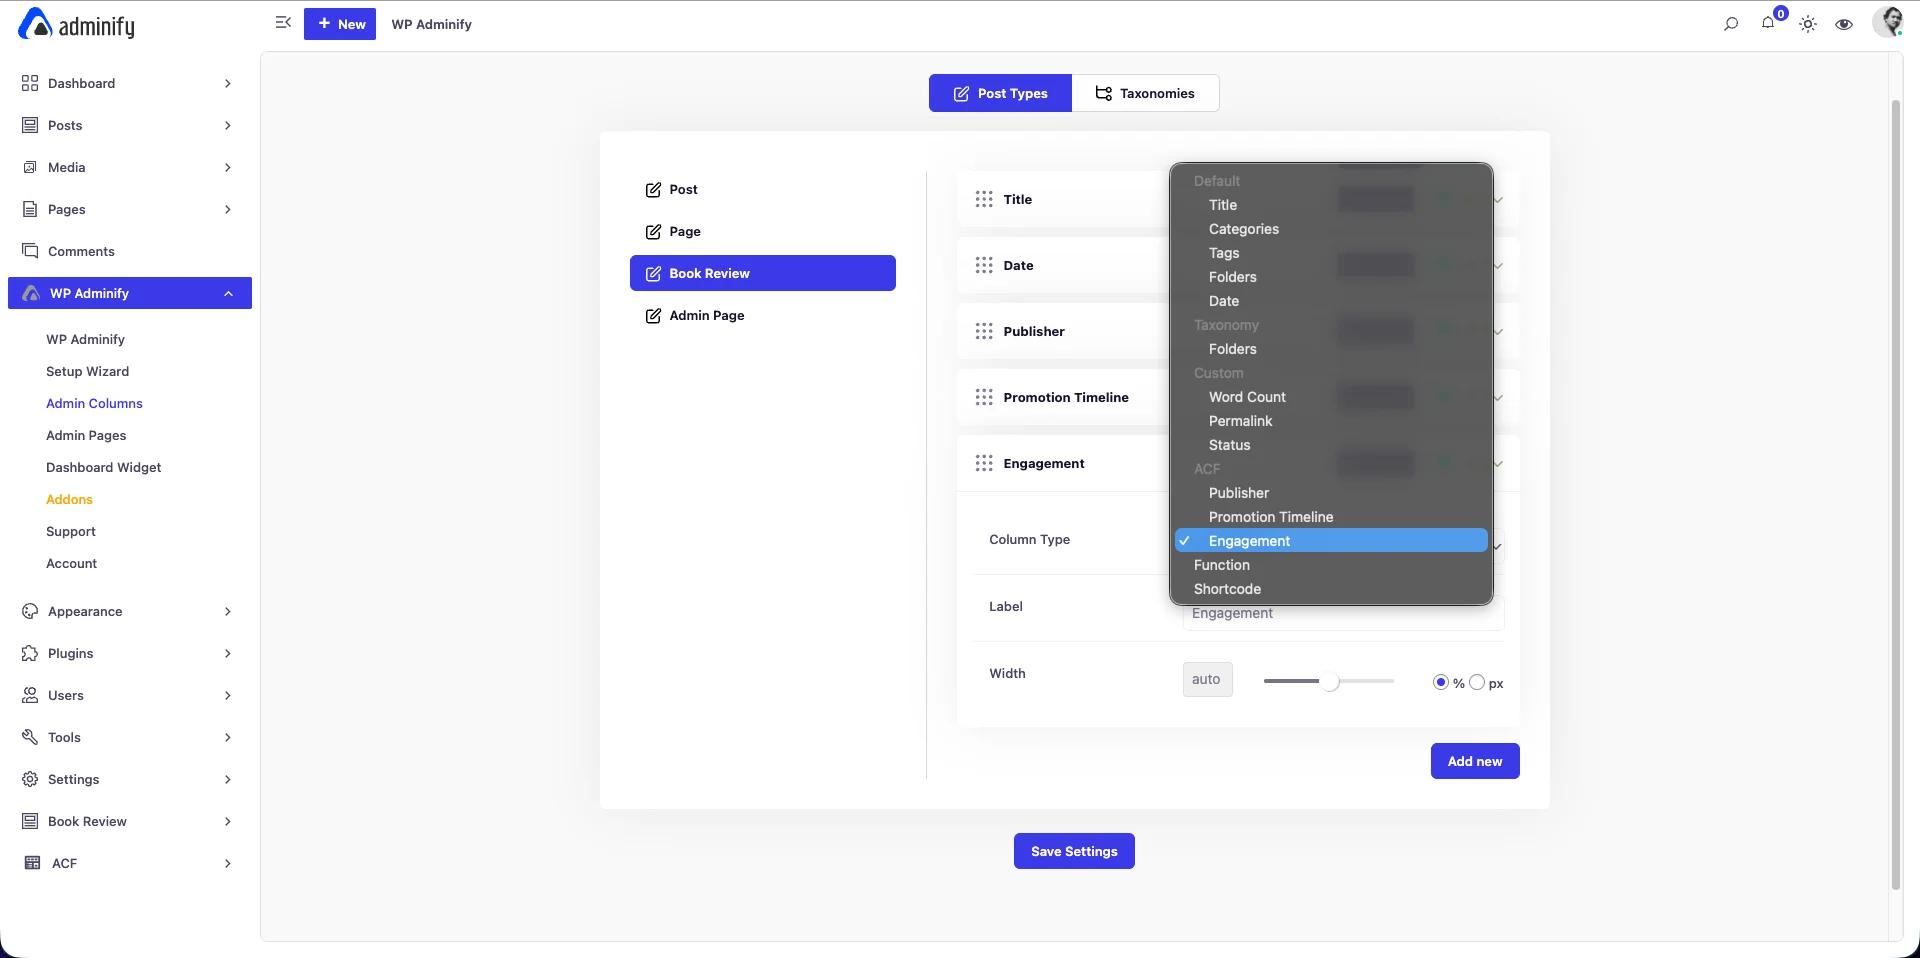
You can also drag and drop columns to reorder them - place your most important ACF columns right after the title for maximum visibility.
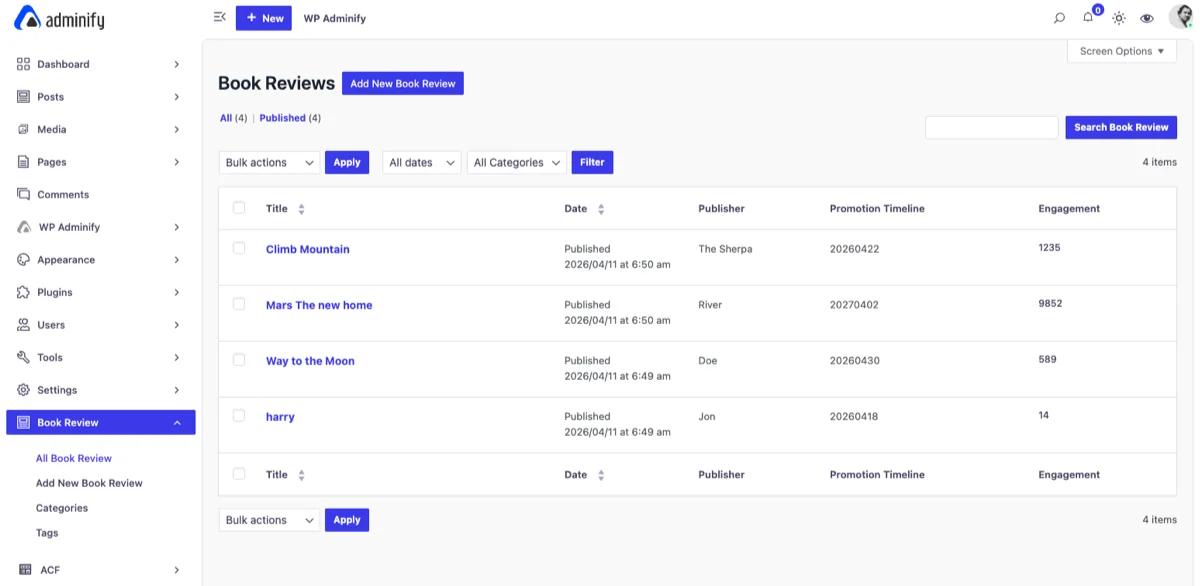
Step 4: Verify Your ACF Admin Columns
Navigate back to your post type list (e.g., Book Reviews > All Book Reviews). Your ACF field data now appears as new columns in the table, populated with the values from each post.
From here you can:
- Sort by ACF column values to find specific entries
- Rearrange columns via drag-and-drop in the Admin Columns Editor
- Remove default columns you don't need (like Tags or Comments) to make room
- Add more columns - including built-in ones like Post ID, featured image thumbnail, or word count
The Admin Columns Editor also supports fields from MetaBox and Pods frameworks, so if you later migrate away from ACF or use multiple field plugins, your column setup still works.
Method 2: Add ACF Fields to Admin Columns Using Custom Code
If you prefer handling this with PHP - maybe you're building a theme for distribution, working in a version-controlled environment, or simply want zero plugin dependencies - here's how to add ACF fields to admin columns programmatically.
Add the following code to your child theme's functions.php file, a code snippets manager, or a site-specific plugin.
Step 1: Register the Column Header
Use the manage_{post_type}_posts_columns filter to add your column to the post list. Replace book_review with your post type slug:
1
2/**
3 * Add ACF-based columns to Book Review post type.
4 *
5 * @param array $columns Existing columns.
6 * @return array Modified columns.
7 */
8function wpat_add_acf_admin_columns( $columns ) {
9    // Insert after title column
10    $new_columns = array();
11    foreach ( $columns as $key => $value ) {
12        $new_columns[ $key ] = $value;
13        if ( 'title' === $key ) {
14            $new_columns['acf_publisher']  = __( 'Publisher', 'your-textdomain' );
15            $new_columns['acf_engagement'] = __( 'Engagement', 'your-textdomain' );
16        }
17    }
18    return $new_columns;
19}
20add_filter( 'manage_book_review_posts_columns', 'wpat_add_acf_admin_columns' );
21
This inserts the "Publisher" and "Engagement" columns right after the Title column. You can adjust the position by changing which column key you insert after.
Step 2: Populate the Column with ACF Data
Use the manage_{post_type}_posts_custom_column action to output the field value. The get_field() function is ACF's standard API for retrieving field values:
1
2/**
3 * Display ACF field values in custom admin columns.
4 *
5 * @param string $column_name The column identifier.
6 * @param int    $post_id     The current post ID.
7 */
8function wpat_display_acf_column_data( $column_name, $post_id ) {
9    switch ( $column_name ) {
10        case 'acf_publisher':
11            $value = get_field( 'publisher', $post_id );
12            echo $value ? esc_html( $value ) : '—';
13            break;
14
15        case 'acf_engagement':
16            $value = get_field( 'engagement', $post_id );
17            echo $value ? esc_html( $value ) : '—';
18            break;
19    }
20}
21add_action( 'manage_book_review_posts_custom_column', 'wpat_display_acf_column_data', 10, 2 );
22
Important: Use the ACF field name (not the field label) in get_field(). You can find the field name in ACF > Field Groups > Edit > Field Name. If you use the wrong name, the column will display the em dash fallback for every post.
Step 3: Make ACF Columns Sortable (Optional)
To enable sorting by your ACF column values, register them as sortable and handle the query:
1
2/**
3 * Register ACF columns as sortable.
4 *
5 * @param array $columns Sortable columns.
6 * @return array Modified sortable columns.
7 */
8function wpat_acf_sortable_columns( $columns ) {
9    $columns['acf_publisher']  = 'acf_publisher';
10    $columns['acf_engagement'] = 'acf_engagement';
11    return $columns;
12}
13add_filter( 'manage_edit-book_review_sortable_columns', 'wpat_acf_sortable_columns' );
14
15/**
16 * Modify the query to sort by ACF meta values.
17 *
18 * @param WP_Query $query The main query.
19 */
20function wpat_acf_column_orderby( $query ) {
21    if ( ! is_admin() || ! $query->is_main_query() ) {
22        return;
23    }
24
25    $orderby = $query->get( 'orderby' );
26
27    if ( 'acf_publisher' === $orderby ) {
28        $query->set( 'meta_key', 'publisher' );
29        $query->set( 'orderby', 'meta_value' );
30    }
31
32    if ( 'acf_engagement' === $orderby ) {
33        $query->set( 'meta_key', 'engagement' );
34        $query->set( 'orderby', 'meta_value_num' );
35    }
36}
37add_action( 'pre_get_posts', 'wpat_acf_column_orderby' );
38
Note the distinction between meta_value (for text fields, sorts alphabetically) and meta_value_num (for number fields, sorts numerically). Using the wrong one will produce unexpected sort orders.
Step 4: Handle Different ACF Field Types
Not all ACF field types return simple strings. Here's how to display common field types correctly in your admin columns:
1
2/**
3 * Render different ACF field types in admin columns.
4 *
5 * @param string $column_name Column identifier.
6 * @param int    $post_id     Post ID.
7 */
8function wpat_render_acf_field_types( $column_name, $post_id ) {
9    switch ( $column_name ) {
10        // Image field (returns array when format = "Array")
11        case 'acf_cover_image':
12            $image = get_field( 'cover_image', $post_id );
13            if ( $image ) {
14                printf(
15                    '<img src="%s" width="50" height="50" style="object-fit:cover;" alt="%s" />',
16                    esc_url( $image['sizes']['thumbnail'] ),
17                    esc_attr( $image['alt'] )
18                );
19            } else {
20                echo '—';
21            }
22            break;
23
24        // True/False field
25        case 'acf_featured':
26            $value = get_field( 'featured', $post_id );
27            echo $value ? '✓' : '✕';
28            break;
29
30        // Date Picker field
31        case 'acf_publish_date':
32            $value = get_field( 'publish_date', $post_id );
33            echo $value ? esc_html( $value ) : '—';
34            break;
35
36        // Select field
37        case 'acf_status':
38            $value = get_field( 'status', $post_id );
39            if ( $value ) {
40                $colors = array(
41                    'active'  => '#28a745',
42                    'pending' => '#ffc107',
43                    'expired' => '#dc3545',
44                );
45                $color = isset( $colors[ $value ] ) ? $colors[ $value ] : '#6c757d';
46                printf(
47                    '<span style="color:%s;font-weight:600;">%s</span>',
48                    esc_attr( $color ),
49                    esc_html( ucfirst( $value ) )
50                );
51            } else {
52                echo '—';
53            }
54            break;
55    }
56}
57add_action( 'manage_book_review_posts_custom_column', 'wpat_render_acf_field_types', 10, 2 );
58
This approach works well for a handful of fields. But if you're managing 5+ ACF columns across multiple post types, the code gets verbose quickly — that's where a visual tool like the Admin Columns Editor saves significant development time.
WP Adminify vs Custom Code: Which Approach Fits?
| Criteria | WP Adminify Admin Columns Editor | Custom PHP Code |
|---|---|---|
| Setup time | 2-3 minutes per post type | 15-30 minutes per post type |
| Code required | None | PHP (functions.php or plugin) |
| ACF field type handling | Automatic (detects field type) | Manual (custom rendering per type) |
| Drag-and-drop reorder | Yes | No (requires code changes) |
| Supports MetaBox / Pods | Yes | Requires separate code per framework |
| Sortable columns | Built-in toggle | Requires additional hooks |
| Theme update safe | Yes | No (unless child theme or plugin) |
| Best for | Site managers, agencies, multi-CPT sites | Theme developers, minimal-plugin setups |
For most WordPress sites - especially those managed by agencies building customized admin experiences for clients - the visual editor is the practical choice. It handles field type detection, column ordering, and framework compatibility automatically. The code approach is better suited for developers distributing themes or plugins where adding a UI dependency isn't ideal.
What Is Advanced Custom Fields (ACF)?
Advanced Custom Fields is a WordPress plugin that replaces the default custom fields interface with a powerful, developer-friendly field management system. Instead of manually adding key-value pairs through WordPress's basic "Custom Fields" meta box, ACF provides structured field types - over 30 of them - with a visual editor for creating field groups.
ACF supports field types including:
- Basic - Text, Textarea, Number, Email, URL, Password
- Content - WYSIWYG Editor, Image, File, Gallery, oEmbed
- Choice - Select, Checkbox, Radio Button, True/False
- Relational - Post Object, Relationship, Taxonomy, User
- Layout - Repeater (Pro), Flexible Content (Pro), Group
- Special - Date Picker, Color Picker, Google Map, ACF Options Pages (Pro)
Each field group can be assigned to specific post types, pages, user profiles, taxonomy terms, option pages, or even menu items — giving you full control over where custom data entry happens.
ACF stores its data as standard WordPress post meta, which means it's compatible with get_post_meta(), WP_Query meta queries, and the REST API. For developers, ACF also provides its own API functions — get_field(), the_field(), have_rows() — that simplify retrieving and displaying field data on the front end.
Common Issues and Fixes
Here are the issues we see most often when setting up ACF admin columns:
ACF Fields Not Appearing in Admin Columns Editor
Cause: The ACF field group's location rules don't match the post type you're adding columns to.
Fix: Open your ACF field group, scroll to Location Rules, and verify the rule says "Post Type is equal to [your post type]." If you've set it to a page template or user role instead, the fields won't appear in the Admin Columns Editor for that post type. Also confirm the field group status is "Active."
Column Shows Empty Values for Existing Posts
Cause: The ACF fields were added after the posts were created, so those posts don't have the meta values stored yet.
Fix: Open each post and save it - ACF will write default values to the database. For bulk updates, you can use a plugin like WP All Export paired with WP All Import to bulk-update the meta values, or use a quick WP-CLI command:
# Set a default ACF value for all book_review posts missing the "publisher" field
wp post list --post_type=book_review --format=ids | xargs -I {} wp post meta update {} publisher "Unknown"
Sorting Doesn't Work Correctly for Number Fields
Cause: If you're using custom code, you may have set orderby to meta_value (string sort) instead of meta_value_num (numeric sort). String sorting treats "9" as greater than "100" because it compares character by character.
Fix: Use meta_value_num for any numeric ACF field. The WP Adminify Admin Columns Editor handles this automatically based on the field type.
Column Data Looks Wrong for Image or Relationship Fields
Cause: ACF stores images as attachment IDs and relationships as post ID arrays. If your code outputs the raw value, you'll see numbers instead of images or post titles.
Fix: Use the field type-specific rendering code shown in Method 2, Step 4 above. Or use WP Adminify, which auto-detects the field type and renders thumbnails for image fields, linked titles for relationship fields, and formatted dates for date pickers.
Best Practices for ACF Admin Columns
After setting up ACF columns on dozens of client sites, here are the patterns that work best:
Keep Columns Focused
Don't add every ACF field as a column. Pick 3-5 fields that are genuinely useful for scanning and decision-making. Too many columns creates horizontal scrolling and defeats the purpose. If you need to simplify your dashboard, start by showing only the fields your team actually checks in list view.
Use Descriptive Labels
Rename columns to be scannable. Instead of using the ACF field name "promo_timeline," label the column "Promotion Ends" so any team member understands it instantly.
Remove Default Columns You Don't Need
Most WordPress post lists include columns for Tags, Comments, and Author that many sites never use. Remove those via the Admin Columns Editor (or the manage_posts_columns filter) to make room for your ACF data. This is especially useful on sites where you've already cleaned up admin notices and want a distraction-free post list.
Combine with Other Admin Productivity Features
ACF columns work even better alongside other WP Adminify productivity features like post thumbnails in the list view, Post/Page ID columns, and the ability to duplicate posts. Together, these turn the WordPress post list into a complete content operations hub.
Frequently Asked Questions
Does this work with ACF Free or only ACF Pro?
Both. The Admin Columns Editor in WP Adminify works with ACF Free and ACF Pro. The custom code method also works with both versions since it uses the standard get_field() function available in both. The only difference is that Pro-only field types like Repeater, Flexible Content, and Gallery are only available if you have ACF Pro installed.
Can I add ACF columns to WooCommerce products?
Yes. WooCommerce Products are a custom post type (product), so both methods work. In the Admin Columns Editor, select "Products" from the post type dropdown and your ACF fields assigned to the Product post type will appear. This is especially useful for displaying custom product attributes like manufacturer, warehouse location, or supplier code directly in the product list.
Will ACF admin columns slow down my site?
On the front end, no - ACF admin columns only load on the admin post list screen. On the admin side, each column adds one get_post_meta() call per post per column. For a list of 20 posts with 3 ACF columns, that's 60 meta queries - WordPress handles this comfortably. If you're showing 100+ posts per page with 10+ columns, you may notice a slight delay, but that's an edge case. If your WordPress admin is already slow, the bottleneck is likely elsewhere.
Can I display ACF Repeater or Flexible Content fields as columns?
Partially. You can display a summary (e.g., row count or first entry), but the full nested data structure of Repeater and Flexible Content fields isn't practical in a narrow table column. With custom code, you'd output something like "3 entries" using count( get_field( 'repeater_field' ) ). The Admin Columns Editor handles this by showing a formatted summary.
Does WP Adminify support Pods and MetaBox in addition to ACF?
Yes. The Admin Columns Editor supports three major custom fields frameworks: ACF, MetaBox, and Pods. You can mix fields from different frameworks in the same post type's column set — useful if you're gradually migrating between field plugins or using different frameworks for different purposes.
Is the Admin Columns Editor a free feature in WP Adminify?
The Admin Columns Editor is available as an addon for WP Adminify. Check the Admin Columns Editor pricing page for current plans. The core WP Adminify plugin (free on WordPress.org) includes built-in admin columns for Post ID, Thumbnails, and other standard fields through its Productivity settings.
Conclusion
Adding ACF fields to your WordPress admin columns transforms your post list from a basic index into a functional data dashboard. Instead of clicking into posts to check custom field values, you see everything at a glance — sortable, scannable, and actionable.
Here's the recap:
- WP Adminify method: Use the Admin Columns Editor addon — select your post type, pick ACF fields from the ACF tab, drag to reorder, and save. Handles field type rendering and sorting automatically.
- Custom code method: Hook into
manage_{post_type}_posts_columnsandmanage_{post_type}_posts_custom_columnto register and populate columns manually. Best for developers distributing themes. - Best practice: Limit yourself to 3-5 ACF columns per post type. Show only the data your team actually needs in list view.
If you're managing multiple post types with custom field data, also check out our guide on essential admin columns for WordPress to see which built-in columns pair well with your ACF setup.