Ever wondered why some websites feel instantly recognizable, even at the login screen? It’s all about branding.
Your WordPress login page is the key to it. Whether you’re running an e-commerce store, a membership site, or a blog with a growing audience, changing out the default WordPress logo is a must. With your own logo, you can boost brand recognition and create a polished, professional vibe.
Introducing Loginfy, a plugin from the same developers as WP Adminify, that lets you customize your login page in minutes. That without any coding required.
Remember customers recognize brands with their logo. So, the more frequently they're gonna see it, the more they’ll remember it. Branding is the key to a business’s success and that leads with a logo.
Today, we’re going to tell you how to change default WordPress login page logo. So, let’s get started.
How to Change Default WordPress Login Page Logo
Before you start, you must prepare your customized logo and upload it in the WordPress media manager. When your logo is complete, just install Adminify and begin making changes right away.
WordPress offers a variety of choices for changing the login logo. But doing so requires writing a lot of code and running a lot of other files if you don't use a plugin. Which is hard, for beginners and users who are not comfortable with coding.
So, the simplest way to change the default WordPress login page logo is with Loginfy. And, here's a step by step guide to do it.
But before we move on to the explanation and guide, you can check our documentation on changing the login page logo, if you want to skip and have an idea of with our plugin already.
Step 1: Install & Activate Loginfy
First, to get started with Loginfy, you need to install and activate the plugin. It's basic and just like installing any other plugins. But here's a rundown on how to do that:
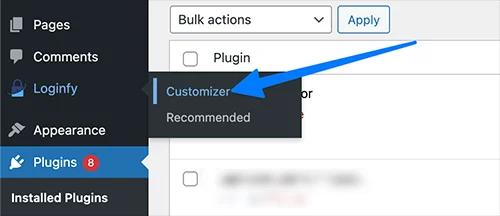
Navigate to WordPress Dashboard > Plugins > Add New plugin. Now search for Loginfy.
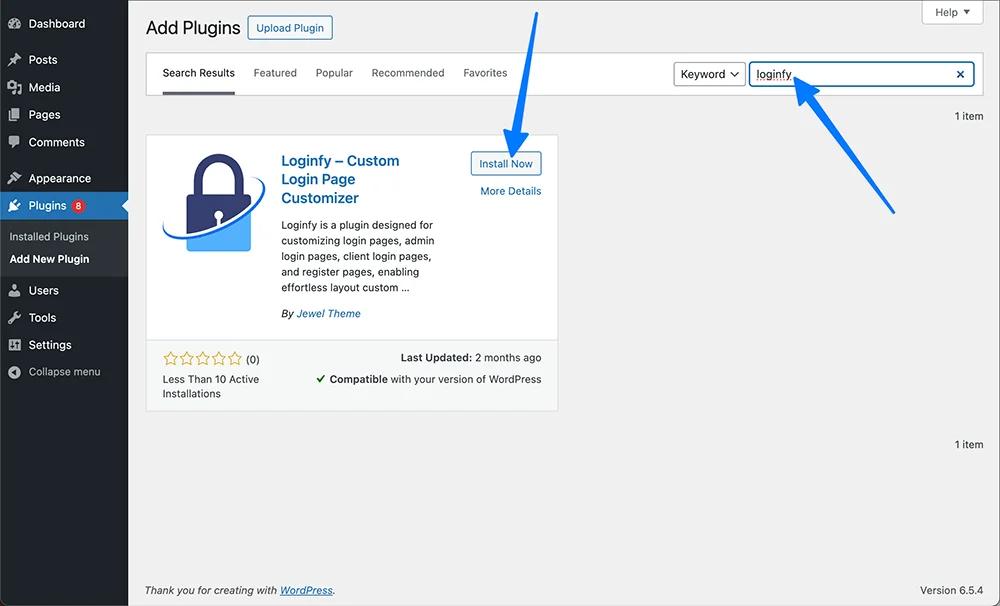
After you're done with installing and activating Loginfy, you'll notice a new menu item called Loginfy.
You can also checkout the Pro Version of Loginfy. It gives you some more advanced customization settings. It'll definitely help you create the perfect login page experience for your users.
Step 2: Changing Default WordPress Login Page Logo using Loginfy
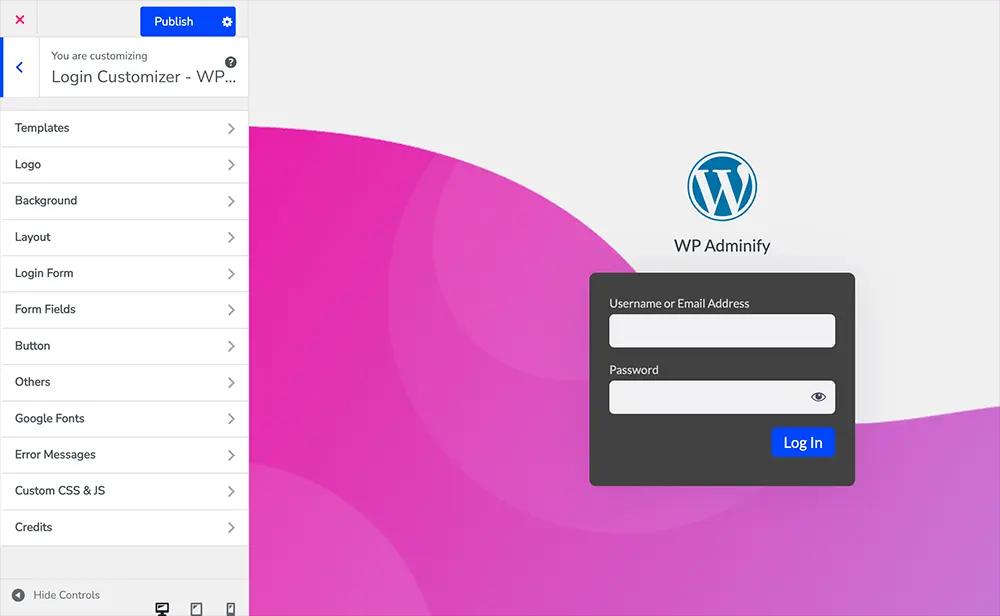
Now, from the Loginfy menu, go to the Customizer. And you'll see the options to upload your login page logo.
You can choose to add a logo or just the name of your company in Text format. Surprisingly, Loginfy gives you a third option. And with it you can display both logo and text altogether.
Just after that, you'll see the desired logo uploading options. And, you'll be surprised to know that Loginfy can detect the logo via URL (Must need to be publicly available).
You can also customize the logo after you're done uploading. And you'll see settings for adding a link in the logo, size and etc. But, don't forget to save after you're done by clicking the publish / update button.
Here's a quick video to show you how to change default WordPress login page logo with Loginfy:
Other Login Customization Settings
Loginfy give you some more advanced options to customize your login page.
You'll find settings like buttons, log-in form fields, error messages, and others to help you customize the login page more specifically.
Also, Loginfy have the compatibility with Google Fonts, meaning you can use any fonts from the Google's library.
And, if you are good with custom CSS or JS then you can also use those to further customize the login page alongside the logo.
Login Page Templates: There are several templates to use. Using them you can design your admin access page just the way you like. Just choose your template and publish it. That's all.
Login Page Background: You can add a picture or video in the background that will be shown. You can also just customize the hue. Select slideshow to display several photographs sequentially if you wish to upload more than one. ]
There are options for alignment and how the background will be shown. Last but not least, you can apply an overlay color to your background to make it more stunning.
Different Login Page Layout: You can select the horizontal and vertical alignments from the layout option. Also, you'll have the option to divide the screen in half. You can customize one half by adding some commercial messages and the other half with a login form.
Login Form Customization: You can change the background, height, width, padding, margins, border, border radius, colors, and so much more.
Don’t forget to save and publish all the edits, or else all your efforts will go in vain.
How to Change WordPress Login Page Logo without Plugin
So, you wanna do it the hard way. Yes, there's obviously a way to change WordPress login page logo without plugin. Here's how to do that.
If you have the basic knowledge of WordPress Theme file structure, you can easily do it. All you have to do is, copy the following code in your code editor.
/*Set Logo to login page*/
function adminify_login_logo_change() {
?><style type="text/css">body.login div#login h1 a {
background-image: url(http://adminify.local/wp-content/uploads/2023/01/adminify_logo.png);
padding-bottom: 30px;
}</style><?php
} add_action( 'login_enqueue_scripts', 'adminify_login_logo_change' );
Then copy your logo image URL and replace with the URL on "background-image" property. That's enough to change WordPress login page logo without plugin.
Is It Necessary to Change WordPress Login Logo?
According to studies (Edgar Dale), people retain 30% of what they see. Top brands and marketers use this as one of their greatest marketing strategies.
This custom login page logo is a powerful representation of the company and is quickly recognized by the majority of people. Visitors will often have expectations if they can recognize your brand on a product or piece of information. And hence, it's important to meet those expectations.
DO YOU KNOW? WP Adminify also let's you change the default Gutenberg editor logo?
Adminify offers you a wide range of customizations to enhance your logo and make it more memorable for the users. You can adjust every aspect of your login experience thanks to Loginfy.
Related Reading
Frequently Asked Questions (FAQs)
1. Will changing the login logo affect WordPress updates?
No. Loginfy only add styles and settings. It doesn’t touch WordPress core files. And the updates will work normally. If you’re adding code yourself, place it in a child theme, so updates won’t overwrite it.
What size and file type should my logo be?
A good size to start with is about 320×80 pixels. For high-resolution screens you can upload double that size and scale it down.
Can I change the login logo link and hover text?
Yes. Inside Loginfy’s settings you can set where the logo links (usually your homepage) and what text appears when people hover over it. Advanced users can also use a small PHP snippet to control these two settings.
Does this change WooCommerce or front-end login forms?
No. These changes apply only to the built-in WordPress login page (wp-login.php). Login forms built by WooCommerce or membership plugins have their own templates. To match branding everywhere, you’ll need to customize those templates.
How do I revert if the login page breaks?
If something goes wrong, deactivate the plugin in your WordPress dashboard or rename its folder via FTP. If you used code, remove or comment it out. Then clear your browser and site cache. The default WordPress login page will reappear instantly.
Can I show different logos for staff or customers?
Yes. The easiest way is to create separate login pages with different branding using Adminify or Loginfy. More advanced users can detect a URL parameter (like ?brand=staff) and load a different logo automatically.
Does removing the WordPress logo improve security?
Not directly. Changing the logo improves branding and user trust but it doesn’t make your site safer by itself. Keep WordPress, plugins, and themes updated, use strong passwords, and enable two-factor authentication for real security.