Here’s a fun little fact. In 2021: out of the reported 3.57 million skydives made, only 721 had to use their reserve parachute. In other words, the odds of a skydiver needing to use their reserve parachute are approximately 1 in 5,000.
Now, what if I was to tell you “Hey, just jump without your reserve?” Would you do it? I think the answer will be a resounding “No!” quite soundly. Why is that?
Disaster only needs to strike once and all is lost. Now I say all this because your WordPress website's security rests on a similar balance.
"Around 13000 WordPress sites are hacked daily!"
So its evident that the risks are at all time high. Cyber threats continuously evolving. And hackers are constantly finding new ways to breach securities.
For WordPress website owners, it is very much important to prevent unauthorized access and data breaches. The easiest solution to this is two factor authentication (2FA).
Today, I'll share a guide on how to activate two factor authentication (2FA) for WordPress.
What is Two Factor Authentication for WordPress Admin?
Two-factor authentication (2FA) is a additional security measure. It requires a second form of identification to log in. The first is with your credentials. The second is an unique code sent to your phone or generated by an authenticator app.
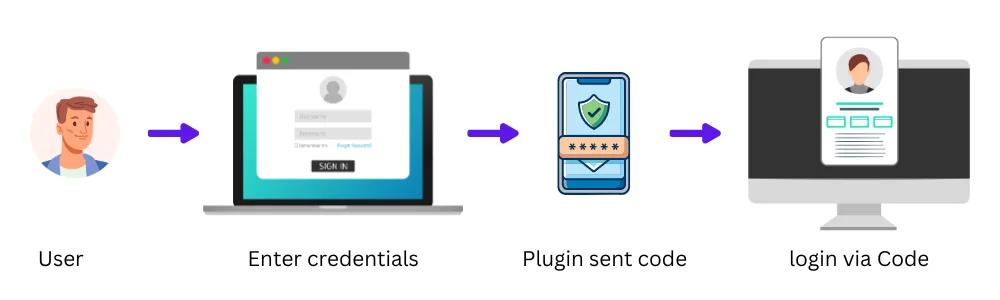
When you log in to your WordPress admin, you enter your password first. Then, you're asked for the second form of ID. And this is the two factor authentication or 2FA in short.
This extra step make sure that even if someone steals your password, they can't access your site. This makes sure that your WordPress admin better secured.
How to Activate Two-Factor Authentication in WordPress
Here's how to activate two factor authentication in WordPress.
Choose a 2FA Plugin
First, you need to select a 2FA plugin. Some popular options are:
You can get from the WordPress plugin repository. For example, we'll use the Google Authenticator app.
Install and Activate the Plugin
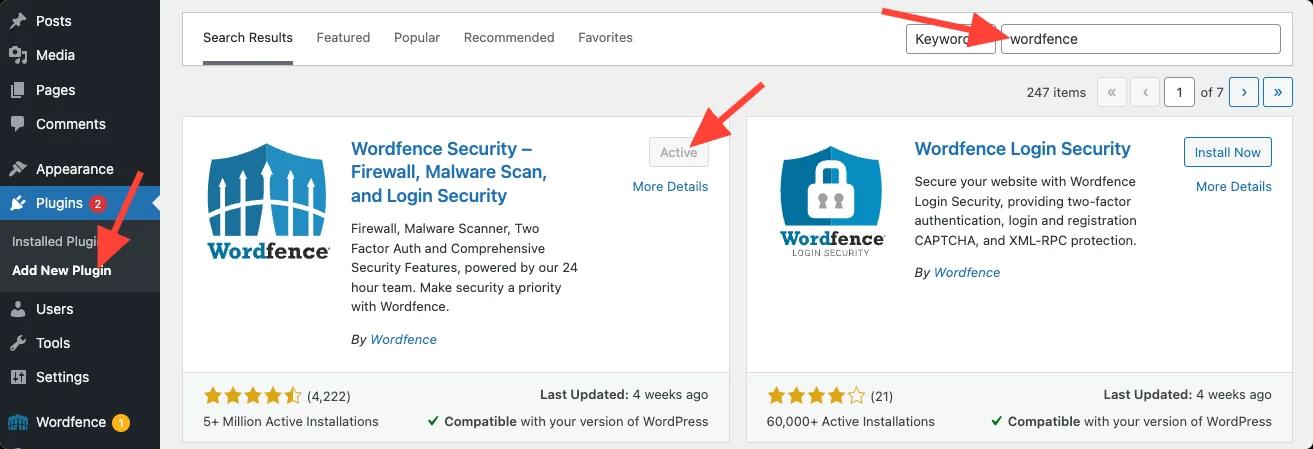
First you need to log in to your WordPress dashboard. Then, Navigate to Plugins > Add New.
Now, Search for "Wordfence". Click "Install Now". After installation, click "Activate".
Configure the Plugin
To configure the plugin:
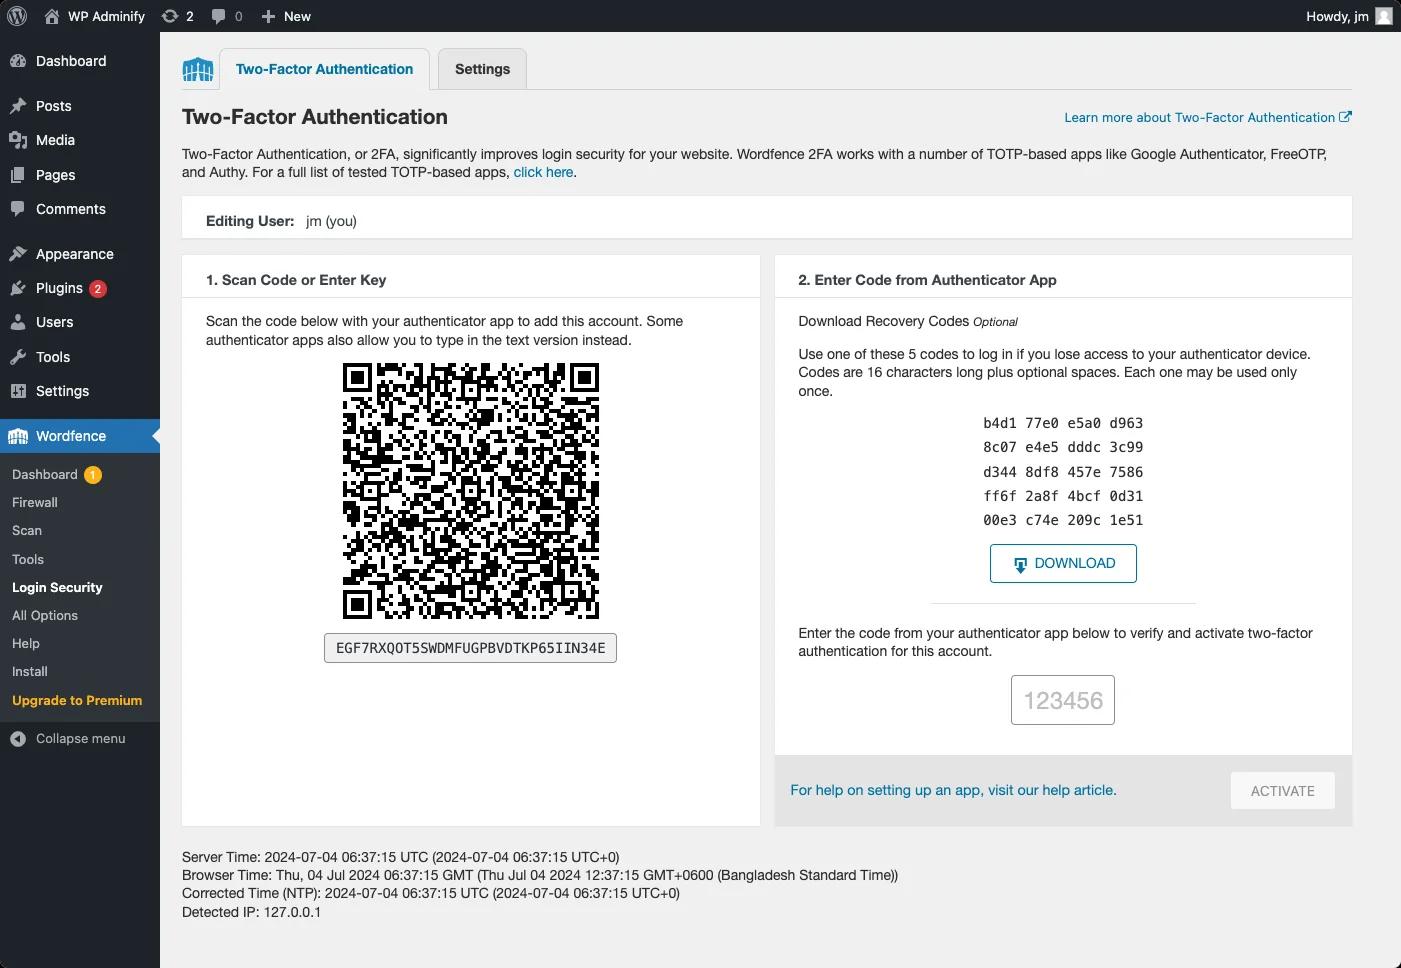
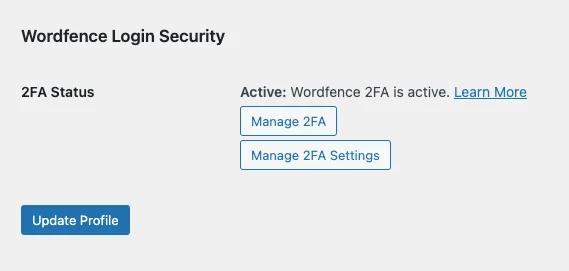
Go to Wordfence > Login security. Scan the displayed QR code with your authenticator app with your smartphone.
Open the authenticator app on your smartphone. Tap the "+" icon to add a new account.
Select "Scan a QR code" and use your phone’s camera to scan. You can see the QR code in WordPress settings.
Set Up the Authenticator App
Here's how to set up the authenticator app:
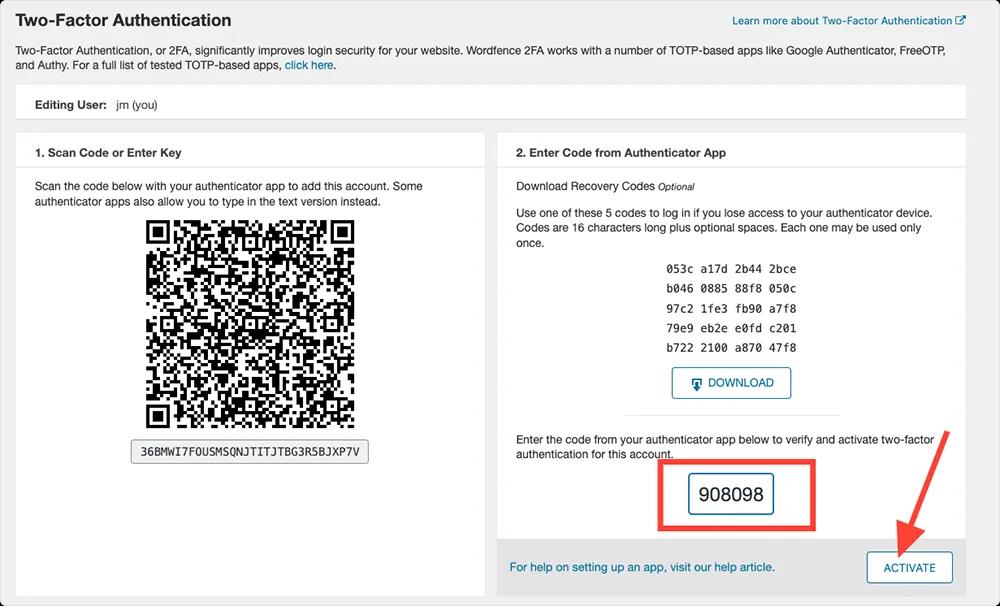
The app will generate a six-digit code. Add the code here and click on activate
Download Backup Codes
As soon as you activate the 2FA, it will provide you a option to download the backup codes.
Store these codes in a safe place. These codes can be used if you lose access to your authenticator app.

2FA Activation based on WordPress User Role
Navigate to settings. Select Required / Optional / Disabled 2FA for roles. Save the settings.

Testing the Setup
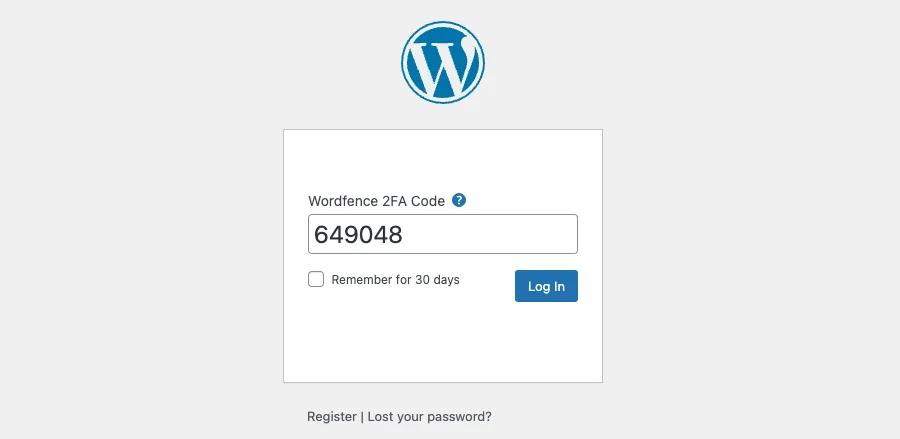
Log out of your WordPress admin. And, log back in using your username and password.
Now, you'll need to enter the six-digit code from your authenticator app. Enter the code and click "Log In".
Enhance Security with Custom Login URL (Optional)
WordPress provides a secure login system. But you can add an extra layer of protection by changing the default login URL (/wp-login.php). This makes it harder for scrapers/crawlers to discover your login page.
Here's how to do that using WP Adminify's URL Redirection:
What WP Adminify Offers:
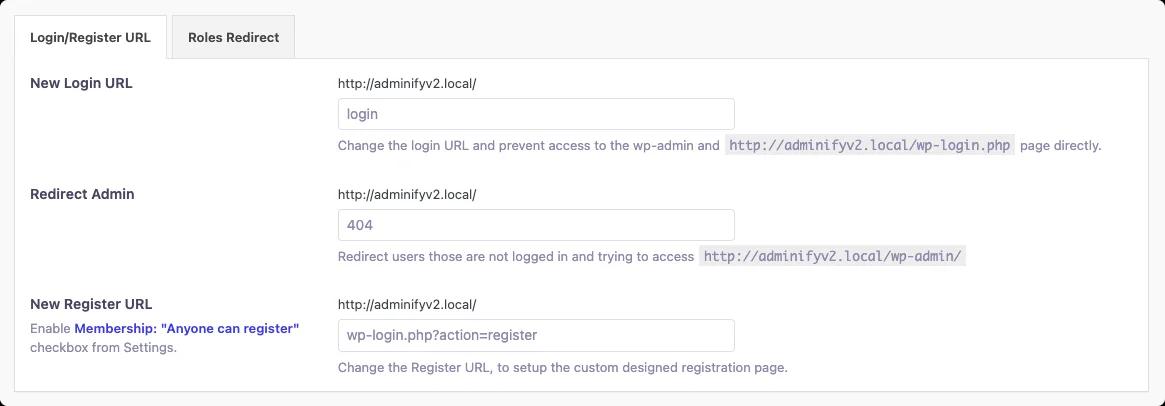
New Login URL:
Set a custom login URL (e.g., /secure-login) to replace the default /wp-admin or /wp-login.php.
Note: This changes the default login page URL.
Redirect Admin:
Redirect users access from the default admin URL (/wp-admin or /wp-admin/) to a custom page (Could be a 404 error page).
New Register URL (Optional):
You can create a unique registration page to customize the user registration process.
WP Adminify doesn't directly control user registration. But you can use other third party plugins for that. Then, set a custom URL for your registration page using WP Adminify.
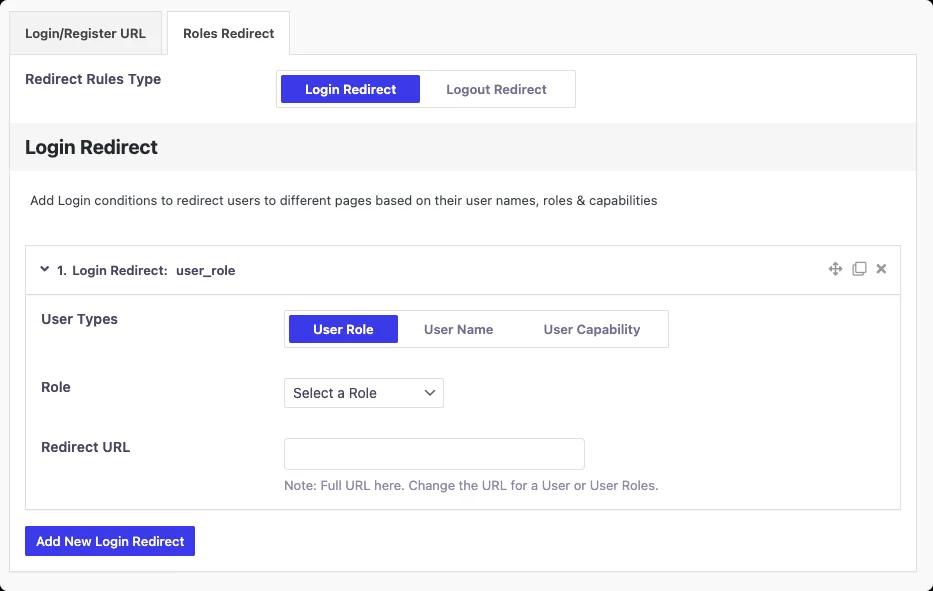
Login Redirect:
Control where logged-in users with specific roles or usernames get redirected after logging in.
Logout Redirect:
Control where users are sent after logging out, depending on their roles or usernames.
Recommendation
Since you’re already down the rabbit hole of security, there’s an extra level beyond 2FA you can go to ensure ultimate protection. This one’s a bit subtle so bear with us.
How can a robber rob a safe if the safe doesn’t look like a safe? Think of cheesy money heist movies. The safes are always hidden in plain sight: behind a painting, or behind a bookshelf. What do we learn from this? You can’t steal from or break into something you can’t see.
In terms of WordPress login pages, they are pretty easy to spot. They stick out like a sore thumb. What if we could change that?
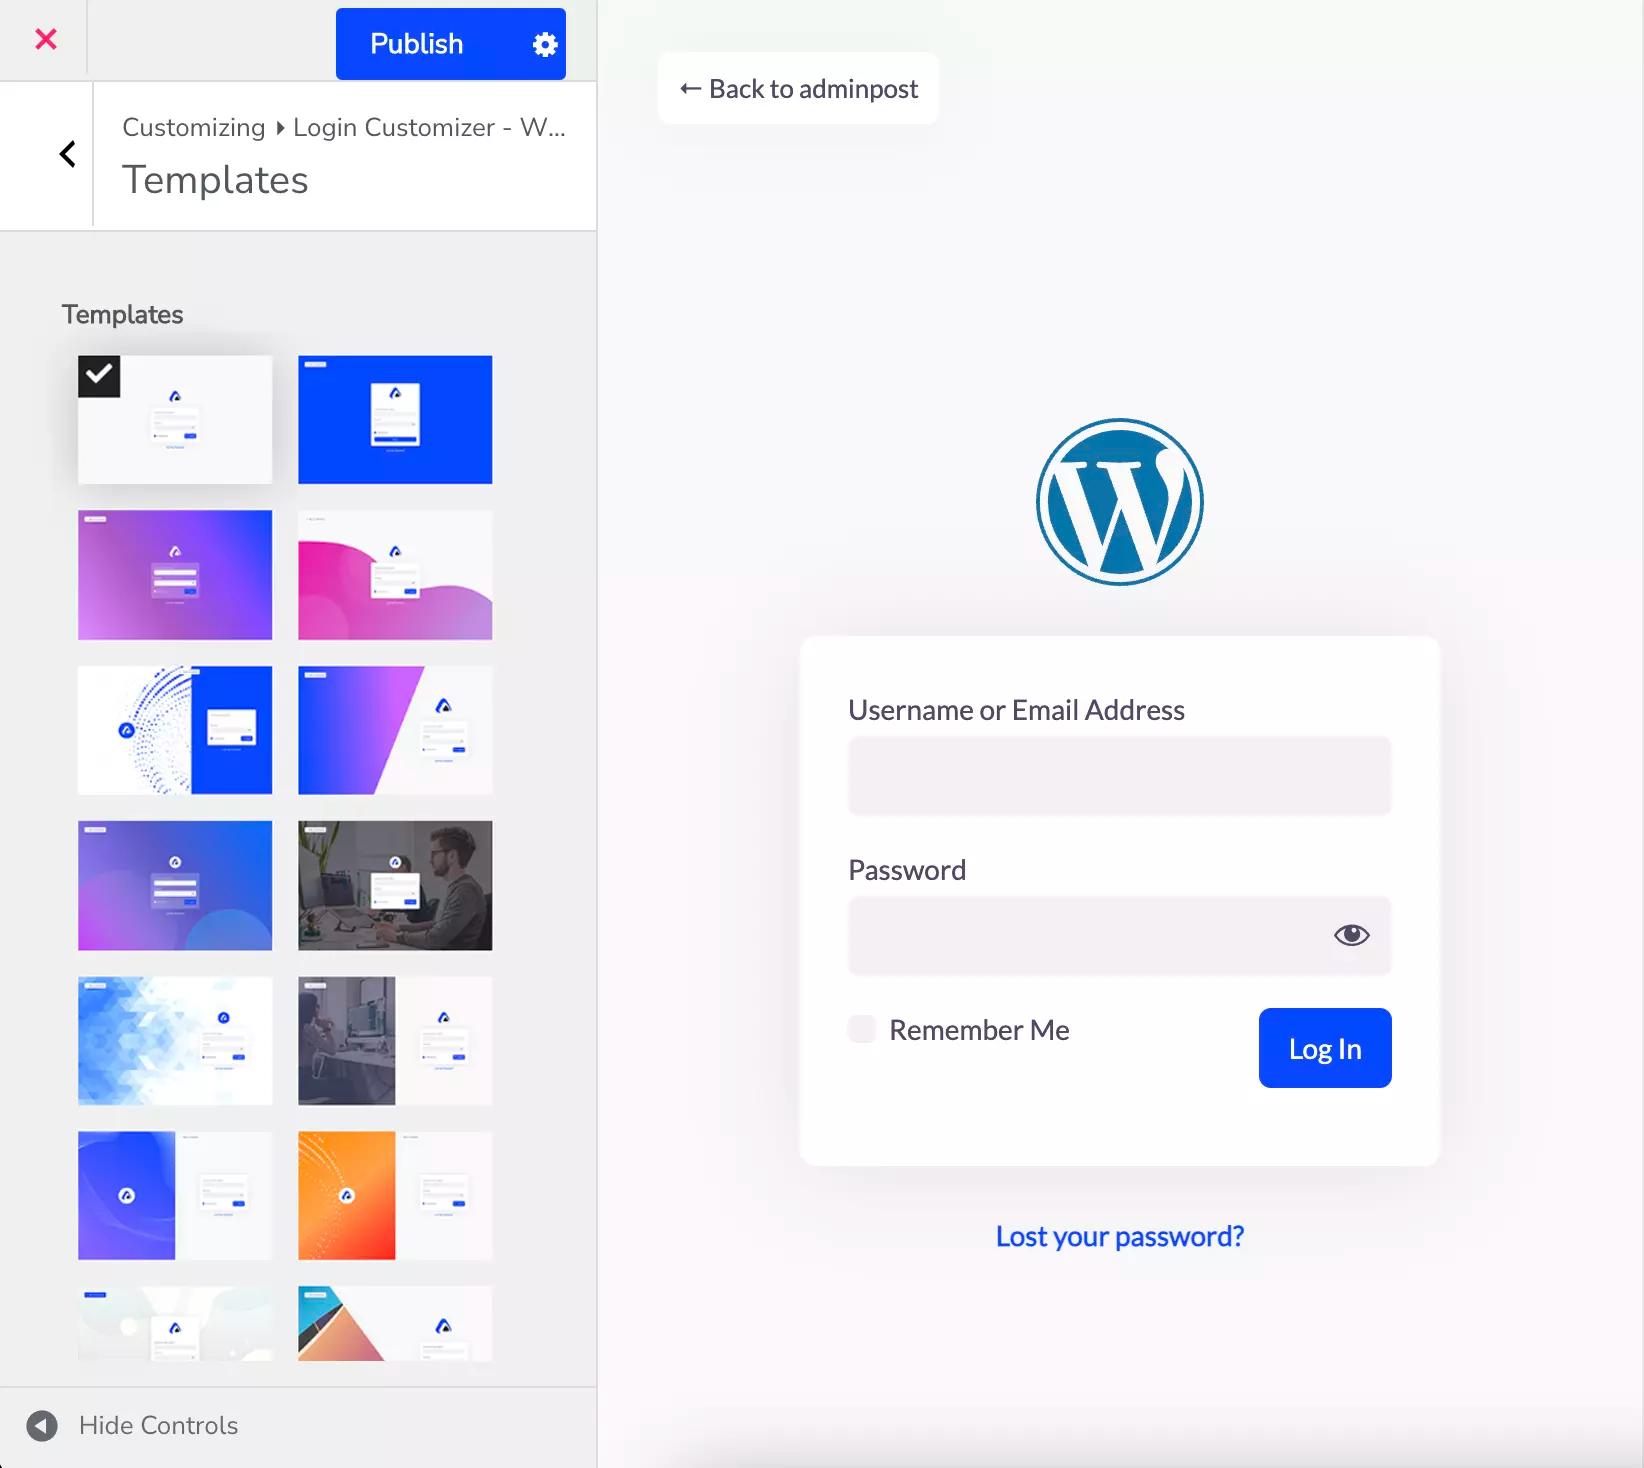
Well with Loginfy, you can.
Loginfy is a WordPress plugin that lets you completely customize the look of your login page so that it doesn’t look like a typical WordPress login page. Hackers and malicious third parties will usually ignore custom-looking login pages because they are harder to break into. Loginfy lets you:
- Change logos, backgrounds, forms, and buttons for a perfect design.
- Live preview ensures a flawless login page before publishing.
- Extensive color & typography options for perfect brand alignment.
- Advanced features like custom CSS & Javascript for unique login pages.
- Improve security & user experience with options to hide features.
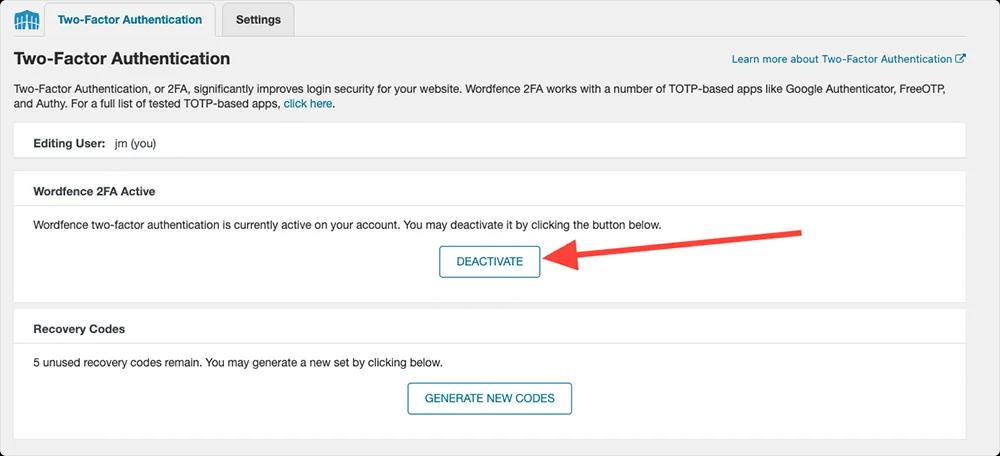
How do I disable 2FA for WordPress?
Log in to your WordPress admin dashboard. Go to WordFence >Login Security (or your chosen plugin).
You will get a button called "Deactivate" inside "Two-Factor Authentication". Just click on this button and confirm deactivation.
How do I reset my 2FA on WordPress?
Log in using a backup code if you have one. Go to Settings > Google Authenticator (or your chosen plugin).
Scan a new QR code with your new authenticator app.
If you don’t have a backup code, contact your site administrator for assistance. Otherwise, use other recovery options provided by your plugin.
How to disable the two factor authentication from single user?
Log in to your WordPress admin dashboard. Go to Users > All Users. Click on the username of the account for which you want to disable 2FA.
Scroll down to the 2FA settings section. Uncheck the box to disable 2FA for that user. Save the settings.
Final Thoughts
Now you know to to activate two-factor authentication for WordPress admin.
Using 2FA significantly reduces the risk of unauthorized access, even if your password is compromised.
As cyber attacks continues, 2FA helps you safeguard your website. Don't leave your WordPress site vulnerable. Go through this article to learn to activate 2FA today! Take control of your website's security.