The WordPress login page allows authorized users to uninterruptedly access the website by entering the correct credentials.
But unauthorized users may also try to reach the site to take full control of it. They sometimes prevail and make others completely despondent.
If you have a website designed with WordPress, you may fall into trouble and even give up on your web-oriented business if the website’s security system becomes fragile and vulnerable.
So what do you do to protect your profitable site? Of course, you need to change the WordPress login page URL first.
Besides, you have to gain mastery over ethereal actions to prevent malicious attacks. How? It’s not a daunting task at all if you can apply one of the highly functional plugins, WP Adminify.
In this article, we will walk you through the process of harnessing the resounding plugin. Let’s dive deeper.
Is it worth changing the WordPress login page URL?
No matter how robustly you develop your website, it doesn't matter how strong your password is; you will encounter frequent unwanted access attempts from toxic users.
They may, at times, break into your site to inflict it. Ultimately, they may steal your sensitive data and interrupt the performance. Literally, there will be little hope of expecting any revenue from the site once it’s out of your control.
To say it straight, the entire security system of your website may fall into jeopardy unless you adopt preventive steps.
In this case, you need to protect your data and information from unlawful login seekers at any cost.
That means you have to utilize tools and software compatible with WordPress to reinforce security.
There are a plethora of plugins available online that can rescue your site from a great loss by changing the login page URL to other pages. The sooner you take the steps, the better it will be for your website.
How to change the WordPress login page URL?
You obviously expect seamless interaction, a higher conversion rate, and maximum revenue from your website.
And it’s possible if you can reach your business goal by working relentlessly based on specific strategies.
But you must be mindful of the security system of your site, as it might be susceptible to getting hacked by hackers. You can create a custom WordPress login page URL to deceive cunning, malicious users.
As the WP Adminify plugin is at your fingertips, there is no need for concern.
You can unhesitantly install the plugin to get your desired task successfully done. Only installing won’t do; you also need to navigate the process properly to succeed.
Maximize Your Site's Security
Whether you're managing a single site or multiple clients, WP Adminify empowers you to create an efficient dashboard that is truly reflective of your brand's identity and your needs.

Do you want to excel at changing the WordPress login page using Adminify? If so, then you’re asked to adhere to the following steps:
Backup your website:
The WP Adminify is safe and tested.
But you may back up your WordPress website prior to working with the plugin to overcome any unexpected occurrences. By backing up, you can make sure there will be no obstacles to reviving the site if it crashes by chance.
How do you back up your site? Try to install a reliable plugin to keep the data and assets of your site intact.

Install WP Adminify
To change your login url you'll need the a Pro version of WP Adminify.
After purchase, you'll receive a zip file of the plugin from your login page. Then you can go to the "Upload Plugin" option from the dashboard and click on the "Add New" option.
Then click on "Upload Plugin", now choose the WP Adminify plugin that you've downloaded from your account.

Configure the plugin
After installing the plugin, you need to activate the license which you can get from here.
Once you configure the premium version of it, you will discover the "WP Adminify Pro" option in the left bar of the dashboard. Just click on the option, and a page with a vast number of modules will be presented to you.

Enable the Redirect URLs module
Now your task is to find the Redirect URLs module, which you badly need to manipulate.
The module might be disabled by default. So you have to enable it to allow it to commence the operation.
Once you are able to enable the module, your next task is to click on the "Save" button and reload the page.

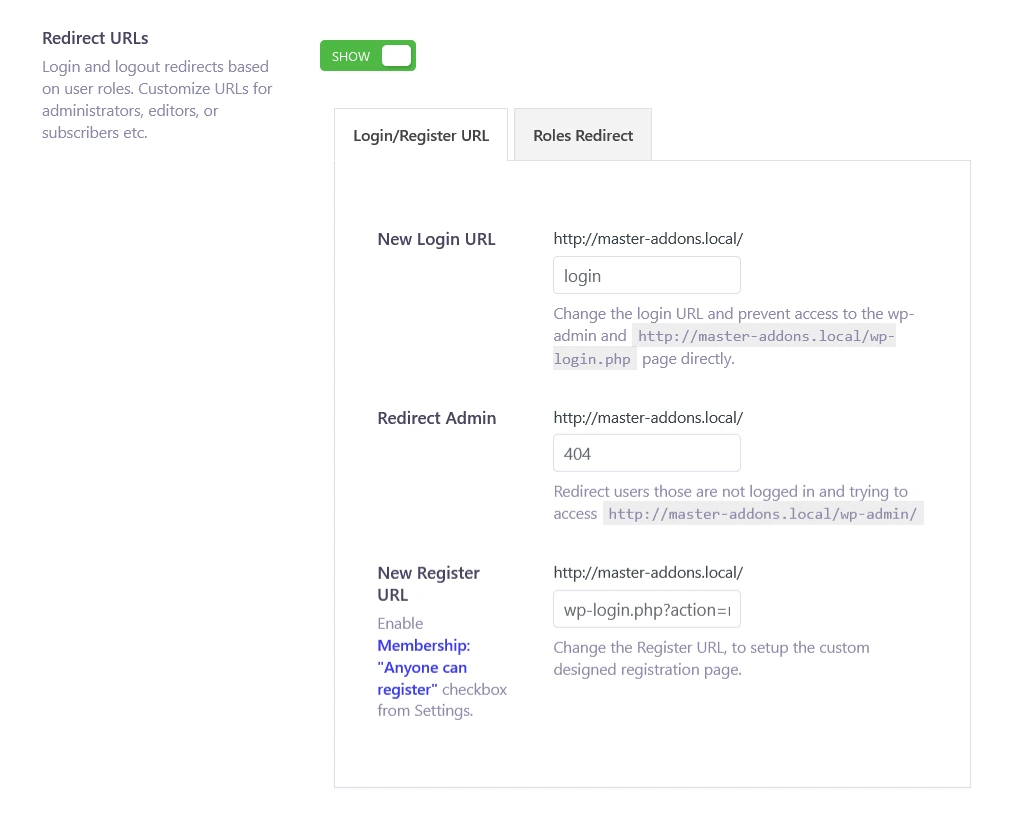
Click on the Redirect URLs
The module will be aligned with the other modules in the left menu bar of the dashboard after enabling it.
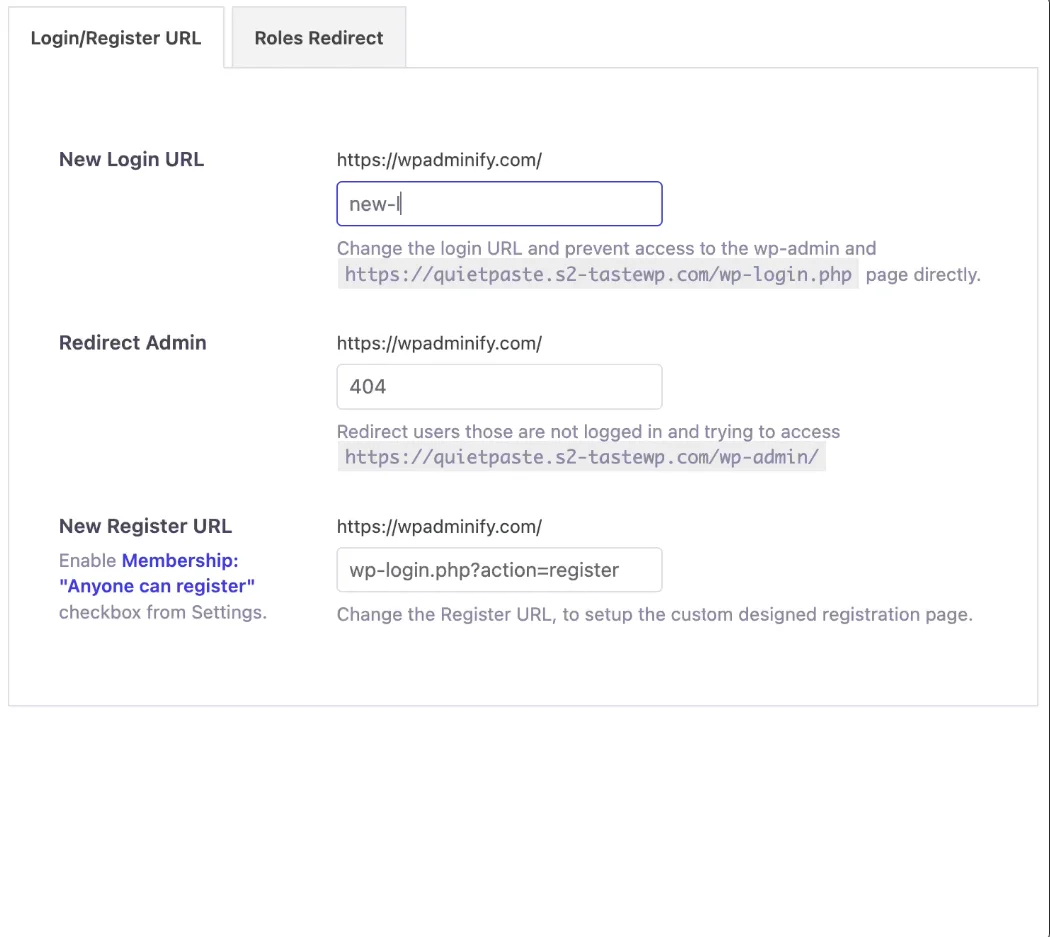
This time, you have to click on it. A login URL page involving the "New Login URL" and Redirect Admin" fields will be shown to you. You have to fill up the fields with appropriate data.

Fill in the fields under the Login URL page
Now it’s the most important step. You have to enter the login page URL into the "New Login URL" field.
Then enter a page URL into "Redirect admin", where you’re willing to redirect users with a view to enhancing security.
It will be the best option if you enter the "page 404" URL to prevent access for those who are trying to make an intrusion on your site.
But you can also change the WordPress login page URL to other pages at your convenience.

Test your new login URL
You’re ready to take full advantage of the intuitive WP Adminify plugin once you enter the page URLs and click on the "Save" button. As of now, just test your new login URL to make sure the plugin is working with your website.

If you find the login page is redirecting you to "404", you take a deep sigh as your time and effort have paid off.

Change WordPress login URL without plugin (using code)
If your WordPress abilities are a bit advanced by which I mean that you are comfortable touching code then this method will be cakewalk for you.
Lets break it down into a few steps.
Step 1: Back up your website
Now, in life we don’t get do-overs but thankfully in WordPress we do so it’s best to use it. Especially when you’ll be tinkering with sensitive configuration files on the backend of your website.
No matter how sure you are of your coding abilities, mistakes can happen. So its best to be prepared, just in case you introduce some bug inducing code while editing core WordPress files.
We’ve already discussed earlier how you can do this so if you’re just joining us on this section I’d advise you to just scroll up a little and see how to back up your website.
Step 2: Access your website files
There are many ways to access your website files. You can use FileZilla and connect to your host server using FTP or you can use the file manager tool from your cPanel settings.
Step 3: Locate the functions.php file
Find the functions.php file in the your public_html file. Just follow this path in the file directory:
public_html >>> wp-content >>> themes >>> “Whatever theme you’re using” >>> functions.php

Step 4: Edit the functions.php file
Double click on the functions.php file or right click on it and hit edit to get to the code.
Then scroll to the bottom of the code and add the following code snippet:
function custom_login_url_redirect() {
    // Check if the current request is for the login page
    if (strpos($_SERVER['REQUEST_URI'], '/wp-login.php') !== false) {
        // Redirect to the custom login URL
        wp_redirect('https://example.com/custom-login');
        exit;
    }
}
add_action('init', 'custom_login_url_redirect');
Remember to replace https://example.com/custom-login with your actual custom login URL.
Step 5: Test the New Login URL
Now we test!
Instead of typing the default /wp-login.php or /wp-admin, simply enter the unique URL you specified (e.g., https://example.com/custom-login) directly into your browser's address bar and hit enter.
If everything's configured correctly, you'll be redirected straight to the standard WordPress login screen - but through your new, obscured pathway. Nifty, right?
Now you know how to change wp admin url for better security on your Wordpress site.
Without and with code!
Final words
It’s presumed that the reduction of protection can wreak havoc on the potential of a website through continuous intrusive attacks. If you’re running a website built with WordPress, you need to ensure optimal security at all times by changing the login page.
How to change the WordPress login page URL to enhance security? It won’t appear to be a strenuous task if you can follow ideal methodologies and realize the nuances of the utilities available online.
However, based on rigorous research and practical experience, we shared with you a phenomenal plugin that can certainly make a significant difference by changing the login page.
You can reach out to the unmatched plugin to prevail over others in terms of protecting and customizing your website.


