
WordPress, with its user-friendly interface and extensive customization options, is the go-to platform for millions of websites around the world.
As a website owner or administrator, you might find the default WordPress admin menu a bit cluttered at times. Fear not! Creating a custom admin menu can provide you with greater control and accessibility to the features you need the most.
In this guide, we’ll walk you through the steps of creating a custom admin menu in WordPress to enhance your website management capabilities. We'll use the Admin Menu Editor by WP Adminify here.
Why Create a Custom Admin Menu?
The default admin menu in WordPress provides access to various sections, including posts, pages, media, plugins, and settings. However, as your website grows, navigating through these options can become overwhelming.
A custom admin menu allows you to organize features, tools, and settings that are most relevant to your website, making management more efficient and user-friendly.
Understanding WordPress Admin Menus
Before we dive into creating a custom admin menu, let’s understand what WordPress admin menus are. These navigation panels are located on the left side of your WordPress dashboard. They serve as gateways to different sections of your site.
By creating a custom menu, you can add, remove, or rearrange these sections to match your workflow. Admin menu editor module can help you to personalize your Dashboard menu.
To understand more regarding WordPress administration menus development you can check this Adminstration Menus guideline. It will help you create and properly assign admin menu items as WordPress standards.
Planning Your Custom Admin Menu
To create an effective custom admin menu, start by outlining the sections and features you frequently use. Consider the needs of different users if you’re running a multi-author blog or a collaborative website.
Having a clear plan will help you design a menu that truly enhances your WordPress experience.
Use custom admin page
Creating a custom menu requires more than just adding it to your WordPress Dashboard. You also need to fill it with some content. If you want to use a custom menu for an existing option or page, that's fine. But if you want to make a new custom admin page, it can get tricky.
With the Custom Admin Page feature, you can easily design any kind of admin page using your preferred page builder or the default WordPress editor.

Now we can move on to the main task of creating a custom admin menu in your WordPress Dashboard. I will demonstrate two different methods for this: one using the WP Adminify plugin and the other using code.
Creating a Custom Admin Menu with a Plugin
Choose a suitable plugin from the WordPress repository. Look for plugins like "WP Adminify" that offer intuitive interfaces for menu customization. Before following the steps make sure you have the WP Adminify plugin installed and activated.
If you are not a WP Adminify user, make sure to install it. Otherwise, scroll down and follow the steps to Add a custom admin menu by code. It doesn't require any plugin to install.
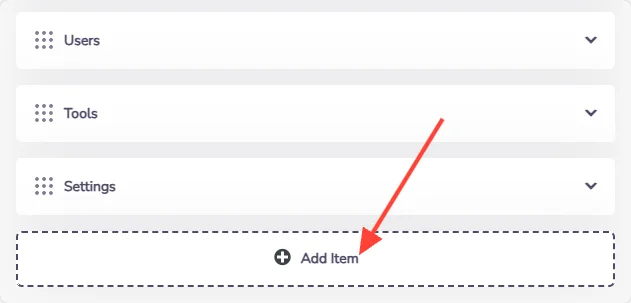
Add new Menu
Please ensure that you have successfully installed the WP Adminify plugin. Once installed, kindly proceed to the "Menu Editor" option panel and select the "Add Item" option to continue. The interface should resemble the provided screenshot.
Custom admin menu interface
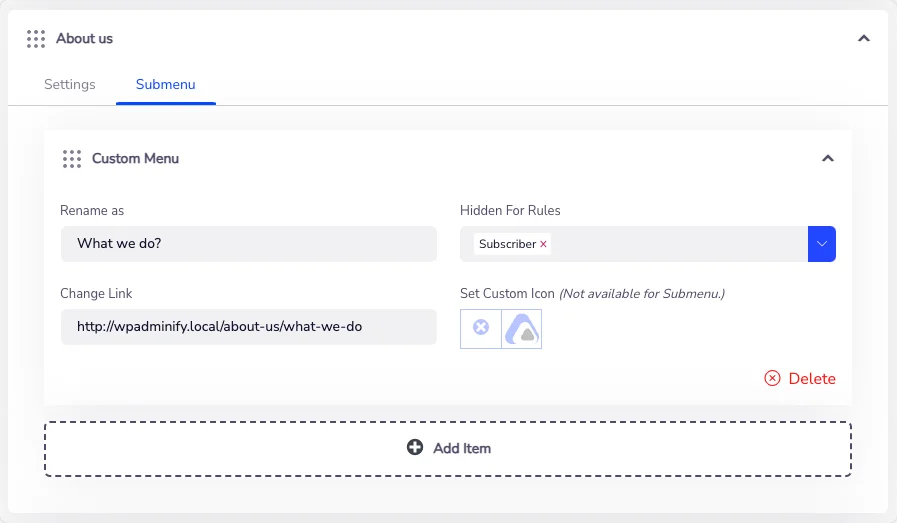
After selecting the "Add Item" option, you'll be presented with an interface that showcases all the essential settings needed for creating a custom admin menu item. Additionally, you'll notice the availability of a submenu option, allowing you to effortlessly add sub-items under any primary custom menu.
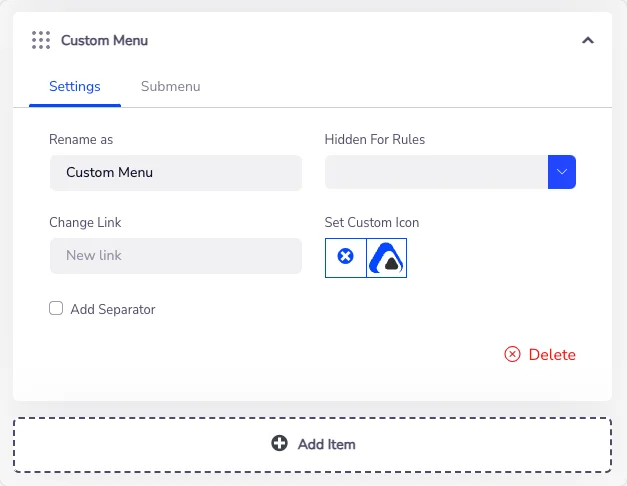
Fill up options for Custom Admin Menu Items
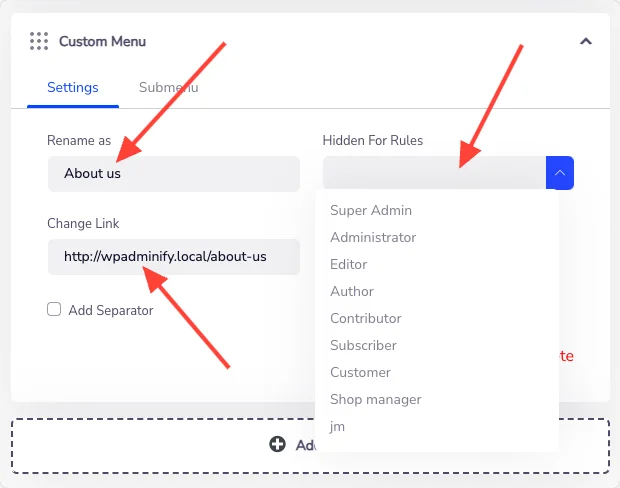
Begin by meticulously completing all the necessary options. First, provide a descriptive name for your custom menu item. Next, configure the associated link, and if needed, selectively hide the menu based on specific user roles or individual users.
Set icon for custom menu item
This admin menu editor offers Dashicons, Simple Line Icons, Themify Icons, and Icomoon Icons. You can upload any type of Custom Icons too. It will automatically adjust the height and width of your icon.
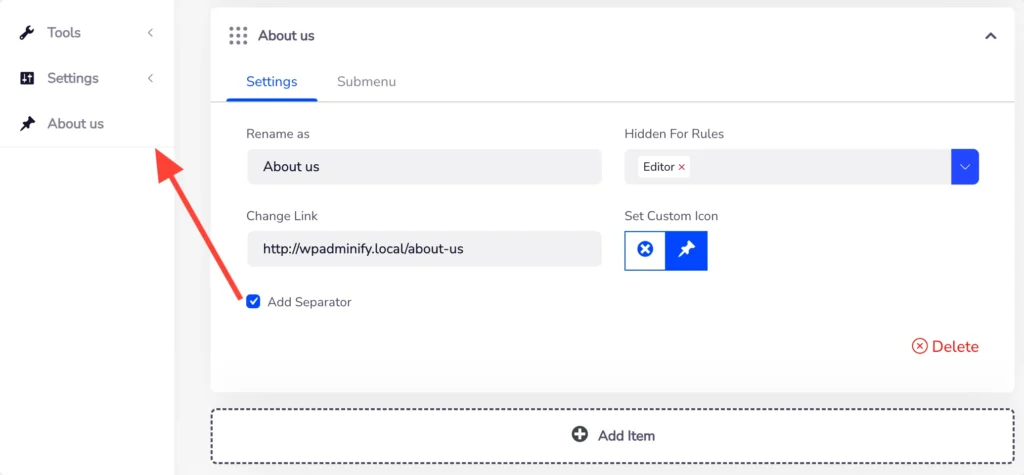
Add separator for Admin Menu items
Observe the appearance of the custom menu with a separator. Simply enable the checkbox labeled "Add Separator" and save your changes. Additionally, you have the flexibility to add separators to any existing admin menu items.
Add submenu under custom admin menu items
Creating the main custom menu is essential, but there are instances where additional sub-menu items need to be crafted beneath a primary admin menu item. Utilizing the submenu option, you can generate an unlimited number of submenus. However, it’s important to note that custom icons are disabled for these submenu items, as WordPress does not permit icon display within submenus.
Thank you for exploring the process of adding a menu to the WordPress admin dashboard. While plugins like WP Adminify offer convenience, I’ll now guide you through creating a custom admin menu item without relying on any external plugins.
Creating a Custom Admin Menu Without a Plugin
If you prefer a code-based approach, follow these steps:
Accessing Your Theme’s Functions.php File
- Log in to your WordPress dashboard.
- Go to “Appearance” and select “Theme Editor.”
- On the right, find and click on “Theme Functions” or “functions.php.”
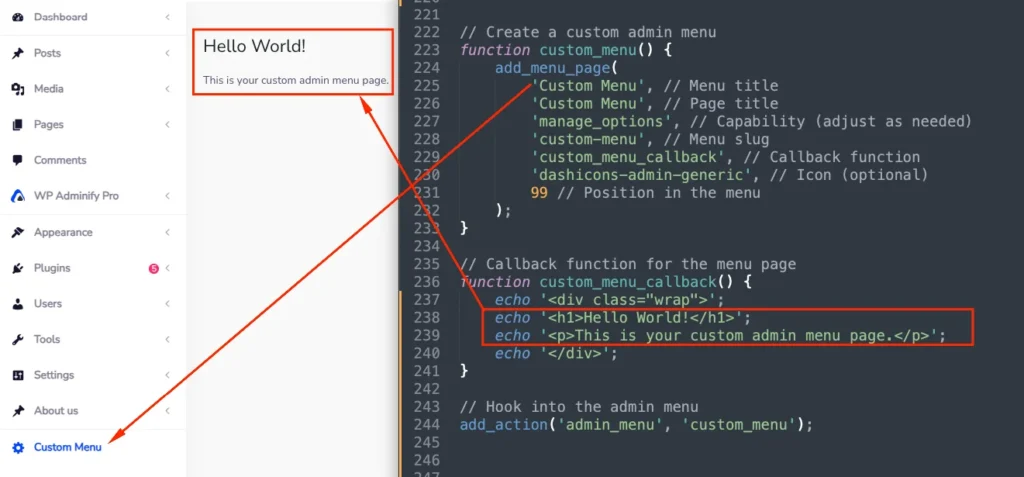
Adding Code to Create a Menu
Add the following code snippet to your functions.php file to create a basic custom admin menu:
// Create a custom admin menu
function custom_menu() {
add_menu_page(
'Custom Menu', // Menu title
'Custom Menu', // Page title
'manage_options', // Capability (adjust as needed)
'custom-menu', // Menu slug
'custom_menu_callback', // Callback function
'dashicons-admin-generic', // Icon (optional)
99 // Position in the menu
);
}
// Callback function for the menu page
function custom_menu_callback() {
echo '<div class="wrap">';
echo '<h1>Hello World!</h1>';
echo '<p>This is your custom admin menu page.</p>';
echo '</div>';
}
// Hook into the admin menu
add_action('admin_menu', 'custom_menu');
Replace 'Custom Menu' and 'custom_menu_callback' with your desired menu title and content.
Whether you choose a plugin or prefer coding, creating a custom admin menu empowers you to streamline your WordPress experience. Take control of your dashboard, organize your features, and make website management a breeze!
If you’re not well-versed in coding, I highly recommend opting for the WP Adminify plugin. It streamlines the process, granting you access to a plethora of features without requiring any manual code input.


