When navigating a website, navigation menus are essential tools for providing guidance. They give users a broad overview of the website and facilitate easy access to the pages or information they wish to view.
They are arguably the most important component of a website. A menu that is well-structured can greatly improve the user experience by making navigation simple.
One of the most widely used content management systems, WordPress, provides a variety of choices for making unique menus without the need for coding expertise.
We'll look at three easy ways to make custom menus in WordPress in this post: using the built-in features of your theme, using Full Site Editing (FSE) or the Gutenberg editor for block themes, and using a plugin. Regardless of your level of WordPress experience, these techniques are simple to implement.
What is the Difference Between Classic Themes and Block Themes?
Understanding the main distinctions between WordPress's Classic and Block themes is crucial before we start building custom menus since they have an immediate effect on how menus are made and maintained.
Classic Themes:
- Conventional Method: For many years, WordPress has relied on classic themes. They use a conventional PHP-based framework in which theme files like as header.php, footer.php, and functions.php manage the layout and design.
- Widgets and Customizers: The WordPress Customizer and widgets are usually used to customize Classic themes. The Appearance > Menus component is used to construct menus, and the design is frequently less customizable, necessitating coding expertise for more complex adjustments.
- Restricted Flexibility: Classic themes require a combination of established theme settings and code, despite their high degree of customization. Custom CSS or theme file modifications are frequently required to create a complex or highly customized layout.
Block Themes:
- Full Site Editing (FSE): WordPress 5.9 included block themes, which are made to function with FSE. This enables users to use Site Editor blocks to design and modify the whole layout of their website, including headers, footers, and content sections.
- Gutenberg Blocks: The Gutenberg editor's block system controls every aspect of a Block theme, offering a more graphical and user-friendly approach to site creation and customization. This includes menus, which may be constructed with block-based components like the Navigation Block.
- Increased Design versatility: Compared to Classic themes, Block themes provide a great deal of versatility, allowing users to create unique layouts without ever touching code. For those who like a more interactive, drag-and-drop method of designing websites, this is perfect.
Knowing these distinctions will enable you to select the best custom menu creation technique for your theme and level of experience with WordPress' editing features.
WordPress offers the resources you need to create functional and aesthetically pleasing menus that improve the navigation of your website, regardless of whether you're using a Classic or Block theme.
Now that we've cleared it out, let's examine custom menus.
Comprehending WordPress Custom Menus
With WordPress custom menus feature, you can design and administer navigation menus that complement the layout and style of your website.
With custom menus, you have total control over what is shown and how it is arranged, unlike typical menus that could automatically include pages or posts in a predetermined order.
This adaptability lets you draw attention to key material, arrange connections logically, and improve user experience for your site's users.
What Are Custom Menus?
A custom menu is a collection of links, typically displayed in the website's header, footer, or sidebar, that guides users to various parts of the site.
These links can include:
- Pages: Static pages such as "About Us," "Services," and "Contact."
- Posts: Specific blog posts or categories of posts.
- Custom Links: External links or internal links that point to specific URLs.
- Categories: Links to blog categories, allowing users to filter posts by topic.
- Buttons: Call to action buttons such as "Purchase" "Buy Now" or "Register".
Why Customize Your Menus?
Ever felt lost on a website, clicking around aimlessly? We've all been there, and it's frustrating! That's why custom menus are so important.
Let's chat about why they can be such a godsend for your site:
- No More Confusion: Imagine your menu as a friendly tour guide. With a well-organized setup, your visitors can breeze through your site without hiccups. No more confusion, just smooth sailing! Happy visitors stick around longer - it's a win-win.
- Highlight Content Effectively: Got a page you're extra proud of? Maybe a killer blog post or an irresistible offer? Pop it in your menu where everyone can see it! It's like giving your best content the VIP treatment.
- Staying Relevant: Websites are living things, always growing and shifting. Custom menus let you keep up with the times. New content? No problem! Just customize your menu to show off your latest and greatest.
- Brand Imposition: Your menu isn't just functional - it's part of your site's brand! Style it up to match your brand's personality. A cohesive look tells visitors they're in the right place and you mean business.
Custom menus are a powerful tool for website owners to shape the user journey and ensure that visitors can access all the essential parts of the site with ease.
Whether you're using a classic theme, a modern block theme, or a plugin, creating and managing custom menus is a worthwhile endevour for anyone looking to build a presence on WordPress.
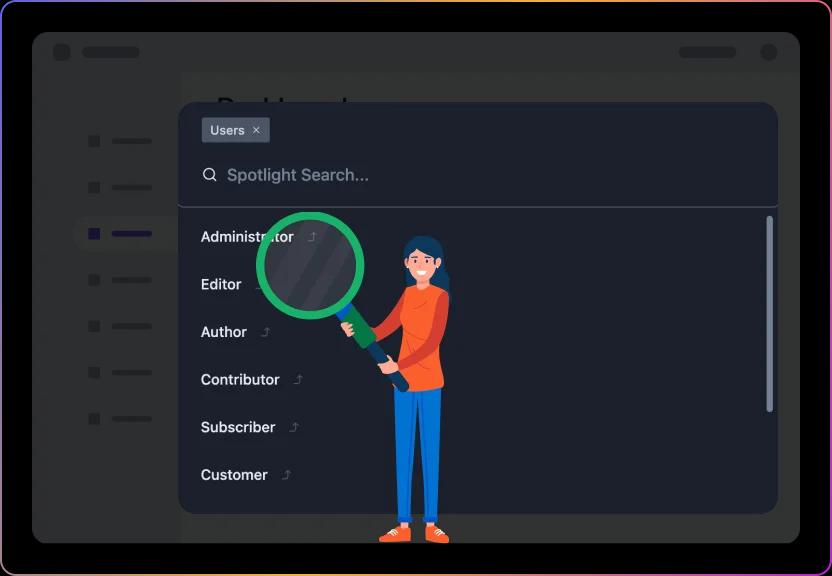
Find what you need faster
WP Spotlight adds powerful search functionality to your WordPress site, making navigation and discovery seamless for yourself and your clients.
Now you know what a custom menu is so lets look at how to customize menu in wordpress.
Method 1: How to Add Custom Menu in wordpress (Only for Classic Themes)
Many WordPress themes come with built-in support for creating and managing custom menus. This method is straightforward and does not require any additional plugins or technical skills.
You can easily create a custom menu through the WordPress dashboard and assign it to various locations provided by your theme, such as the header, footer, or sidebar.
Before going into this method please do ensure that you’re working with a classic theme and not a block theme as these functionalities are not available in block themes which we will check out later in the article.
Step-by-Step Guide
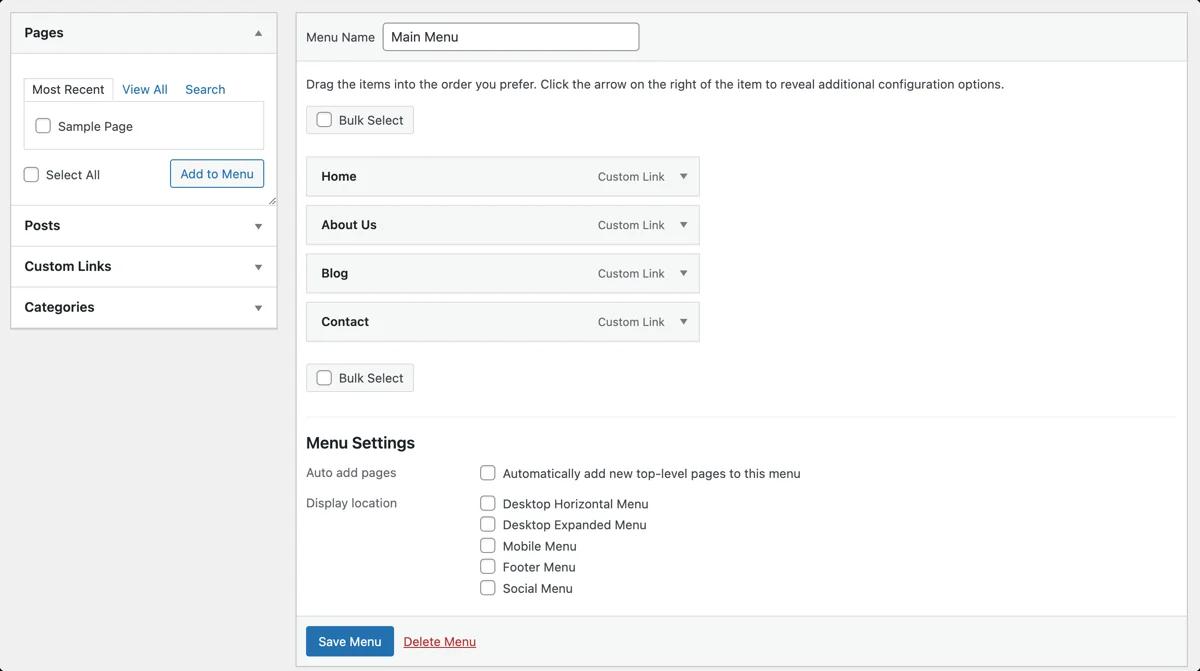
1. Accessing the Menus through Appearance > Menus
To start creating a custom menu, navigate to your WordPress dashboard and go to Appearance > Menus. This section allows you to manage your site's menus.
2. Creating a New Menu
If you're creating a menu for the first time, you'll need to set it up:
- Name Your Menu: Give your menu a descriptive name, like "Main Navigation" or "Footer Links," to help you identify it later.
- Click "Create Menu": After naming your menu, click the "Create Menu" button.

3. Adding Items to Your Menu
Once your menu is created, you can start adding items:
- Pages: You can add static pages such as "Home," "About Us," and "Contact" by selecting them from the list of available pages.
- Posts: If your theme supports it, you can add specific blog posts or groups of posts by category.
- Custom Links: To add external or internal links, use the "Custom Links" option. Enter the URL and link text you want to display.
- Categories: You can include links to blog categories, allowing users to filter content by topic.
Simply check the boxes next to the items you want to include and click "Add to Menu." You can’t add buttons in this method however. To add a button on a classic theme you’ll need to resort to a menu builder plugin.
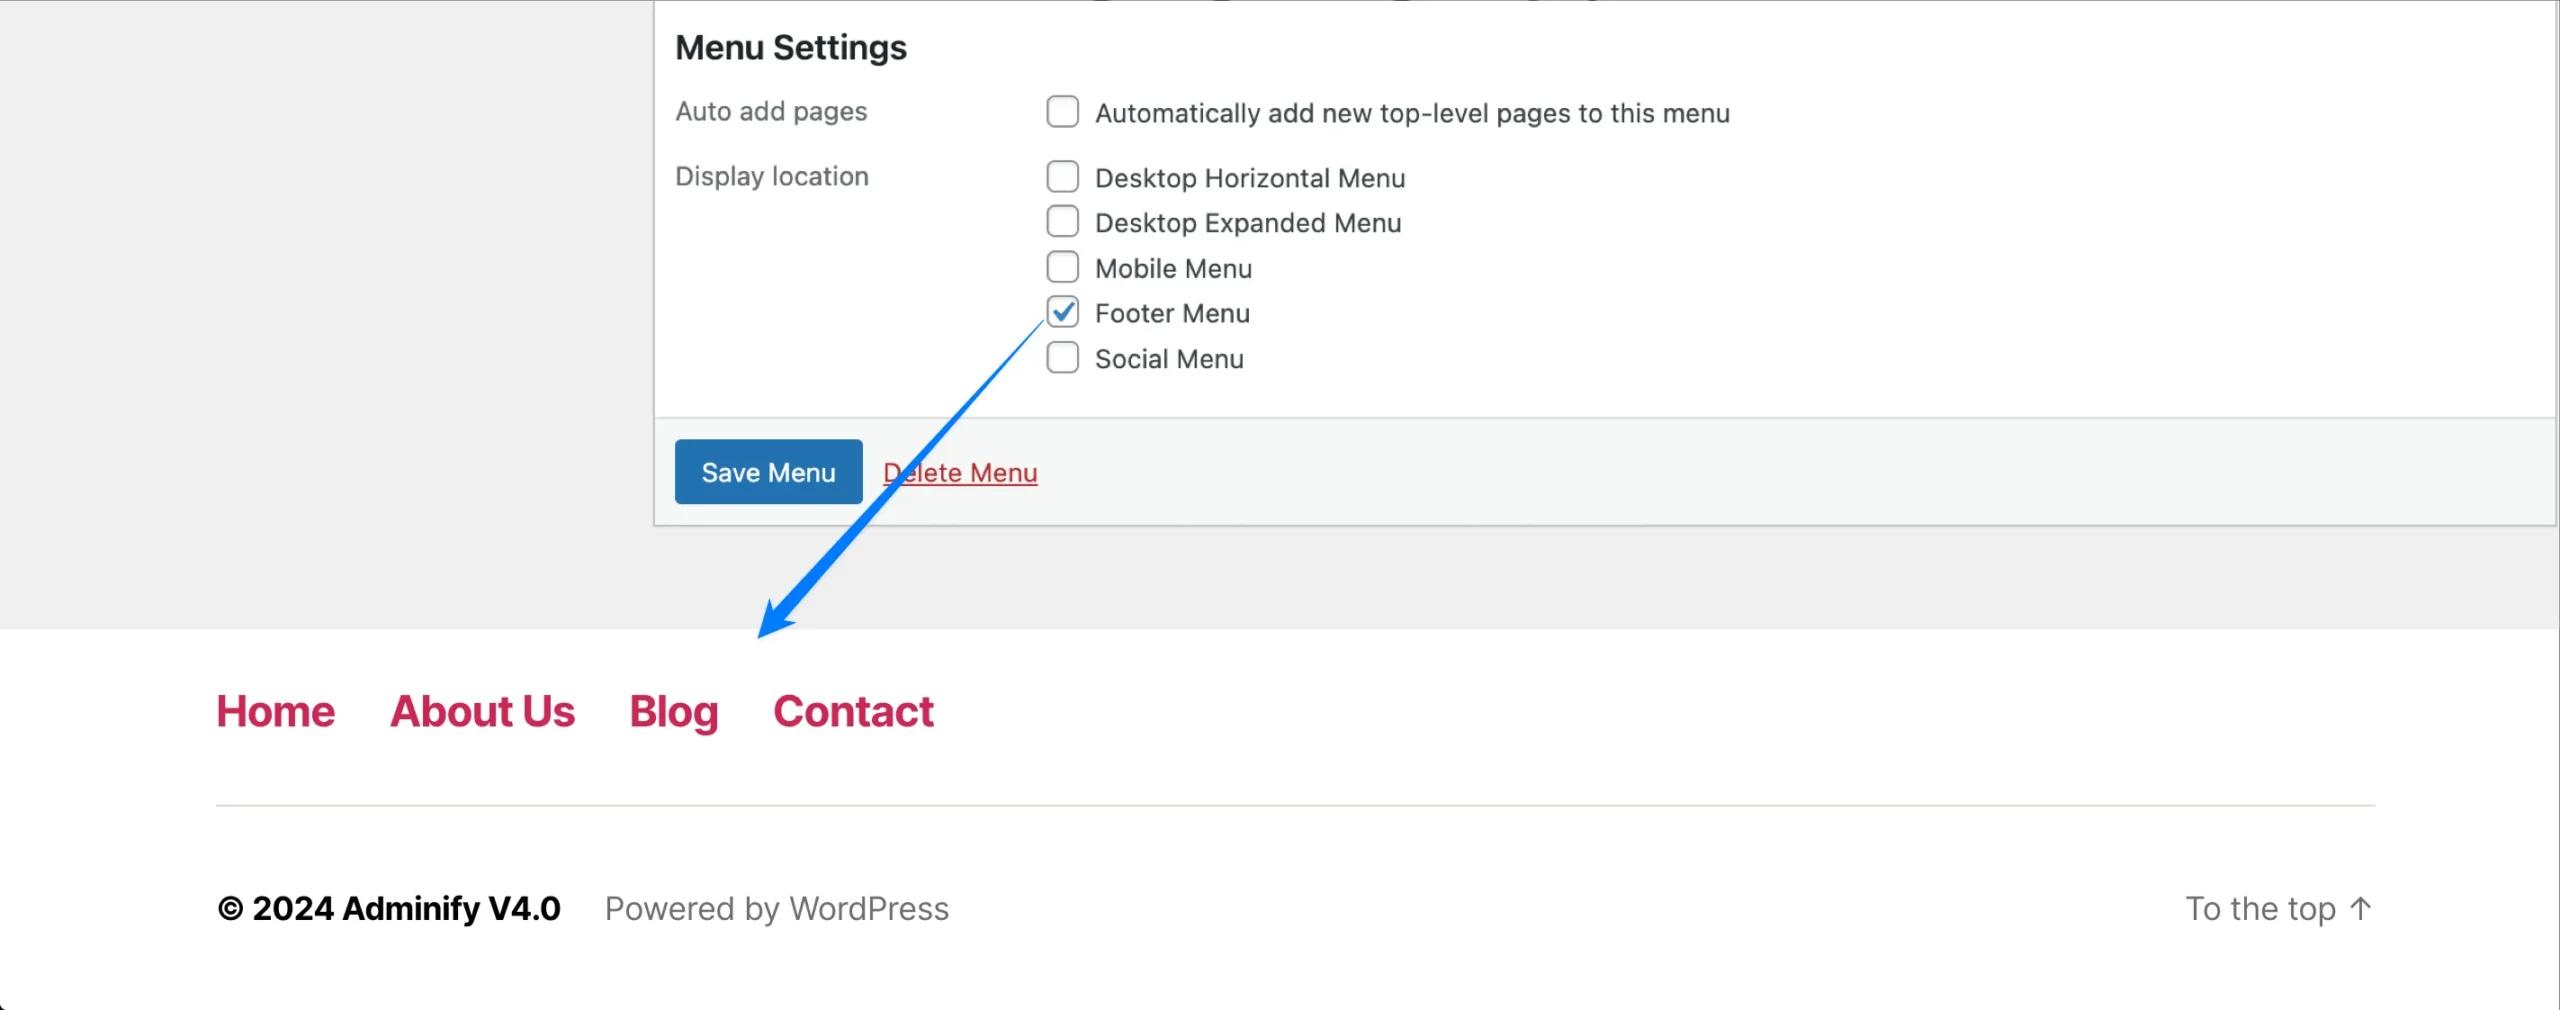
4. Assigning the Menu to a Location
After adding items, you'll need to decide where the menu will appear on your site. Your theme may support multiple menu locations, such as:
- Primary Menu: Typically located in the header, this is the main navigation menu.
- Footer Menu: A secondary menu located in the footer area.
- Sidebar Menu: A menu displayed in the sidebar, if your theme supports sidebars.
Select the appropriate location(s) for your menu by checking the corresponding box under "Menu Settings".
Remember, not all themes will support all three options. Some may only provide the Primary and Footer menu, others may include all three.
5. Organizing and Arranging Menu Items
You can easily organize and rearrange the items in your menu by dragging and dropping them into the desired order.
To create sub-menus (dropdown menus), simply drag an item slightly to the right under the parent item. This nesting creates a hierarchical structure.
6. Saving and Previewing Your Menu
Once you've added and arranged your menu items, click the "Save Menu" button to save your changes. It's a good idea to preview your site to ensure the menu appears as expected. Navigate to the front end of your website and check the menu's appearance and functionality.
Alternatively, you can also go to Appearance > Customize. This will take you to a live editor:
From here, click on "Menus" and start customizing your existing menus or add new menus.
As you’ve seen, using your theme's built-in functionality is a convenient and efficient way to create custom menus in WordPress.
It provides a simple interface for managing navigation without the need for additional tools or coding, making it accessible for all users.
There are a few limitations however such as styling changes or additional component usage such as buttons are not supported. So lets look at the second method that addresses these limitations.
Method 2: Using Full Site Editing (FSE) or the Gutenberg Editor for Block Themes (Only for Block Themes)
With the introduction of Full Site Editing (FSE) in WordPress, creating and managing custom menus has become more flexible and intuitive, especially for block themes.
This method leverages the Gutenberg editor's block-based approach, allowing users to design and customize their entire site, including navigation menus, using blocks.
Step-by-Step Guide
1. Navigating to Appearance > Editor
To access the Full Site Editing interface, go to your WordPress dashboard and navigate to Appearance > Editor. This will open the Full Site Editor, where you can customize various parts of your theme, including headers, footers, and templates.

2. Accessing the Site Editor or Template Parts
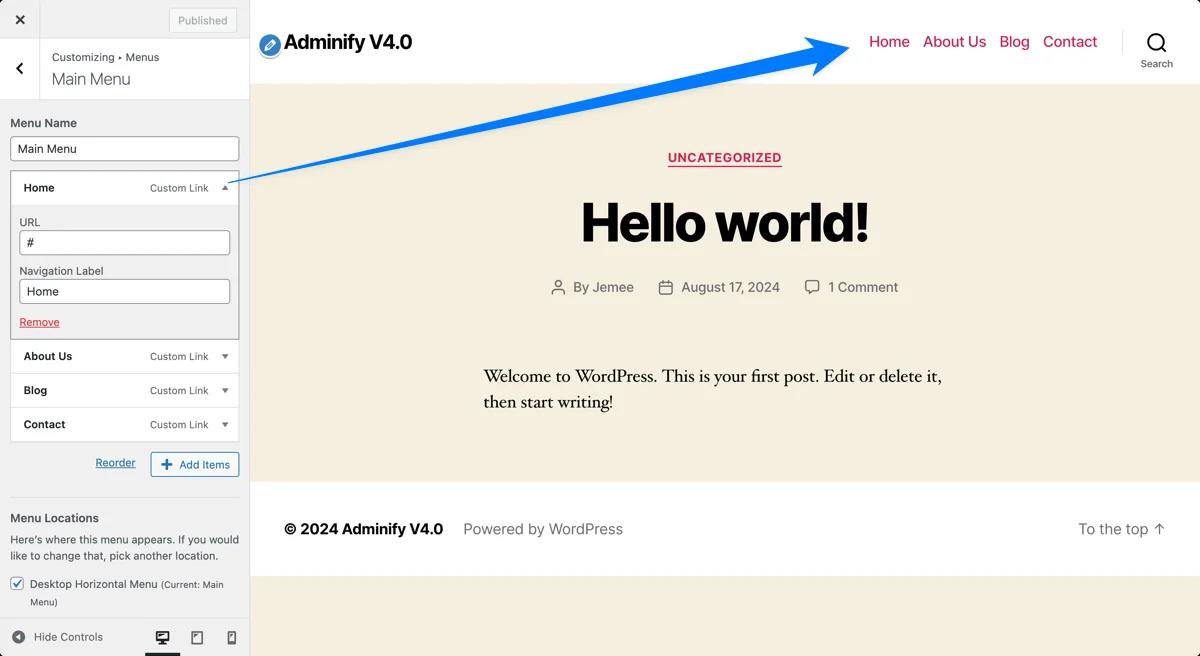
In the Site Editor, you can modify global site elements or specific template parts like headers and footers. If your goal is to add or edit a navigation menu, you'll typically work within the header template or Navigation part. Click on "Navigation" or the specific template part you wish to edit.
3. Adding a Navigation Block
To create a menu, you'll use the Navigation Block:
Insert the Navigation Block: Click on the "+" icon to add a new block and search for "Navigation." Select the Navigation Block and place it in your desired location, such as within the header area.
Adding Menu Items: Once the Navigation Block is added, you can start adding menu items. Click on "Add items" and choose from existing pages, posts, categories, custom links, or even specific templates. You can also reorder the items by dragging and dropping them within the block.

Creating Sub-Menus: To create dropdown sub-menus, simply drag a menu item slightly to the right beneath another item, creating a nested structure.
For block themes such as Twenty-Twenty-Four there’s a header usually added by default. Now if you want to add a custom menu (Navigation bar) to just one of the page then you can start editing right inside the header just click the "+" button and search for the navigation element:
Here’s what you’ll see after adding the navigation element:
You’ve just created the first option on your custom menu. Now you can add more options to the menu, add submenus to the options, add buttons and do bunch of other neat stuff.
As easy and fun as this is, it’s not the best practice. What you need to do is create a custom menu element so you can save it and use it across all your pages. You don’t want to have to design the whole menu again if you need to add it on another page.
So what do you do? When you first land on the editor on the left side bar click on "Navigation".
Then click on the 3 dots and click on Edit.
This will remove the all the other elements on the website and simply allow you to start editing the custom menu you want to create.
Here’s the test menu I created:
Next you need to save your new navigation menu. Just go the top right and click on "Save".
Now whenever you create a new page, no matter the pattern you use this custom navigation bar will be added to header. Here you can see that I created a Test page and the custom menu that I created is already here.
4. Customizing the Appearance
The Gutenberg editor provides various customization options for the Navigation Block:
- Layout: You can adjust the layout to display the menu horizontally or vertically.
- Colors and Fonts: Customize the menu's text color, background color, and font settings to match your site's branding.
- Additional Styling: Use additional block settings to adjust padding, spacing, and other design elements.
5. Saving Changes and Previewing the Menu
Once you've configured your menu, click the "Save" button to apply your changes. You can preview your menu's appearance and functionality by navigating to the front end of your website.
6. Managing Menus Across Your Site
In the Site Editor, you can manage menus across different templates and template parts. For instance, you may have different menus for different sections of your site (e.g., a main menu in the header and a secondary menu in the footer). You can easily switch between these templates and customize them accordingly.
Using Full Site Editing and the Gutenberg editor for block themes offers a highly visual and flexible way to create and manage custom menus. This method is ideal for users who prefer a more intuitive, drag-and-drop interface and want to take full advantage of the block-based design approach in WordPress.
Method 3: Using a Plugin (Only for Classic Themes)
Using a plugin to create and manage custom menus in WordPress is an excellent option for users who want additional functionality and design flexibility beyond what their theme or Full Site Editing provides. There are numerous plugins available that offer advanced features such as mega menus, customizable styling, and more complex menu structures.
Step-by-Step Guide
1. Choosing and Installing a Menu Plugin
To get started, you'll need to choose a suitable plugin based on your requirements. Some popular menu plugins include:
- Master Addons: Ideal for creating large, multi-column menus with a wide range of customization options.
- WP Mega Menu: Offers an intuitive drag-and-drop interface for building responsive menus.
- Responsive Menu: Focuses on mobile-friendly menu solutions.
To install a plugin, follow these steps:
- Go to Plugins > Add New in your WordPress dashboard.
- Search for the desired plugin by name.
- Click "Install Now," then "Activate" once the installation is complete.
2. Setting Up a New Menu Through the Plugin's Settings
After activating the plugin, navigate to its settings page. This is usually found under a new menu item added to your dashboard or within the Appearance menu.
- Creating a Menu: Depending on the plugin, you may have an option to create a new menu or modify an existing one. Follow the prompts to set up your menu.
- Adding Items: Just like in the default WordPress menu system, you can add pages, posts, categories, custom links, and more. Some plugins may offer additional options like icons, images, and custom widgets.
3. Customizing the Menu Layout and Style
One of the main benefits of using a plugin is the ability to customize the menu's appearance and behavior extensively:
- Layout Options: Choose from various layout styles, such as horizontal, vertical, or mega menu layouts.
- Styling: Customize colors, fonts, backgrounds, and other design elements to match your site's branding. Many plugins offer an intuitive interface with live previews, making it easy to see changes in real time.
- Advanced Features: Some plugins provide additional features such as animations, custom breakpoints for responsive design, and role-based menu visibility (showing or hiding menu items based on user roles).
4. Assigning the Menu to a Location and Saving Changes
Once you've configured your menu, you'll need to assign it to a specific location on your site. This can usually be done within the plugin's settings or through the standard Appearance > Menus interface:
- Primary Location: Often the main navigation area, such as the header.
- Secondary Locations: You may also have options for footer menus, sidebar menus, or custom widget areas.
Make sure to save your changes and check how the menu appears on the front end of your site.
5. Previewing and Testing Your Menu
It's important to preview your menu on both desktop and mobile devices to ensure it functions correctly and looks good across all screen sizes. Test all links and interactive elements to confirm that they work as intended.
Using a plugin for creating custom menus in WordPress provides a wide range of features and customization options that may not be available through your theme or the default WordPress functionality. This method is particularly useful for users who need advanced menu structures, unique design elements, or enhanced functionality like mega menus and responsive options.
NOTE: Before using any of these plugins it should be noted that to get the most functionality out of these plugins its recommended to get the Pro versions. The free versions are somewhat limited in their customization abilities...
Choosing the Best Method for Your Needs
When it comes to creating custom menus in WordPress, there isn't a one-size-fits-all solution.
The best method for you depends on your specific needs, the complexity of your site, and your comfort level with different tools.
Here's a breakdown of the three methods we've discussed, along with key factors to consider when deciding which one to use.
| Method | Best For | Advantages | Limitations |
| Using Your Theme's Built-in Functionality | Users who prefer using a classic theme and are looking for a straightforward, no-fuss approach to creating menus. | - Simplicity: Easy to use and accessible directly from the WordPress dashboard. - Compatibility: Works seamlessly with most classic WordPress themes. - No Extra Cost: Utilizes features already included in your theme. | - Limited Customization: Restricted by what your theme offers, lacking advanced features like mega menus or complex styling options. - Dependence on Theme: Will need to learn FSE if switching to a block theme. |
| Using Full Site Editing (FSE) or the Gutenberg Editor for Block Themes | Users who want a more visual and flexible approach to menu creation, particularly with block-based themes | - Full Control: Visual, drag-and-drop interface for designing menus within your site. - Block Flexibility: Incorporates a variety of blocks, including custom ones. - Consistent Design: Ensures menu design consistency with your site | - Learning Curve: More complex, especially for users unfamiliar with the block editor or FSE. - Theme Dependence: Requires a block theme, and switching themes may require adjustments. |
| Using a Plugin | Users who need advanced features, unique designs, or specialized functionality not available through their theme or FSE. | - Advanced Features: Access to complex structures like mega menus, responsive designs, and role-based visibility. - Extensive Customization: Wide range of styling and layout options. - Flexible Functionality: Offers features like drag-and-drop interfaces, live previews, and tool integrations. | - Additional Setup: Requires installing and configuring a plugin, which may add complexity. - Potential Costs: Some advanced plugins may require a premium version. - Compatibility Issues: Possible issues with certain themes or other plugins |
Factors to Consider
When choosing the best method for creating your custom menus, consider the following:
- Complexity of Your Site: If your site is running a classic theme and requires simple navigation, the built-in functionality may be sufficient. For more complex needs, FSE or a plugin might be better.
- Design Consistency: If maintaining a consistent design across your site is important, FSE can offer a more integrated approach. Plugins also provide design options but might require more effort to match your theme's style.
- Ease of Use: If you're looking for something quick and easy, classic themes and built-in menu functionality is likely the best option. However, if you want more control and are comfortable with WordPress, you will need to switch to block themes to utilize FSE or plugins that offer greater flexibility.
- Future Flexibility: Consider whether you might change themes or add more features to your site in the future. Plugins offer the most flexibility, but FSE is also adaptable if you switch to block themes.
Tips for Creating Effective Menus
Creating a custom menu is more than just organizing links; it's about designing a user-friendly navigation system that enhances your visitors' experience on your website.
A well-crafted menu can guide users to important content, improve engagement, and even boost your site's SEO.
Here are some tips to help you create effective menus that serve both your audience and your website goals.
1. Keep It Simple and Focused
- Prioritize Essential Links: Include only the most important pages and categories in your main menu. Overloading your menu with too many options can overwhelm visitors and make navigation more difficult.
- Use Clear, Descriptive Labels: Ensure that each menu item is labeled clearly so users immediately understand where each link will take them. Avoid jargon or overly creative names that might confuse visitors.

2. Consider the User Journey
- Logical Structure: Organize your menu items in a way that reflects how users are likely to navigate your site. For example, start with broad categories and drill down into more specific content.
- Limit Menu Levels: While dropdown menus can be helpful, avoid creating too many sub-levels. Ideally, users should be able to find what they need within two clicks.

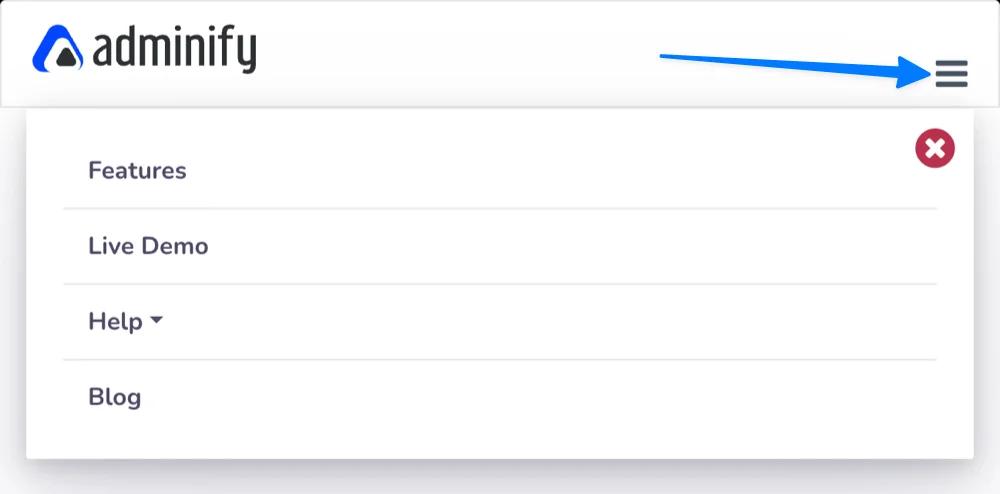
3. Optimize for Mobile Devices
- Responsive Design: Ensure that your menu is fully responsive and functions well on all screen sizes. Mobile users should have an easy time navigating your site without having to zoom or scroll excessively.
- Simplified Mobile Menus: Consider using a hamburger menu (☰) for mobile devices to save space. Keep the mobile menu simple and focus on the most critical links.
4. Utilize Mega Menus for Complex Sites
- When to Use Mega Menus: If your site has a large number of pages or categories, a mega menu can help organize content into a more digestible format. This type of menu displays all options at once, making it easier for users to find what they're looking for.
- Group Related Content: In mega menus, group similar items together under clear headings to help users quickly locate relevant content.

5. Incorporate Visual Elements
- Use Icons and Images: Adding icons or small images next to menu items can make them more visually appealing and easier to recognize. Just ensure that the visuals complement the text and do not overwhelm the design.
- Highlight Important Links: Use design elements like bold text, colors, or underlines to draw attention to key links, such as "Contact Us" or "Sign Up."
6. Leverage Drop-down and Sub-menus Strategically
- Sub-menus for Related Content: Use drop-down or sub-menus to organize related content under a main category. This helps keep the main menu clean and focused while still offering access to deeper pages.
- Avoid Overcrowding: While sub-menus are useful, avoid creating too many layers, as this can make navigation cumbersome and confusing.
7. Align Menus with Your Branding
- Consistent Styling: Ensure that your menu design aligns with your overall website branding. Use consistent fonts, colors, and styling that match the rest of your site.
- Custom Fonts and Colors: Depending on your theme or plugin, customize the font style, size, and colors of your menu to match your brand identity.
8. Test and Iterate
- User Testing: Regularly test your menu with actual users to ensure it is intuitive and effective. Pay attention to how easily they can navigate your site and whether they can quickly find key content.
- Analytics Review: Use website analytics to see which menu items are most clicked and adjust your menu based on user behavior. Remove or reposition items that are rarely used.
9. Consider Accessibility
- Keyboard Navigation: Ensure your menus are navigable using a keyboard, which is crucial for users with disabilities. Test your menu to confirm that all links can be accessed and activated without a mouse.
- Screen Reader Compatibility: Use semantic HTML and ARIA labels to ensure that screen readers can correctly interpret and read out your menu content for visually impaired users.
10. SEO Considerations
- Include Keywords: Where appropriate, include relevant keywords in your menu labels. This can help improve your site's SEO by signaling to search engines what each page is about.
- Internal Linking Strategy: Use your menu as part of a broader internal linking strategy to guide both users and search engines through your site’s hierarchy.
Conclusion
Creating a custom menu in WordPress doesn't have to be complicated, whether you're using your theme's built-in functionality, the powerful Full Site Editing (FSE) and Gutenberg editor for block themes, or a specialized plugin for advanced features.
By choosing the method that best suits your needs and following best practices, you can design an intuitive and effective navigation system that enhances your visitors' experience and supports your website's goals.
With the right approach, your custom menu can become a powerful tool for guiding users through your content, improving engagement, and helping your site stand out.