


Key Takeaways
- White label WordPress development is the process of building client sites on WordPress and delivering them under the agency's brand, so the client sees the agency in the admin, on the login page and in emails.
- A reusable template site with the theme, core plugins, user roles and admin branding already set up lets an agency start every client build from the same tested base.
- WP Adminify's Backup tab exports all plugin settings as JSON with an Export & Download button and imports them on another site, which copies one branded admin setup to every client site.
- WP Adminify's "Adminify" Branding section, on the Agency plan or higher, renames the plugin on the Plugins screen and in the admin menu, for example to "Acme Admin Suite" by Acme Studio.
- A white label WordPress onboarding checklist should be tested while logged in as the client's own role, because menu and visibility rules show different screens to administrators.
White label WordPress development means your agency builds client sites on WordPress and delivers them as your own product. The client logs in and sees your logo, your support details and a clean admin with no WordPress branding or plugin vendor names. To do this at scale, you need a repeatable process: one template site, one branding setup, a way to copy it, and a clear handover.
This guide covers that delivery process step by step, from the template site to maintenance after handover. If you first want to know every place WordPress shows its brand, start with our guide to white label WordPress for agencies. WP Adminify is a plugin, and we do not build client sites. We make the tool many agencies use for the branding part, and WP Adminify's white label feature appears in the steps below where it fits.
What Is White Label WordPress Development?
White label WordPress development has two meanings. For most agencies, it is building client sites and delivering them under your own brand. It can also mean hiring a partner developer who builds sites you sell as your own work, with the partner hidden. Both meanings end with the same result: a client site that only shows your agency's brand.
If you use a partner, the partner builds and you own the client relationship, the branding and the handover. The process below applies either way.
Whoever builds the site, clients notice the same things:
- A login page with their logo or yours, not the WordPress logo.
- An admin with plain menu names and only the tools they need.
- Your support details in the footer and on the dashboard.
- No upgrade offers or review requests from plugin vendors.
- Emails that come from you or from their business, not from "WordPress".
Step 1: Build a Reusable Template Site
A template site is a WordPress install with your standard theme, plugins, user roles and admin branding already set up and tested. Every new client build starts as a copy of it. This saves setup time. Every client also gets the same tested admin, no matter which developer or partner builds the site.
Put these on the template site:
- Theme and page builder: pick one stack and stay with it. If you use a white label WordPress page builder setup, add the builder and your saved layouts now.
- Core plugins: security, backup, SEO, forms, caching and your admin branding plugin. Keep the list short. Each plugin is one more thing to update and explain.
- User roles: decide which role the client gets. Many agencies give clients the Editor role, or a custom "Client Manager" role copied from Editor, and keep Administrator for the agency.
- Admin branding: your logo, colours, footer text, greeting and menu rules (Step 2).
Copy the template to a new site with your host's cloning tool or a migration plugin, then change the client details. Update the template often so new builds do not start with old plugins.
Step 2: Brand the Admin on the Template Site
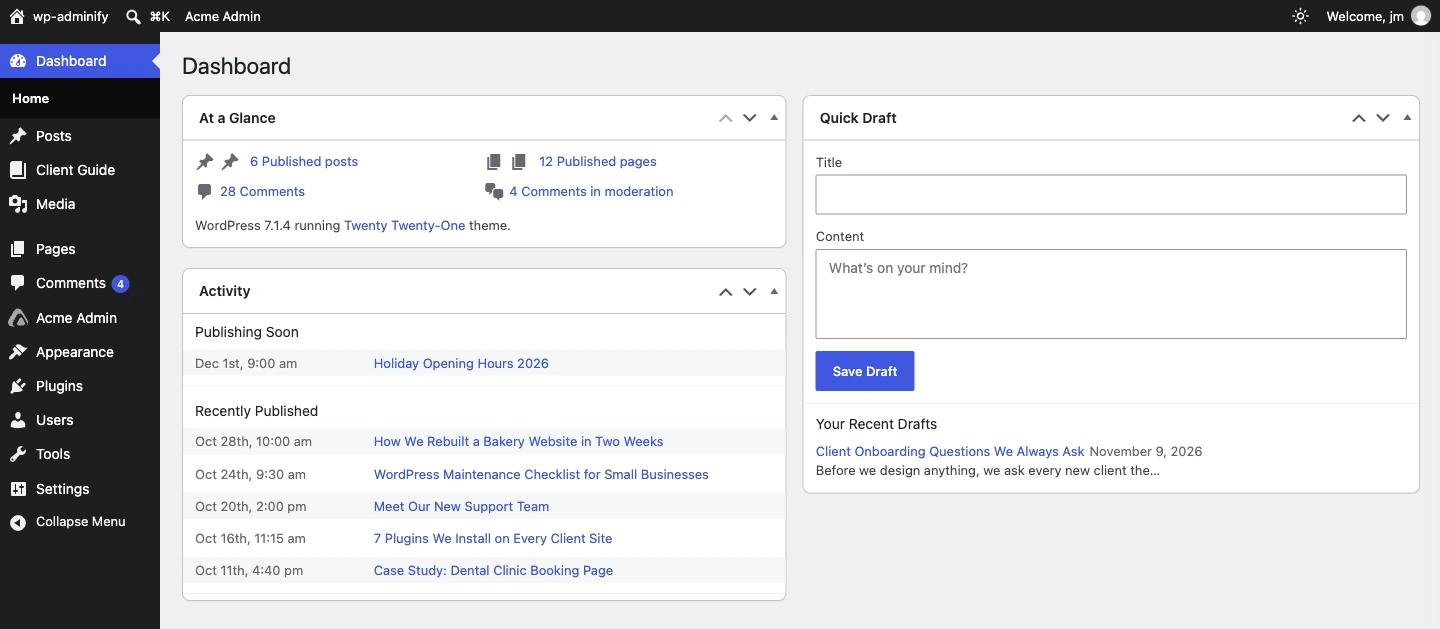
Branding the admin means replacing the WordPress logo, the "Howdy" greeting, the footer credit and the default dashboard with your own. In WP Adminify the main options are on one screen, White Label, and they show no Pro badge. Set them once on the template site, and every copy inherits them.
The per-site brand checklist we use on our test site:
- Greeting: in White Label, set Change "Howdy" Text to "Welcome", or turn on Remove "Howdy" message?.
- Admin bar: under Admin Bar Cleanup, tick WordPress Logo, Comments, Updates and "New" Button.
- Footer: turn on Show Footer Credit, then type your support line in Admin Footer Text. The text field only appears and only works with that switch on.
- Logo and colours: in the Customize tab, turn on the Adminify UI, pick a template or custom colours, and upload light and dark logos.
- Menu: in Admin Menu > Menu Editor, rename items, reorder them, and hide Plugins, Tools and Settings for the client's role.
All of these are part of White Label WordPress in WP Adminify. The menu rules use the admin menu editor with its Hidden For Roles or Users field.
If you want the code route for any single item, our guide to remove the WordPress logo from the admin bar shows four methods.
White label CSS: match the admin to the brand
Some brand details need CSS: a brand font, button colours or a small fix to a plugin screen. Keep that admin CSS in one place. WP Adminify has a code snippets tab for custom admin CSS and JS, so the CSS travels with the settings export in Step 4. Keep the rules short and scoped to admin classes, so a WordPress update is less likely to break them.
Step 3: Brand the Plugin List
The Plugins screen is the last place a client sees vendor names. To brand it, rename your admin plugin to your own product name and hide plugins the client never needs. WP Adminify can rename itself through the "Adminify" Branding section of the White Label tab, which needs the Agency plan or higher.
The fields are Light Logo, Dark Logo, Plugin Name, Plugin Description, Developer/Agency Name, Menu Label, Menu Icon and Plugin URL, plus Hide All Row Meta Links and Remove Action Links. On our test site we set Plugin Name to "Acme Admin Suite", the agency name to "Acme Studio" and the menu label to "Acme Admin".

For the other plugins, hide what the client does not need to see. Our guide on hiding plugins from clients shows how. Leave plugins visible if the client is expected to use them, such as a forms or booking plugin.
The Branding section also has Force Disable White Label (Adminify). It hides the White Label settings until the plugin is deactivated and reactivated. Turn it on as the last step before handover, not on the template site, or you will lock yourself out of the settings you still need to change.
Step 4: Copy the Settings to Every Client Site
To copy one admin setup to many client sites, export the settings from the template site and import them on each new site. In WP Adminify, the Backup tab exports all settings as JSON with an Export & Download button and has an Import box. One file carries your branding, menu rules and options.
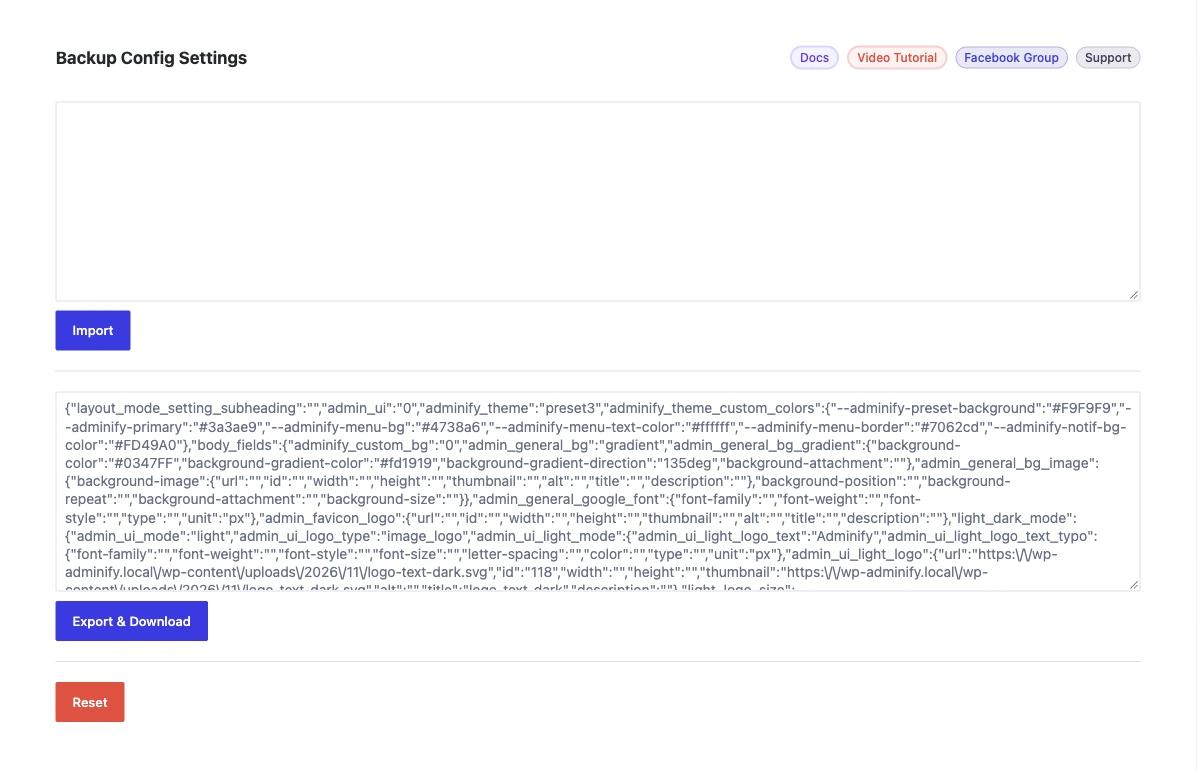
- On the template site, go to WP Adminify > Backup and click Export & Download. Save the file in your agency's shared folder with a date in the name.
- On the client site, install and activate WP Adminify with the same plan features you need.
- Go to WP Adminify > Backup, paste the file contents into the Import box and click Import.
- Change the client details: logo, footer text and support email.
- Upload the logos again on the client site if needed. The export stores logo images as URLs from the source site, as you can see in the JSON, so a logo hosted only on the template site will break if that site goes away.
Once the file exists, a new client site gets the full admin setup in minutes, and every site in your portfolio matches. For more on how agencies run many sites with one setup, see WP Adminify for agencies.
Step 5: White Label WordPress Onboarding and Client Handover
White label WordPress onboarding is the handover moment: the client gets their login, sees their branded admin for the first time and learns how to make simple changes. A short checklist, tested as the client's role, plus one help page inside the dashboard, prevents most first-week support questions.
Before you send the login details, check each item while logged in as the client's user:
- The login page shows the right logo and links to the right site. Our WordPress login page white label guide covers this.
- The admin bar has no WordPress logo and shows your greeting.
- The footer shows your support line.
- The menu shows only what the client's role needs, in plain words.
- The dashboard has a welcome or help widget instead of WordPress news. A WordPress client dashboard with links to the pages they edit most works well.
- The Plugins screen shows your product name, or the client cannot see it at all.
- Password reset and new user emails come from your name or the client's business.
- Force Disable White Label is on, if you want the branding settings hidden.
Then hand over the login URL, a one-page guide or short video, and the way to reach support. A "Client Guide" admin page or dashboard widget keeps that help one click away.
Step 6: Maintain the Sites After Handover
After handover, white label work continues as maintenance: plugin and core updates, backups, security checks and support, all sold under your brand. The branded admin helps here every day, because the footer and dashboard tell the client who looks after the site and where to ask for help.
Keep the template site and the settings file current. When you change your branding or add a menu rule, export a new file and roll it out during your normal update round. Keep the Plugins, Tools and Settings menus hidden for client roles, so updates stay with your team.
How Should You Price White Label WordPress Work?
Price white label WordPress work by the result the client gets. Do not price it by the hours you spend on branding. Most agencies include the branded admin in the build price and sell ongoing care as a monthly plan. Because the template and the settings file cut setup time, the branding itself costs you little per site.
Common ways to structure it:
- Build fee: the site, the branded admin and the handover in one price.
- Care plan: a monthly fee for updates, backups, security and support. The branded footer and dashboard remind the client what the plan covers.
- Partner work: if a partner builds the sites, add your margin on top of their fee for project management, branding and the client relationship.
Also count your tool costs. Check that your plugin licences cover the number of client sites you run, and which plan each feature needs. In WP Adminify, plugin rebranding is on the Agency plan or higher.
Frequently Asked Questions
What is a white label WordPress agency?
A white label WordPress agency builds or maintains WordPress sites for other agencies, which sell the work under their own brand. The partner stays hidden from the end client. The selling agency keeps the client relationship, the branding and the handover, and usually adds a margin on top of the partner's fee.
Is WP Adminify a white label development agency?
No. WP Adminify is a WordPress plugin made by Pixar Labs. It gives agencies the tools to brand the admin, rename the plugin, edit menus and copy settings between sites. Your agency or your partner still builds the site and handles the client.
How do I copy WP Adminify settings to another site?
Go to WP Adminify, then the Backup tab, on the source site and click Export and Download. On the new site, open the same tab, paste the file contents into the Import box and click Import. Then update the client details and upload logos on the new site if needed.
What should a white label WordPress onboarding checklist include?
Check the login page, the admin bar, the footer support line, the menu for the client's role, the dashboard help widget, the Plugins screen and the sender of system emails. Test everything while logged in as the client's user, not as an administrator, because role rules change what each user sees.
Final Thoughts
White label WordPress development comes down to six steps: build a template site, brand the admin, brand the plugin list, copy the settings with export and import, run an onboarding checklist as the client's role, and keep the sites updated under your brand. With the template and the settings file, one process works for five sites or fifty.
For every place WordPress shows its own brand, with both the code and the no-code method, read How to White Label WordPress next.
Your email address will not be published